Tundra: Difference between revisions
From Halopedia, the Halo wiki
m (→Gallery: Linkbox gallery) |
m (→top: image category and link replacements, replaced: deployable lookout tower → Covenant watchtower) |
||
| (3 intermediate revisions by 2 users not shown) | |||
| Line 1: | Line 1: | ||
{{ | {{Status|Gameplay}} | ||
{{Multiplayer map infobox | {{Multiplayer map infobox | ||
|name=Tundra | |name=Tundra | ||
| Line 17: | Line 17: | ||
'''Tundra''' is a [[Halo Wars]] [[multiplayer]] map.<ref>[https://www.halowars.com/GameInfo/Maps.aspx '''Official Halo Wars Community Site''': ''Skirmish Maps'']</ref> | '''Tundra''' is a [[Halo Wars]] [[multiplayer]] map.<ref>[https://www.halowars.com/GameInfo/Maps.aspx '''Official Halo Wars Community Site''': ''Skirmish Maps'']</ref> | ||
Tundra is set on a snowy terrain, featuring three craters from crashed ships and a frozen lake. This map features a single | Tundra is set on a snowy terrain, featuring three craters from crashed ships and a frozen lake. This map features a single {{Pattern|Emp'seam|Antlion}} in its center, which can provide an advantage when attacking the enemy's base. Numerous [[Energy Wall]]s are dotted around the map, all of which can be activated by garrisoning a unit in adjacent [[Covenant watchtower]]. | ||
==Strategy== | ==Strategy== | ||
*Because of the number of cliffs and craters on the map, it is advisable to use air units to recon sections of the map. | *Because of the number of cliffs and craters on the map, it is advisable to use air units to recon sections of the map. | ||
*If possible, the player should use infantry to capture the | *If possible, the player should use infantry to capture the Antlion in the center of the map. Unfortunately, there is a large garrison of Rebel troops and snipers with high veterancy defending, so a small army is necessary before attacking. Once captured, it can destroy the rebel bases scattered throughout the map with a single shot. The easiest way to capture the Mega-Turret in a short period of time would be on a [[Deathmatch]] game, using [[Ripa 'Moramee|the Arbiter]] or the [[Prophet of Regret]] to kill the Rebels quickly and then garrisoning Suicide Grunts or [[Honor Guard]] inside. The player can then use the Mega-Turret to, as said before, destroy Rebel bases or disrupt enemy troops. Flamethrower units can also deal with the defending Rebel forces easily. The snipers with their high veterancy can make short work of Spartans and Covenant heroes so caution should be taken. | ||
*If the enemy has mainly a vehicle or infantry-based force, it is advisable to take the sniper towers with barriers and halt their forward progress. When they try and attack the player's units in the towers, the player can send reinforcements to deal with the assaulting forces. | *If the enemy has mainly a vehicle or infantry-based force, it is advisable to take the sniper towers with barriers and halt their forward progress. When they try and attack the player's units in the towers, the player can send reinforcements to deal with the assaulting forces. | ||
*Unless the player is looking for a drawn-out fight or are in desperate need of an extra source of supplies, | *Unless the player is looking for a drawn-out fight or are in desperate need of an extra source of supplies, they should probably ignore the bases to the far left and right of the starting base. However, forces coming from one of the bases have an almost straight shot at their enemy's home base. | ||
*The base adjacent to the player's starting base should be taken early, because it can provide a source of supplies (by building Supply Pads/Warehouses) and troops (by building a Barracks/Hall). It also contains a pair of towers where troops can be garrisoned which will make defending both bases much more effective. | *The base adjacent to the player's starting base should be taken early, because it can provide a source of supplies (by building Supply Pads/Warehouses) and troops (by building a Barracks/Hall). It also contains a pair of towers where troops can be garrisoned which will make defending both bases much more effective. | ||
Latest revision as of 19:43, January 30, 2024
| Tundra | |
|---|---|

| |
| Map overview | |
|
Game: |
|
| Lore information | |
|
Location: |
Presumably Harvest |
| Gameplay overview | |
|
Terrain: |
|
|
Recommended number of players: |
1v1 (2 players) |
| “ | A frozen pond and several craters channel troop movements into killing zones in this battle-scarred region. | ” |
Tundra is a Halo Wars multiplayer map.[1]
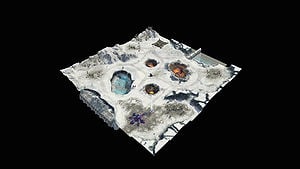
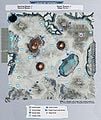
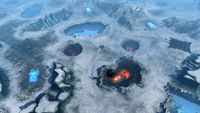
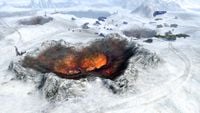
Tundra is set on a snowy terrain, featuring three craters from crashed ships and a frozen lake. This map features a single Emp'seam-pattern Antlion in its center, which can provide an advantage when attacking the enemy's base. Numerous Energy Walls are dotted around the map, all of which can be activated by garrisoning a unit in adjacent Covenant watchtower.
Strategy[edit]
- Because of the number of cliffs and craters on the map, it is advisable to use air units to recon sections of the map.
- If possible, the player should use infantry to capture the Antlion in the center of the map. Unfortunately, there is a large garrison of Rebel troops and snipers with high veterancy defending, so a small army is necessary before attacking. Once captured, it can destroy the rebel bases scattered throughout the map with a single shot. The easiest way to capture the Mega-Turret in a short period of time would be on a Deathmatch game, using the Arbiter or the Prophet of Regret to kill the Rebels quickly and then garrisoning Suicide Grunts or Honor Guard inside. The player can then use the Mega-Turret to, as said before, destroy Rebel bases or disrupt enemy troops. Flamethrower units can also deal with the defending Rebel forces easily. The snipers with their high veterancy can make short work of Spartans and Covenant heroes so caution should be taken.
- If the enemy has mainly a vehicle or infantry-based force, it is advisable to take the sniper towers with barriers and halt their forward progress. When they try and attack the player's units in the towers, the player can send reinforcements to deal with the assaulting forces.
- Unless the player is looking for a drawn-out fight or are in desperate need of an extra source of supplies, they should probably ignore the bases to the far left and right of the starting base. However, forces coming from one of the bases have an almost straight shot at their enemy's home base.
- The base adjacent to the player's starting base should be taken early, because it can provide a source of supplies (by building Supply Pads/Warehouses) and troops (by building a Barracks/Hall). It also contains a pair of towers where troops can be garrisoned which will make defending both bases much more effective.
Gallery[edit]

|
Browse more images in this article's gallery page. |
Sources[edit]
| ||||||||||||||||||||


