Raid on Installation 08: Difference between revisions
From Halopedia, the Halo wiki
SpartanLeet (talk | contribs) No edit summary |
|||
| (36 intermediate revisions by 13 users not shown) | |||
| Line 1: | Line 1: | ||
{{ | {{Status|Canon}} | ||
{{Battle infobox | {{Battle infobox | ||
|prev=[[Battle of Installation 00]] | |prev=*[[Battle of Installation 00]] | ||
*[[Raid on High Charity]] | |||
|conc= | |conc= | ||
|next= | |next=[[Operation: SUNSPEAR]] | ||
|name=Raid on Installation 08 | |name=Raid on Installation 08 | ||
|image= [[File:Halo3Mythos.jpg|300px]] | |image= [[File:Halo3Mythos.jpg|300px]] | ||
| Line 19: | Line 20: | ||
*[[Fleet of Retribution]] | *[[Fleet of Retribution]] | ||
|side2=*[[Flood]] | |side2=*[[Flood]] | ||
|side3=*[[Sentinel|Forerunner constructs]]<ref group="notes">Allied with the [[United Nations Space Command]] and [[Fleet of Retribution]] for the first half of the battle. Defected after [[343 Guilty Spark]] killed [[Avery Johnson]]</ref> | |side3=*[[Sentinel|Forerunner constructs]]<ref group="notes">Allied with the [[United Nations Space Command]] and [[Fleet of Retribution]] for the first half of the battle. Defected after [[343 Guilty Spark]] killed [[Avery Johnson]].</ref> | ||
|commanders1=*[[Master Chief Petty Officer|MCPO]] [[John-117]] | |commanders1=*[[Master Chief Petty Officer|MCPO]] [[John-117]] | ||
*[[Arbiter]] [[Thel 'Vadam]] | *[[Arbiter]] [[Thel 'Vadam]] | ||
|commanders2=[[Gravemind]]† | |commanders2=[[Gravemind]]† | ||
|commanders3=[[343 Guilty Spark]] {{C|[[Wounded in action|WIA]]}} | |commanders3=[[343 Guilty Spark]] {{C|[[Wounded in action|WIA]]}} | ||
|forces1=*SPARTAN-II (1) | |forces1=*[[SPARTAN-II]] (1) | ||
*[[Cortana|UNSC AI]] (1) | *[[Cortana|UNSC AI]] (1) | ||
*Sangheili Arbiter (1) | *[[Sangheili]] [[Arbiter]] (1) | ||
*[[Sergeant Major|SgtMaj]] [[Avery Junior Johnson|Avery J. Johnson]] | *[[Sergeant Major|SgtMaj]] [[Avery Junior Johnson|Avery J. Johnson]]† | ||
*{{UNSCShip|Forward Unto Dawn}} | *{{UNSCShip|Forward Unto Dawn}} | ||
*[[M12 Light Reconnaissance Vehicle|M12 Warthog]] (1) | *[[M12 Light Reconnaissance Vehicle|M12 Warthog]] (1) | ||
*[[Pelican dropship]] (1) | *[[D77H-TCI Pelican|Pelican dropship]] (1) | ||
|forces2=*Many [[Pod infector]]s | |forces2=*Many [[Pod infector]]s | ||
*Many [[Flood combat form]]s | *Many [[Flood combat form]]s | ||
| Line 46: | Line 47: | ||
*Installation 00 heavily damaged | *Installation 00 heavily damaged | ||
}} | }} | ||
The '''Raid on Installation 08''' was a small engagement between the [[United Nations Space Command|UNSC]]-[[Fleet of Retribution|Sangheili]] alliance, [[the Flood]] and later the [[Forerunner]] [[Sentinel]]s acting under [[343 Guilty Spark]]'s orders. It took place immediately after the [[Raid on High Charity|raid]] on [[High Charity]] and marked the end of both the [[Battle of Installation 00]] and the [[Human-Covenant War]].<ref>'''[[Halo 3]]''', campaign level ''[[Halo (Halo 3 level)|Halo]]''</ref> | {{Quote|Finish the fight.|''Halo 3'' tagline.}} | ||
The '''Raid on Installation 08''' was a small yet crucially significant engagement between the [[United Nations Space Command|UNSC]]-[[Fleet of Retribution|Sangheili]] alliance, [[the Flood]] and later the [[Forerunner]] [[Sentinel]]s acting under [[343 Guilty Spark]]'s orders. It took place immediately after the [[Raid on High Charity|raid]] on [[High Charity]] and marked the end of both the [[Battle of Installation 00]] and the [[Human-Covenant War]] as an era: finishing the fight.<ref>'''[[Halo 3]]''', campaign level ''[[Halo (Halo 3 level)|Halo]]''</ref> | |||
==Prelude== | ==Prelude== | ||
===Battle of Installation 00=== | ===Battle of Installation 00=== | ||
{{Main|Battle of Installation 00}} | {{Main|Battle of Installation 00}} | ||
After realizing that the [[Prophet of Truth]] had gained access to the Ark, a joint UNSC-Sangheili attack force was sent through the [[Portal at Voi]] to combat the Prophet of Truth's Covenant force there, and stop the Covenant | After realizing that the [[Prophet of Truth]] had gained access to the Ark, a joint UNSC-Sangheili attack force was sent through the [[Portal at Voi]] to combat the Prophet of Truth's Covenant force there, and stop the Covenant from activating the [[Halo Array]] and destroying all sentient life in the galaxy. This ended the war. | ||
The combined forces of the UNSC-Sangheili alliance was enough to completely destroy Truth's forces and prevent the Halo Array from firing. However, the arrival of the [[Flood hive]] on High Charity changed the course of the battle. [[John-117]] set out for High Charity. His goal was to retrieve a copy of Installation 04's index from the captured [[Artificial intelligence|AI]] [[Cortana]] and fire off the newly rebuilt Halo, completely destroying the Flood in and around the Ark. | The combined forces of the UNSC-Sangheili alliance was enough to completely destroy Truth's forces and prevent the Halo Array from firing. However, the arrival of the [[Flood hive]] on High Charity changed the course of the battle. [[John-117]] set out for High Charity. His goal was to retrieve a copy of Installation 04's index from the captured [[Artificial intelligence|AI]] [[Cortana]] and fire off the newly rebuilt Halo, completely destroying the Flood in and around the Ark. | ||
| Line 57: | Line 60: | ||
===Raid on High Charity=== | ===Raid on High Charity=== | ||
{{Main|Raid on High Charity}} | {{Main|Raid on High Charity}} | ||
John-117 landed in High Charity and combated Flood forces deep into their hive. After fighting through waves of Flood forms, he retrieved Cortana, and therefore, the activation index she acquired during the events of the original [[Battle of Installation 04]]. The SPARTAN then set High Charity's secondary reactors to explode. He met up with [[Thel 'Vadam]], who had also ventured into the hive to help him, and they took off in a [[D77H-TCI Pelican|Pelican]] to activate Installation 08 and destroy the [[Flood]]. As they left, | John-117 landed in High Charity and combated Flood forces deep into their hive. After fighting through waves of Flood forms, he retrieved Cortana, and therefore, the activation index she acquired during the events of the original [[Battle of Installation 04]]. The SPARTAN then set High Charity's secondary reactors to explode. He met up with [[Thel 'Vadam]], who had also ventured into the hive to help him, and they took off in a [[D77H-TCI Pelican|Pelican]] to activate Installation 08 and destroy the [[Flood]]. As they left, High Charity exploded, killing nearly all of the Flood there. Meanwhile, the human and Sangheili survivors from Installation 00 were evacuated to the [[CAS-class assault carrier|assault carrier]] ''[[Shadow of Intent]]'' which headed back to Earth through the portal. | ||
==Battle== | ==Battle== | ||
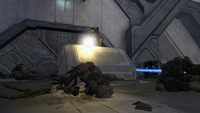
[[File:1578649590 bd337a0283 b.jpg|250px|thumb|left|The trio enters the Control Room.]] | [[File:1578649590 bd337a0283 b.jpg|250px|thumb|left|The trio enters the Control Room.]] | ||
John-117 crash-landed the damaged Pelican near the Installation's [[control room]]. At the same time, [[Avery Junior Johnson|Sergeant Major Avery Johnson]] landed the {{UNSCShip|Forward Unto Dawn}} on the Installation, far away from the control room. On foot, John, along with Cortana and Thel 'Vadam, made their way to the control room. The [[Gravemind]], having survived | John-117 crash-landed the damaged Pelican near the Installation's [[control room]]. At the same time, [[Avery Junior Johnson|Sergeant Major Avery Johnson]] landed the {{UNSCShip|Forward Unto Dawn}} on the Installation, far away from the control room. On foot, John, along with Cortana and Thel 'Vadam, made their way to the control room. The [[Gravemind]], having survived High Charity's explosion, sent waves of [[Flood dispersal pod]]s to prevent the activation of the Installation. The SPARTAN and the Arbiter fought through the Flood forces as they progressed to the top of the tower, with some assistance from the [[Sentinel]]s and Sergeant Johnson. Once at the top, the team met up with the sergeant, secured the area and entered the control room. | ||
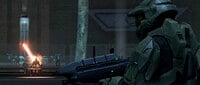
[[File:Damaged Monitor.jpg|150px|thumb|The Master Chief battles [[Rampant]] [[Guilty Spark]].]] | |||
Once inside, the team hesitantly tried to activate the Installation immediately. [[343 Guilty Spark]], after realizing that firing the partially-completed installation would destroy the ring as well as the Ark, turned against the team. His initial attack mortally wounded the sergeant and blasted the former Arbiter out of the control room. John-117 was severely injured by the initial blast to the point of draining his shield. The SPARTAN was locked into a battle with the rampant Monitor and struggled to destroy it. The mortally wounded Sergeant Johnson took the rogue Monitor by surprise with his [[M6 Grindell/Galilean Nonlinear Rifle|Spartan Laser]], temporarily incapacitated the Forerunner construct. John, seizing the moment, used the sergeant's Spartan Laser to destroy Guilty Spark. John tended to the grievously wounded Johnson, whose dying words were ''"send me out, with a bang."'' Cortana gave her condolences to John, briefly mourning the death of his friend, before firing the Installation using the Activation Index. | |||
As the remaining members of the team exited the control room, they found themselves fighting against both Sentinels and the Flood. During the battle, the team were addressed telepathically by the Gravemind, who warned them that their efforts would only delay the Flood's ultimate goal of consuming the galaxy. | |||
===Warthog run=== | |||
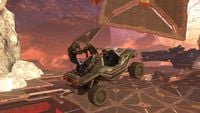
[[File:H3 WarthogRun Concept.jpg|250px|thumb|left|John-117, Cortana, and Thel 'Vadam escape the ring in a firey Warthog run.]] | |||
The team made their way out of the vicinity of the tower and commandeered an abandoned [[Warthog]] left behind by Sergeant Johnson. With the vehicle, the team frantically rode to the ''Forward Unto Dawn'' as fast as they could, passing through a labyrinth of construction tunnels, and collapsing platforms. The ring began to shake itself apart as explosions erupted around the escaping vehicle. Several Flood forms engaged the Chief and the Arbiter in their Warthog but were evaded. Thel shot down several Sentinels with the Warthog's turret. | |||
The team eventually made it to the ''Dawn'', John floored the pedal and sped the warthog off a ramp, crash-landing into the ship's cargo bay. Thel nodded respectfully to his Spartan comrade and quickly climbed to the bridge and started piloting the ship to safety. Vehicles and cargo started to fall out as the ship took off while John struggled to hold on in the cargo bay of the vessel after securely placing Cortana inside the bay's [[Holotank]]. A warthog slammed into him causing him to lose his grip and fall. John managed to grab onto the edge of the bay and ducked beneath a falling tank. As they approached the Portal Cortana expressed concern to which John comforted her saying "We'll make it." The incomplete Installation fired, causing it to explode and severely damage the Ark. Master Chief John-117, Cortana, and Arbiter Thel 'Vadam had escaped.{{clear}} | |||
==Aftermath== | ==Aftermath== | ||
[[File:FUD Escaping The Ark.jpg|250px|thumb|left|The ''Forward Unto Dawn'' escapes as Installation 08 prepares to fire.]] | [[File:FUD Escaping The Ark.jpg|250px|thumb|left|The ''Forward Unto Dawn'' escapes as Installation 08 prepares to fire.]] | ||
This battle apparently marked the end of the Flood threat. As the incomplete Halo fired, it obliterated itself, along with presumably all Flood and Sentinel forces, as well as any surviving Covenant forces on it or the Ark, which being directly below the installation, was severely damaged. | This battle apparently marked the end of the Flood threat. As the incomplete Halo fired, it obliterated itself, along with presumably all Flood and Sentinel forces, as well as any surviving Covenant forces on it or the Ark, which being directly below the installation, was severely damaged.{{Ref/Reuse|Array}} | ||
While ''Forward Unto Dawn'' was entering the Portal the field collapsed, severing the ship in two. The bow, with Thel inside, made it to the exit coordinates above Earth and crashed into the Indian Ocean. The stern section was less fortunate, being thrown out of the collapsing slipspace field on the way. John and Cortana were trapped in the wreckage as it drifted in space for several years, eventually being caught in the gravity of [[Requiem]], a Forerunner [[shield world]], in [[2557]]. This led to a series of [[Battle of Requiem|series of skirmishes]] as the Master Chief and Cortana struggled to find a way back to human space, opposed by a [[Jul 'Mdama's Covenant|reformed Covenant faction]] which had sought out Requiem and the [[Ur-Didact]]'s [[Promethean#Mechancical Prometheans|Promethean]] forces within the shield world.<ref>'''Halo 4'''</ref> | While ''Forward Unto Dawn'' was entering the Portal the field collapsed, severing the ship in two. The bow, with Thel inside, made it to the exit coordinates above Earth and crashed into the Indian Ocean. The stern section was less fortunate, being thrown out of the collapsing slipspace field on the way. John and Cortana were trapped in the wreckage as it drifted in space for several years, eventually being caught in the gravity of [[Requiem]], a Forerunner [[shield world]], in [[2557]]. This led to a series of [[Battle of Requiem|series of skirmishes]] as the Master Chief and Cortana struggled to find a way back to human space, opposed by a [[Jul 'Mdama's Covenant|reformed Covenant faction]] which had sought out Requiem and the [[Ur-Didact]]'s [[Promethean#Mechancical Prometheans|Promethean]] forces within the shield world.<ref>'''Halo 4'''</ref> | ||
Some time after the battle, the UNSC dispatched a number of | [[File:HaloLegends-Origins-ArkHalo.png|250px|thumb|Installation 08 fires and crumbles over the Ark, severely damaging it.]] | ||
Some time after the battle, the UNSC dispatched the scouting vessel {{UNSCShip|Rubicon}} to investigate the Ark, following a failed attempt to deploy automated probes to the installation. At the Ark, the ''Rubicon'' deployed a number of [[remote contact team]]s to the Ark, which had been severely damaged by the incomplete ring's firing. Having detected an anomalous signal, one of the UNSC teams discovered the remains of Guilty Spark's tiny debris among the wreckage and brought him back to the ship.<ref>'''[[Eleventh Hour reports|Eleventh Hour report 4]]'''</ref> It turned out that the broken pieces of Spark were still partially intact, though his physical housing was irreversibly damaged. However, he managed to upload his consciousness into the ship's computers, purge its AI, render the crew unconscious, and set off on a quest to find the [[Librarian]].<ref>'''[[Halo: Primordium]]'''</ref> With the help of the crew of the ''[[Ace of Spades]]'' and now residing in an [[armiger]] body, Spark [[Mission to Mount Kilimanjaro|met with]] a personality imprint of the Librarian beneath [[Mount Kilimanjaro]] who helped Spark move on from his past and to a new future with the crew of the ''Ace of Spades''. However, Spark was hunted by [[ONI]] for the wealth of information he could provide them with.<ref>'''[[Halo: Renegades]]'''</ref> | |||
In mid [[2559]], the [[Banished]] and the crew of the {{UNSCShip|Spirit of Fire}} fought for control over the Ark, which by then had fully repaired itself and finished constructing [[Installation 09|a second replacement ring]]. At some point during the conflict, the Banished inadvertently released a number of surviving Flood forms from the remains of [[High Charity]], thus starting a second Flood outbreak on the Ark, and validating the Gravemind's final warning. However, after Banished forces killed a [[ | Following the destruction of [[Installation 08]], the Ark constructed [[Installation 09|a new replacement]] for [[Installation 04]]. In mid [[2559]] it was nearly completed,<ref>'''[[Halo Wars 2]]''', campaign level. ''[[Hold the Line]]''</ref> while the [[Banished]] and the crew of the {{UNSCShip|Spirit of Fire}} fought for control over the Ark, which by then had fully repaired itself and finished constructing [[Installation 09|a second replacement ring]]. At some point during the conflict, the Banished inadvertently released a number of surviving Flood forms from the remains of [[High Charity]], thus starting a second Flood outbreak on the Ark, and validating the Gravemind's final warning. However, after Banished forces killed a [[proto-Gravemind]] on the verge of becoming a [[Gravemind]], the Flood were contained again by the Banished and the Ark's Sentinel defense network.<ref>'''[[Halo Wars 2: Awakening the Nightmare]]'''</ref> | ||
As the battle with the ''Spirit of Fire'' raged on, the new Halo ring, Installation 09, was subsequently launched to the [[Soell system]] in an effort to send a [[distress beacon]] back to human space, but was intercepted en route by a [[Created]] [[Guardian]].<ref>'''[[Halo Wars 2]]''', campaign level, ''[[Last Stand (Halo Wars 2 level)|Last Stand]]''</ref>{{clear}} | |||
==Gallery== | ==Gallery== | ||
<gallery> | <gallery> | ||
File:HLC Let's Get Tactical.jpg|An artistic amalgamation of the Raid on Installation 08 and Avery Johnson's grand finale. | |||
File:Soiark.jpg|John-117, Thel 'Vadam and Cortana approach Installation 08 on a Pelican while the ''Shadow of Intent'' looms below. | File:Soiark.jpg|John-117, Thel 'Vadam and Cortana approach Installation 08 on a Pelican while the ''Shadow of Intent'' looms below. | ||
File:1578645048 c67a9b7a49 b.jpg|The Pelican crash-landing in the installation's canyons. | File:1578645048 c67a9b7a49 b.jpg|The Pelican crash-landing in the installation's canyons. | ||
File:H3 ChiefAndArbyReady.png|John-117 and Thel 'Vadam after crash-landing on Installation 08. | |||
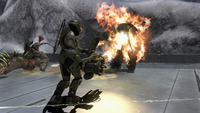
File:Arbiter on installation 04B.jpg|Thel 'Vadam fighting Flood combat forms. | File:Arbiter on installation 04B.jpg|Thel 'Vadam fighting Flood combat forms. | ||
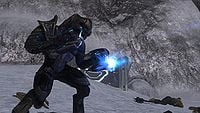
File:DeathofAveryJohnson.jpg|Guilty Spark mortally wounds Johnson. | File:H3 ChiefBurnsFloodTank.png|John-117 attacking a Flood tank form with a flamethrower. | ||
File:H3 ZigguratDefense.png|John-117 and Thel 'Vadam fighting Flood pure forms on the control room's top floor. | |||
File:DeathofAveryJohnson.jpg|343 Guilty Spark mortally wounds Johnson. | |||
File:H3 ChiefSparkBattle.png|John-117 fighting the rampant 343 Guilty Spark | |||
File:ChiefBeam-large.jpg|The replacement Halo is activated. | File:ChiefBeam-large.jpg|The replacement Halo is activated. | ||
File:1577758987 aa8783f570 b.jpg|John-117 and the Arbiter race through the collapsing Halo. | File:1577758987 aa8783f570 b.jpg|John-117 and the Arbiter race through the collapsing Halo. | ||
| Line 96: | Line 111: | ||
*''[[Halo: Hunters in the Dark]]'' {{Mo}} | *''[[Halo: Hunters in the Dark]]'' {{Mo}} | ||
*''[[Halo Mythos]]'' | *''[[Halo Mythos]]'' | ||
*''[[Halo: Outcasts]]'' {{Im}} | |||
==Notes== | ==Notes== | ||
| Line 101: | Line 117: | ||
==Sources== | ==Sources== | ||
{{Ref/Sources}} | |||
{{ | |||
[[Category:UNSC | {{Engagements in the Battle of Installation 00}} | ||
[[Category:UNSC victories]] | |||
Latest revision as of 07:48, March 8, 2024
|
Previous: |
||||||||||||||||||||||||||||
|
Next: |
||||||||||||||||||||||||||||
| Raid on Installation 08 | ||||||||||||||||||||||||||||
|---|---|---|---|---|---|---|---|---|---|---|---|---|---|---|---|---|---|---|---|---|---|---|---|---|---|---|---|---|

| ||||||||||||||||||||||||||||
|
Conflict: |
||||||||||||||||||||||||||||
|
Date: |
||||||||||||||||||||||||||||
|
Location: |
||||||||||||||||||||||||||||
|
Outcome: |
Decisive and final UNSC/Fleet of Retribution victory
| |||||||||||||||||||||||||||
| ||||||||||||||||||||||||||||
- "Finish the fight."
- — Halo 3 tagline.
The Raid on Installation 08 was a small yet crucially significant engagement between the UNSC-Sangheili alliance, the Flood and later the Forerunner Sentinels acting under 343 Guilty Spark's orders. It took place immediately after the raid on High Charity and marked the end of both the Battle of Installation 00 and the Human-Covenant War as an era: finishing the fight.[3]
Prelude[edit]
Battle of Installation 00[edit]
- Main article: Battle of Installation 00
After realizing that the Prophet of Truth had gained access to the Ark, a joint UNSC-Sangheili attack force was sent through the Portal at Voi to combat the Prophet of Truth's Covenant force there, and stop the Covenant from activating the Halo Array and destroying all sentient life in the galaxy. This ended the war.
The combined forces of the UNSC-Sangheili alliance was enough to completely destroy Truth's forces and prevent the Halo Array from firing. However, the arrival of the Flood hive on High Charity changed the course of the battle. John-117 set out for High Charity. His goal was to retrieve a copy of Installation 04's index from the captured AI Cortana and fire off the newly rebuilt Halo, completely destroying the Flood in and around the Ark.
Raid on High Charity[edit]
- Main article: Raid on High Charity
John-117 landed in High Charity and combated Flood forces deep into their hive. After fighting through waves of Flood forms, he retrieved Cortana, and therefore, the activation index she acquired during the events of the original Battle of Installation 04. The SPARTAN then set High Charity's secondary reactors to explode. He met up with Thel 'Vadam, who had also ventured into the hive to help him, and they took off in a Pelican to activate Installation 08 and destroy the Flood. As they left, High Charity exploded, killing nearly all of the Flood there. Meanwhile, the human and Sangheili survivors from Installation 00 were evacuated to the assault carrier Shadow of Intent which headed back to Earth through the portal.
Battle[edit]

John-117 crash-landed the damaged Pelican near the Installation's control room. At the same time, Sergeant Major Avery Johnson landed the UNSC Forward Unto Dawn on the Installation, far away from the control room. On foot, John, along with Cortana and Thel 'Vadam, made their way to the control room. The Gravemind, having survived High Charity's explosion, sent waves of Flood dispersal pods to prevent the activation of the Installation. The SPARTAN and the Arbiter fought through the Flood forces as they progressed to the top of the tower, with some assistance from the Sentinels and Sergeant Johnson. Once at the top, the team met up with the sergeant, secured the area and entered the control room.

Once inside, the team hesitantly tried to activate the Installation immediately. 343 Guilty Spark, after realizing that firing the partially-completed installation would destroy the ring as well as the Ark, turned against the team. His initial attack mortally wounded the sergeant and blasted the former Arbiter out of the control room. John-117 was severely injured by the initial blast to the point of draining his shield. The SPARTAN was locked into a battle with the rampant Monitor and struggled to destroy it. The mortally wounded Sergeant Johnson took the rogue Monitor by surprise with his Spartan Laser, temporarily incapacitated the Forerunner construct. John, seizing the moment, used the sergeant's Spartan Laser to destroy Guilty Spark. John tended to the grievously wounded Johnson, whose dying words were "send me out, with a bang." Cortana gave her condolences to John, briefly mourning the death of his friend, before firing the Installation using the Activation Index.
As the remaining members of the team exited the control room, they found themselves fighting against both Sentinels and the Flood. During the battle, the team were addressed telepathically by the Gravemind, who warned them that their efforts would only delay the Flood's ultimate goal of consuming the galaxy.
Warthog run[edit]

The team made their way out of the vicinity of the tower and commandeered an abandoned Warthog left behind by Sergeant Johnson. With the vehicle, the team frantically rode to the Forward Unto Dawn as fast as they could, passing through a labyrinth of construction tunnels, and collapsing platforms. The ring began to shake itself apart as explosions erupted around the escaping vehicle. Several Flood forms engaged the Chief and the Arbiter in their Warthog but were evaded. Thel shot down several Sentinels with the Warthog's turret.
The team eventually made it to the Dawn, John floored the pedal and sped the warthog off a ramp, crash-landing into the ship's cargo bay. Thel nodded respectfully to his Spartan comrade and quickly climbed to the bridge and started piloting the ship to safety. Vehicles and cargo started to fall out as the ship took off while John struggled to hold on in the cargo bay of the vessel after securely placing Cortana inside the bay's Holotank. A warthog slammed into him causing him to lose his grip and fall. John managed to grab onto the edge of the bay and ducked beneath a falling tank. As they approached the Portal Cortana expressed concern to which John comforted her saying "We'll make it." The incomplete Installation fired, causing it to explode and severely damage the Ark. Master Chief John-117, Cortana, and Arbiter Thel 'Vadam had escaped.
Aftermath[edit]

This battle apparently marked the end of the Flood threat. As the incomplete Halo fired, it obliterated itself, along with presumably all Flood and Sentinel forces, as well as any surviving Covenant forces on it or the Ark, which being directly below the installation, was severely damaged.[2]
While Forward Unto Dawn was entering the Portal the field collapsed, severing the ship in two. The bow, with Thel inside, made it to the exit coordinates above Earth and crashed into the Indian Ocean. The stern section was less fortunate, being thrown out of the collapsing slipspace field on the way. John and Cortana were trapped in the wreckage as it drifted in space for several years, eventually being caught in the gravity of Requiem, a Forerunner shield world, in 2557. This led to a series of series of skirmishes as the Master Chief and Cortana struggled to find a way back to human space, opposed by a reformed Covenant faction which had sought out Requiem and the Ur-Didact's Promethean forces within the shield world.[4]

Some time after the battle, the UNSC dispatched the scouting vessel UNSC Rubicon to investigate the Ark, following a failed attempt to deploy automated probes to the installation. At the Ark, the Rubicon deployed a number of remote contact teams to the Ark, which had been severely damaged by the incomplete ring's firing. Having detected an anomalous signal, one of the UNSC teams discovered the remains of Guilty Spark's tiny debris among the wreckage and brought him back to the ship.[5] It turned out that the broken pieces of Spark were still partially intact, though his physical housing was irreversibly damaged. However, he managed to upload his consciousness into the ship's computers, purge its AI, render the crew unconscious, and set off on a quest to find the Librarian.[6] With the help of the crew of the Ace of Spades and now residing in an armiger body, Spark met with a personality imprint of the Librarian beneath Mount Kilimanjaro who helped Spark move on from his past and to a new future with the crew of the Ace of Spades. However, Spark was hunted by ONI for the wealth of information he could provide them with.[7]
Following the destruction of Installation 08, the Ark constructed a new replacement for Installation 04. In mid 2559 it was nearly completed,[8] while the Banished and the crew of the UNSC Spirit of Fire fought for control over the Ark, which by then had fully repaired itself and finished constructing a second replacement ring. At some point during the conflict, the Banished inadvertently released a number of surviving Flood forms from the remains of High Charity, thus starting a second Flood outbreak on the Ark, and validating the Gravemind's final warning. However, after Banished forces killed a proto-Gravemind on the verge of becoming a Gravemind, the Flood were contained again by the Banished and the Ark's Sentinel defense network.[9]
As the battle with the Spirit of Fire raged on, the new Halo ring, Installation 09, was subsequently launched to the Soell system in an effort to send a distress beacon back to human space, but was intercepted en route by a Created Guardian.[10]
Gallery[edit]

An artistic amalgamation of the Raid on Installation 08 and Avery Johnson's grand finale.

John-117, Thel 'Vadam and Cortana approach Installation 08 on a Pelican while the Shadow of Intent looms below.
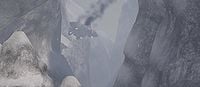
The Pelican crash-landing in the installation's canyons.
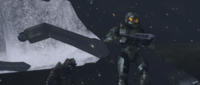
John-117 and Thel 'Vadam after crash-landing on Installation 08.
Thel 'Vadam fighting Flood combat forms.
John-117 attacking a Flood tank form with a flamethrower.
John-117 and Thel 'Vadam fighting Flood pure forms on the control room's top floor.
343 Guilty Spark mortally wounds Johnson.
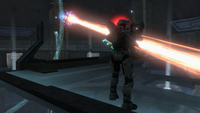
John-117 fighting the rampant 343 Guilty Spark
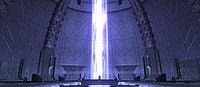
The replacement Halo is activated.
John-117 and the Arbiter race through the collapsing Halo.


List of appearances[edit]
- Halo 3 (First appearance)
- Halo Legends
- Halo: Hunters in the Dark (Mentioned only)
- Halo Mythos
- Halo: Outcasts (Indirect mention)
Notes[edit]
- ^ Allied with the United Nations Space Command and Fleet of Retribution for the first half of the battle. Defected after 343 Guilty Spark killed Avery Johnson.
Sources[edit]
- ^ Halo Waypoint, Hero-Fortitude
- ^ a b Halo Waypoint: The Halo Array
- ^ Halo 3, campaign level Halo
- ^ Halo 4
- ^ Eleventh Hour report 4
- ^ Halo: Primordium
- ^ Halo: Renegades
- ^ Halo Wars 2, campaign level. Hold the Line
- ^ Halo Wars 2: Awakening the Nightmare
- ^ Halo Wars 2, campaign level, Last Stand
|
| |||||


