User:Dab1001/Battle Rifle
From Halopedia, the Halo wiki
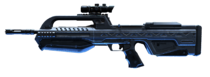
| Battle Rifle | |
|---|---|

| |
| Gameplay role | |
|
Faction: |
|
|
Firing mode: |
Burst fire |
|
Effective range: |
Mid to long |
|
Counterparts: |
Human (UNSC): |
| Weapon stats | |
|
Damage: |
Medium |
|
Projectile speed: |
Very high |
|
Rate of fire: |
Medium |
|
Magazine size: |
36 bullets (12 bursts) |
|
Reserve ammo capacity: |
108 bullets (36 bursts; 3 mags) |
| Variants and attachments | |
|
Halo 5 REQ variant(s): |
Halo 2 Battle Rifle |
|
Scope options: |
|
|
Attachments: |
Halo 5: Guardians: |
Universe and lore
Overview
Unlock and acquisition requirements
Halo 4
Halo 5: Guardians
Variants
Halo 2 Battle Rifle
Scopes and attachments
Counterparts
Gameplay
First-person shooters
Stats
<htmltag tagname="table"> <htmltag tagname="tbody" class="test"> <htmltag tagname="tr"> <htmltag tagname="th">Hello, world!</htmltag> <htmltag tagname="td">Lorem ipsum</htmltag> </htmltag> </htmltag> </htmltag>
| H2 | H3 | ODST | H4 | H2A | H5G | HO | HI | ||||
|---|---|---|---|---|---|---|---|---|---|---|---|
| Battle Rifle | Halo 2 Battle Rifle | ||||||||||
| MP | Launch | Overtime | Launch | Overtime | |||||||
| Basic info | |||||||||||
| Weapon tier | Loadout | Loadout | Loadout | Loadout | Loadout | Loadout | Loadout | Loadout | Loadout | Loadout | Loadout |
| Firing mode | |||||||||||
| Precision weapon | |||||||||||
| Zoom levels | |||||||||||
| Descope enabled | |||||||||||
| Damage | |||||||||||
| Damage type | |||||||||||
| Damage, before falloff | |||||||||||
| Damage, after falloff | |||||||||||
| Damage falloff enabled | |||||||||||
| Damage falloff start range | |||||||||||
| Damage falloff end range | |||||||||||
| Max damage per second, before modifiers | |||||||||||
| Bleedthrough enabled | |||||||||||
| Timing | |||||||||||
| Minimum time between shots | |||||||||||
| Rate of fire | |||||||||||
| Equip time | |||||||||||
| Reload time | |||||||||||
| Ammo | |||||||||||
| Shots per trigger pull | |||||||||||
| Magazine/clip size | |||||||||||
| Reserve ammo (reserve mags) | |||||||||||
| Projectile | |||||||||||
| Projectiles per trigger pull | |||||||||||
| Projectile speed | |||||||||||
| Max projectile range | |||||||||||
| Projectile gravity | |||||||||||
| Multiplayer | |||||||||||
| Time-to-kill | |||||||||||
| Shots to kill | |||||||||||
| Headshots to kill | |||||||||||
| Shots to break shields | |||||||||||
| Max damage per second, versus shields | |||||||||||
| Max damage per second, versus health | |||||||||||
| Spread, bloom and view kickback | |||||||||||
| Minimum spread angle | |||||||||||
| Maximum spread angle | |||||||||||
| Spread increase per shot | |||||||||||
| Spread recovery rate | |||||||||||
| Minimum error angle | |||||||||||
| Aim assist | |||||||||||
| Auto-aim enabled when hip firing | |||||||||||
| Auto-aim angle (Hip fire; zoom level 1; zoom level 2) | |||||||||||
| Auto-aim range (Hip fire; zoom level 1; zoom level 2) | |||||||||||
| Auto-aim near falloff range | |||||||||||
| Auto-aim far falloff range | |||||||||||
| Magnetism enabled when hip firing | |||||||||||
| Magnetism angle (Hip fire; zoom level 1; zoom level 2) | |||||||||||
| Magnetism range (Hip fire; zoom level 1; zoom level 2) | |||||||||||
| Magnetism near falloff range | |||||||||||
| Magnetism far falloff range | |||||||||||
Advantages
Disadvantages
Tactics and strategies
Twin-stick shooters
Stats
User:Dab1001/Battle Rifle/Stats/TSS
Advantages
Disadvantages
Tactics and strategies
Evolution
Skins and coatings
Medals
Achievements
Production notes
Trivia
Gallery
List of appearances
- Halo 2 (First appearance)
- Halo 3
- Halo 3: ODST (Only usable in MCC)
- Halo 4
- Halo: Spartan Assault
- Halo: Spartan Strike
- Halo 5: Guardians
- Halo Online
- Halo Infinite
Sources
| |||||||||||||||||||||||||||||||||||||||||||||||||||||||||||||||||||||||||||||||||||||||||||||||||||||||||||||||||||||||