Security Zone: Difference between revisions
From Halopedia, the Halo wiki
No edit summary |
(switched to new ref template) |
||
| (32 intermediate revisions by 19 users not shown) | |||
| Line 1: | Line 1: | ||
{{ | {{Status|Gameplay}} | ||
{{ | {{Multiplayer map infobox | ||
|pagelabel=Firefight map | |||
|pagegamelabel=ODST | |||
|image = [[File:Alphabase new 1.png|300px]] | |image = [[File:Alphabase new 1.png|300px]] | ||
|name = Security Zone | |name = Security Zone | ||
|game = ''[[Halo 3: ODST]]'' | |game = ''[[Halo 3: ODST]]'' | ||
|location = [[ONI Alpha Site]], [[New Mombasa]] | |devname=<code>sc130</code> | ||
|location = [[ONI Alpha Site (location)|ONI Alpha Site]], [[New Mombasa]] | |||
|terrain = Park, stairs | |terrain = Park, stairs | ||
| | |gametypes = [[Firefight (Halo 3: ODST)|Firefight]] | ||
}} | }} | ||
{{Article quote|Fight in the wide-open ONI exterior.}} | |||
'''Security Zone''' is a [[Firefight]] [[ | '''Security Zone''' is a [[Firefight (Halo 3: ODST)|Firefight]] [[:Category:Levels|map]] in ''[[Halo 3: ODST]]'', based on the [[campaign]] level [[ONI Alpha Site]], set in the city of [[New Mombasa]]. | ||
Players who get 200,000 points on this map will receive the "[[Firefight: Security Zone]]" [[achievement]] and 10 [[Gamerscore]]. | |||
==Layout== | ==Layout== | ||
The map takes place in the inner courtyard of the [[Office of Naval Intelligence]] [[ONI Alpha Site (location)|Alpha Site]] in the city, and is described as a medium-sized map, with [[Sniper Rifle System 99D-S2 Anti-Matériel|sniper rifles]] and [[AIE-486H Heavy Machine Gun|turrets]] situated high up, with a central valley for the purpose of funneling enemies. Midway through a Firefight game on this map, [[Zurdo-pattern Wraith|Wraiths]] will spawn, though hijacking them has been disabled on this map for balance reasons. | |||
The Sniper Rifle spawns on a bench next to a turret, raised platform, to the right of the main staircase near the spawn area. The [[Weapon/Anti-Vehicle Model 6 Grindell/Galilean Nonlinear Rifle|Spartan Laser]] spawns at basically the same position as the [[Sniper Rifle,]] except to the left of the starting position. | |||
[[M9 High-Explosive Dual-Purpose grenade|Frag grenades]], [[M7S Caseless Submachine Gun|Silenced SMGs]] and [[M6C/SOCOM|silenced magnums]] and a [[M41 Surface-to-Surface Rocket Medium Anti-Vehicle/Assault Weapon|rocket launcher]] spawn on the player's side on a wall outside the building. | |||
==Tactics== | |||
===Standard Firefight=== | |||
*It is wise to stay within a short distance of the spawning location, largely because players can see approaching enemies at the bottom of the hill long before they are in range. | |||
*If one is going for the sniper at the very end of the map, be sure to do it early or during a weapon drop. If one is running low on ammo, be sure to have cover from a teammate. | |||
*The concrete barriers will provide excellent cover from Fuel Rod shots and Wraith mortars, however they don't last long. | |||
*If one is aiming for the "Firefight: Security Zone" achievement, destroy the Wraiths if one has time. The Spartan Laser is the best choice to destroy a Wraith, since [[M19 surface-to-surface missile|rockets]] and [[fuel rod]]s are too slow to reach it if the Wraith moves away. | |||
*There are plenty of turrets in the map, so detach one of them if one needs them. They will return during weapon drop anyway. | |||
*Due to the map's large space and the presence of all three known heavy weapons, [[Mgalekgolo|Hunters]] and [[Jiralhanae Chieftain]]s shouldn't be too much of a problem. However, if one doesn't have any of the three heavy weapons, take and detach a turret to kill them. | |||
== | ===Floodfight=== | ||
* | *The Flood would occasionally come with a Ghost. Taking the driver out and commandeering it would give players some advantage to battle Flood Forms. | ||
* | *Giving Marines Spartan Laser and Rocket Launcher would benefit players since they can make a good assistant to deal with the Flood. | ||
*The | **Keep both Marines close to the player as they were very handy with heavy ordinances, and excellent for support. | ||
* | **If moving too far, the Marines would be lacking support and they do not have enough self-defense. | ||
*The Flood would often appear under a surprise attack near the top of the ridge. Be wary of it. | |||
*Fighting Sentinels would be difficult due to the open field. Operating the turret is recommended to conserve ammo | |||
**Always have Plasma Rifle in hand to disable its shield as soon as possible, especially if Tilt Skull is on. | |||
==Driving a Wraith== | ==Driving a Wraith== | ||
The game is scripted so that as soon as the driver of the Wraith is killed, the Wraith explodes making it impossible to drive. However for a split second after the driver is killed, the Wraith can be piloted. Any number of people can accomplish this, however the more, the better: | {{Main|Drive an AA Wraith}} | ||
The game is scripted so that as soon as the driver of the Wraith is killed, the Wraith explodes, making it impossible to drive. However, for a split second after the driver is killed, the Wraith can be piloted. Any number of people can accomplish this, however the more, the better: | |||
*At the start of the round, make your way down to where the Wraith is dropped. Make sure to have a [[ | *At the start of the round, make your way down to where the Wraith is dropped. Make sure to have a [[Paegaas Workshop Spiker|Carbine]] and a [[Type-25 Directed Energy Pistol|Plasma Pistol]]. If one has some companions, have them bring plasma pistols. | ||
* | *Concentrate fire on the turret gunner as one approaches the Wraith. | ||
*Once | *Once the gunner is dead, have one player jump on top of the Wraith while the others stun the Wraith with plasma pistol overcharges. | ||
*Melee the hatch until it pops off. | *Melee the hatch until it pops off. | ||
*Melee the driver until he has no armor but do not kill him yet. | *Melee the driver until he has no armor, but do not kill him yet. | ||
*Crouch on the Wraith so that "Press RB to board Wraith" does ''not'' appear. | *Crouch on the Wraith so that "Press RB to board Wraith" does ''not'' appear. | ||
*While still crouched, hold RB (making sure you do not board the Wraith), and fire a single shot with the carbine into the driver's head. | *While still crouched, hold RB (making sure you do not board the Wraith), and fire a single shot with the carbine into the driver's head. | ||
If done properly, you will become the driver of the | If done properly, you will become the driver of the Wraith. An ally can climb in and become the gunner. If the driver exits, however, the Wraith will explode. While this is doable alone, it is much harder to keep the Wraith stunned while doing everything else on your own. Also, if you are alone, no one manning the turret will become a problem when the [[Yanme'e|Drones]] begin to attack.{{Ref/YouTube|9xyXDw8xxug|Rooster Teeth|Walkthrough}} | ||
==Gallery== | ==Gallery== | ||
{{Linkbox|gallery=yes}} | |||
<gallery widths="150" orientation="landscape"> | <gallery widths="150" orientation="landscape"> | ||
File:HMCC H3ODST SecurityZone Map.jpg|Security Zone map. | |||
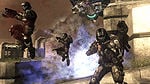
File:H3ODST Firefight SecurityZone1stPerson.jpg|A pair of dropships drop off a wave of Covenant | File:H3ODST Firefight SecurityZone1stPerson.jpg|A pair of dropships drop off a wave of Covenant | ||
File:H3ODST Firefight SecurityZone1stPerson2.jpg|A view of the ''Halo 3: ODST'' Heads Up Display. | File:H3ODST Firefight SecurityZone1stPerson2.jpg|A view of the ''Halo 3: ODST'' Heads Up Display. | ||
| Line 53: | Line 65: | ||
File:H3ODST Firefight SecurityZone2.jpg|Teamwork. Use it. | File:H3ODST Firefight SecurityZone2.jpg|Teamwork. Use it. | ||
File:H3ODST Firefight SecurityZone3.jpg|Chieftains have become more devastating juggernauts. | File:H3ODST Firefight SecurityZone3.jpg|Chieftains have become more devastating juggernauts. | ||
File:Security Zone.png| | File:Security Zone.png|Overview of Security Zone. | ||
File:SecurityZone Weapons.png|Weapon and Ammo Locations. | File:SecurityZone Weapons.png|Weapon and Ammo Locations. | ||
</gallery> | </gallery> | ||
== Sources == | == Sources == | ||
{{Ref/Sources}} | |||
{{Levels}} | {{Levels|ODST|mode=yes}} | ||
Latest revision as of 03:18, September 21, 2022
| Security Zone | |
|---|---|

| |
| Map overview | |
|
Game: |
|
|
Map file name (?): |
|
| Lore information | |
|
Location: |
|
| Gameplay overview | |
|
Terrain: |
Park, stairs |
|
Recommended gametype(s): |
|
| “ | Fight in the wide-open ONI exterior. | ” |
Security Zone is a Firefight map in Halo 3: ODST, based on the campaign level ONI Alpha Site, set in the city of New Mombasa.
Players who get 200,000 points on this map will receive the "Firefight: Security Zone" achievement and 10 Gamerscore.
Layout[edit]
The map takes place in the inner courtyard of the Office of Naval Intelligence Alpha Site in the city, and is described as a medium-sized map, with sniper rifles and turrets situated high up, with a central valley for the purpose of funneling enemies. Midway through a Firefight game on this map, Wraiths will spawn, though hijacking them has been disabled on this map for balance reasons.
The Sniper Rifle spawns on a bench next to a turret, raised platform, to the right of the main staircase near the spawn area. The Spartan Laser spawns at basically the same position as the Sniper Rifle, except to the left of the starting position.
Frag grenades, Silenced SMGs and silenced magnums and a rocket launcher spawn on the player's side on a wall outside the building.
Tactics[edit]
Standard Firefight[edit]
- It is wise to stay within a short distance of the spawning location, largely because players can see approaching enemies at the bottom of the hill long before they are in range.
- If one is going for the sniper at the very end of the map, be sure to do it early or during a weapon drop. If one is running low on ammo, be sure to have cover from a teammate.
- The concrete barriers will provide excellent cover from Fuel Rod shots and Wraith mortars, however they don't last long.
- If one is aiming for the "Firefight: Security Zone" achievement, destroy the Wraiths if one has time. The Spartan Laser is the best choice to destroy a Wraith, since rockets and fuel rods are too slow to reach it if the Wraith moves away.
- There are plenty of turrets in the map, so detach one of them if one needs them. They will return during weapon drop anyway.
- Due to the map's large space and the presence of all three known heavy weapons, Hunters and Jiralhanae Chieftains shouldn't be too much of a problem. However, if one doesn't have any of the three heavy weapons, take and detach a turret to kill them.
Floodfight[edit]
- The Flood would occasionally come with a Ghost. Taking the driver out and commandeering it would give players some advantage to battle Flood Forms.
- Giving Marines Spartan Laser and Rocket Launcher would benefit players since they can make a good assistant to deal with the Flood.
- Keep both Marines close to the player as they were very handy with heavy ordinances, and excellent for support.
- If moving too far, the Marines would be lacking support and they do not have enough self-defense.
- The Flood would often appear under a surprise attack near the top of the ridge. Be wary of it.
- Fighting Sentinels would be difficult due to the open field. Operating the turret is recommended to conserve ammo
- Always have Plasma Rifle in hand to disable its shield as soon as possible, especially if Tilt Skull is on.
Driving a Wraith[edit]
- Main article: Drive an AA Wraith
The game is scripted so that as soon as the driver of the Wraith is killed, the Wraith explodes, making it impossible to drive. However, for a split second after the driver is killed, the Wraith can be piloted. Any number of people can accomplish this, however the more, the better:
- At the start of the round, make your way down to where the Wraith is dropped. Make sure to have a Carbine and a Plasma Pistol. If one has some companions, have them bring plasma pistols.
- Concentrate fire on the turret gunner as one approaches the Wraith.
- Once the gunner is dead, have one player jump on top of the Wraith while the others stun the Wraith with plasma pistol overcharges.
- Melee the hatch until it pops off.
- Melee the driver until he has no armor, but do not kill him yet.
- Crouch on the Wraith so that "Press RB to board Wraith" does not appear.
- While still crouched, hold RB (making sure you do not board the Wraith), and fire a single shot with the carbine into the driver's head.
If done properly, you will become the driver of the Wraith. An ally can climb in and become the gunner. If the driver exits, however, the Wraith will explode. While this is doable alone, it is much harder to keep the Wraith stunned while doing everything else on your own. Also, if you are alone, no one manning the turret will become a problem when the Drones begin to attack.[1]
Gallery[edit]

|
Browse more images in this article's gallery page. |
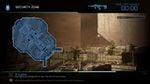
Security Zone map.
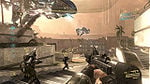
A pair of dropships drop off a wave of Covenant
A view of the Halo 3: ODST Heads Up Display.
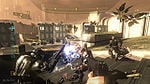
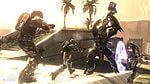
Players take on Hunters.
Teamwork. Use it.
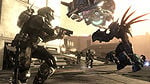
Chieftains have become more devastating juggernauts.
Overview of Security Zone.
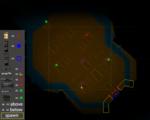
Weapon and Ammo Locations.


Sources[edit]
| |||||||||||||||||


