Windward
From Halopedia, the Halo wiki
| Windward | |
|---|---|

| |
| Map overview | |
|
Game: |
|
|
Map file name (?): |
|
| Lore information | |
|
Location: |
|
| Gameplay overview | |
|
Recommended number of players: |
1-4 |
|
Recommended gametype(s): |
|
| “ | Fight high above the city streets. | ” |
Windward is a Halo 3: ODST Firefight map, based on the campaign level NMPD HQ. Players initially spawn with a Sniper Rifle at the start of the round, but only ammunition can be found on the map. All players respawn with SMGs. The Special Enemy of this map is the Banshee, which spawns at the beginning of every wave and 2 Missile Pod Turrets with which to shoot it down.
Layout
Central building
Players start in a central building on the second floor. When they leave this room, they will enter a hall with stairs in the middle. On the other side of the hall there is a room with two med-kits. If you go downstairs, you will find two med-kits on each side of the hall (making it four med-kits in the central building). Should you take the doors in the lower hall, you will enter a small room with doors that lead on the left and right ledge. In the middle of this small room is a rocket launcher pack with two rockets.
Exterior/ledges, courtyard and tunnels
- Looking towards the ledges, you will find the rocket launcher on the left (on a small dispenser, which is near the missile pod) and the M90 Shotgun on the right side (this time it is further away from the missile pod than the rocket launcher is). Going all the way to the ledge will reward the player with extra ammunition.
- On both sides of the central building, there are two courtyards (or gardens) with multiple stairs and paths which lead to: second floor of the central building, rocket ammo room, landing pads and ledges.
- This map has a number of small tunnels which lead to two landing pads. You can enter these tunnels from the lower courtyards near the ledges.
Enemy spawn points
Enemies can enter the playing field by a number of ways: Phantoms (which land on the pads or in the middle of the courtyards) or from the "monster closets" (shielded doors that the player can't enter). When the bonus round begins, the grunts can come from the roofs of the surrounding building or from the mentioned "monster closets". Enemies which appear on this map are: Brutes (all forms and ranks), Grunts, Jackals (a Jackal sniper can appear as well, but most of the time they are equipped with carbines or shields), Drones (shielded variant is present as well), Hunters and Brute-piloted Banshees.
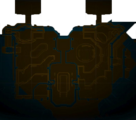
The map of Windward in VISR.
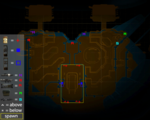
Weapon and ammo locations.
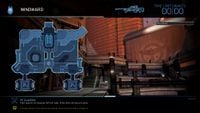
Map of Windward in Halo: The Master Chief Collection.


Tips
Standard Firefight
- The best method of playing on this map is to hold up in the central building and exit only to get the Rocket Launcher and Missile Pods from outside to use against the Covenant inside the central building. From there, it’s all about good aim and a little bit of crowd control.
- If you decide to stay outside, you will be either shot to death, or stuck after the Catch Skull comes into play (there are just too many places from which the grenades can bounce off). Your best option is to take the advice above. Though you can survive for a long time on the earlier sets and rounds, your only difficulty may be the Banshee as it's hard to kill as it flies away if you try to stick it with a grenade or shoot it, you can use the Missile pod but if there isn't one to hand you can use the neat little trick: Go down to one of the landing platforms with a plasma pistol, charge up the plasma pistol to full, wait until the Banshee is in range as the a charged plasma pistol is homing, it should hit the Banshee and cut out its engines causing the Banshee to fall, I recommend you shoot the Banshee when it's flying away otherwise it may land on the platform and just start up again, meaning you've wasted some plasma pistol energy.
- If you decide to hold the tunnels, then you will probably be burned by Brute Stalkers, which can be hard to detect and even harder to avoid once they enter the tunnels, stuck by grenades, once the Catch Skull comes into play, or caught by Kamikaze Grunts.
- If you are playing solo, a good way to survive is just to hold up in the central room. This effectively "funnels" the Covenant.
- The Sniper Rifle is not very useful in this map. Try to utilize the Noob Combo, as it is most effective against Brutes. A Carbine is also a good choice, but once the Famine Skull kicks in, you are going to have some difficulty in keeping an ample supply of ammunition. To kill Brutes and Jackals, you can use the Noob Combo. Use a Missile Pod or a Rocket Launcher to deal with Chieftains and Hunters. Note: during the final wave, the Sniper Rifle can become vastly important, for getting rid of any enemies which will cause you a great deal of trouble, such as the abundance of Brutes which are dropped off.
- A great hiding spot is underneath the escalator. Usually you can sneak out for quick assassinations.
- The interesting thing about this map is even though the Sniper Rifle isn't very useful, you will never find a moment where you run out of ammo. In fact, there are about three boxes of Sniper ammunition around the map, one located near the Shotgun, another located near the spare rockets, and a third and final box located near the hallway on the left, facing the incoming Phantoms courtyard which leads to the lower docking area. You can also find some more spare rockets inside the center building.
- A good idea is to stay on the top level of the map, hopping between the left and right ledges using the central building as cover when thing get a little too dangerous. Falling back into the top room of the level allows you to choose where your opponents run instead of them choosing where you go, as well as allow you to keep your Pistol and SMG fully stocked.
- You can make a Banshee fall out of the sky and die by overcharging the plasma pistol, however, you will not get the Double Kill as with other vehicle kills in the game, only the Brute pilot will be scored.
- The SMG can make short work of Drones. It is advised to keep one near should a swarm of Drones appear.
- Another helpful strategy is to hold of in the large room across from where you spawn. There are two health packs for easy taking, the windows are indestructible, and the room is small so when chieftains come, you can easily assassinate them if you have two or more players. Also when you are in this room, try to push the large table against the door to make a great barrier.
- You can easily get a Spree Medals or Multi-Kill Medals from a heavy weapon if you aim the troops that are coming down from the Phantom at the landing pads.
- Don't be scared to rip the Missile Pods off the turret stand and make use of them against Hunters if you can't get to the rocket launcher in time but make sure you have a clear path to get to the Missile Pod first.
Floodfight
- Snipers will be ineffective on this map, particularly when battling Flood Forms.
- Arm the NMPD Officers with Rocket Launcher, as it will be very helpful in taking down Pure Forms that were often hanging around the wall.
- When fighting Sentinels, quickly take cover at the spawn point. If there were Flood happens nearby, let them take each other out.
- The open space would often makes the players become an easy target for the Sentinels.
Achievements
The following achievements can be unlocked on Windward on Halo 3: ODST.
| Halo: 3: ODST | Title | Unlock requirement |
|---|---|---|
 |
Score over 200,000 points in Firefight on Windward. |
Trivia
- Windward is currently the only Firefight map in which the player starts with a Sniper Rifle as a primary weapon rather than spawning with the default load being the Silenced SMG and Magnum.
- If a player travels to the rocket spawn to the left of the missile pod there is a face if the player jumps off the cliff in the corner.
- If the player looks on the floor inside on the upstairs health room, there are two different ID Badges that have photos of Bungie employees on them.
- Under the main Drop off platform, there is an Easter egg know as the Windward Face, it is also at the part of the campaign level where you fight off the Banshees.
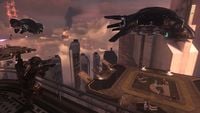
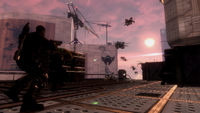
- One can see the ruins of ONI Alpha Site and the destroyed Mombasa Tether in the background of the level. They are both visible from the Northwest side of the map.
Gallery

|
Browse more images in this article's gallery page. |
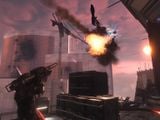
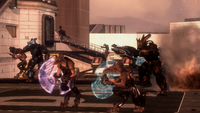
A player shooting down a Banshee.
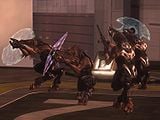
A lance of Jackals on the landing pad.
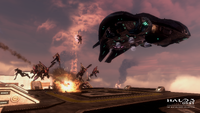
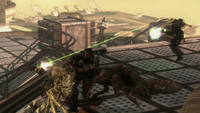
A Phantom drops off Covenant troops to a landing platform.
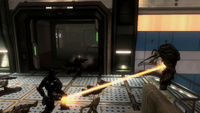
A well-timed rocket killing Covenant troops deployed from a Phantom.
An NMPD officer fighting alongside players in Halo: The Master Chief Collection.
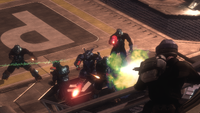
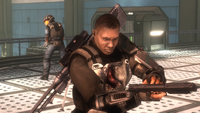
Dare firing a Covenant carbine at Jiralhanae at the landing pad.
A battle at the lobby doors.
A battle with the Flood in the courtyard.
Covenant forces on the landing pad.
Yanme'e approaching a courtyard.
A Phantom deploys Yanme'e in the courtyard.
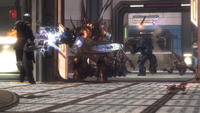
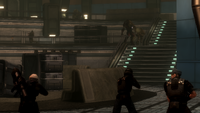
A battle against the Covenant at the lobby staircase.
Romeo fighting from the the top of the lobby staircase.
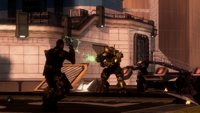
Romeo and Dare fighting a Jiralhanae Captain Major on a landing pad.
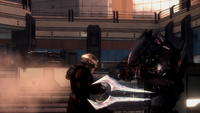
Dare fighting a Sangheili Minor.
Romeo firing a Sentinel beam at a Flood tank form.
Flood enemies approaching Dare and NMPD officers.


Sources
| |||||||||||||||||


