Tsavo Highway: Difference between revisions
From Halopedia, the Halo wiki
| Line 25: | Line 25: | ||
==Summary for this level== | ==Summary for this level== | ||
This level introduces drivable vehicles to the player and is meant to allow a player, who may be unfamiliar with the game, to have some time to get a feel for the controls and physics of vehicles. | This level introduces new drivable vehicles to the player and is meant to allow a player, who may be unfamiliar with the game, to have some time to get a feel for the controls and physics of vehicles. | ||
==Background== | ==Background== | ||
Revision as of 03:43, September 18, 2008
|
Prev: |
|
|
Next: |
|
| Tsavo Highway | |
|---|---|

| |
|
Game: |
|
|
Player: |
|
|
Date: |
|
|
Location: |
|
 |
Halopedia has a walkthrough guide for this level; see Tsavo Highway/Walkthrough. |
Tsavo Highway[1] is the third campaign mission of Halo 3. Upon completing it on Normal, Heroic, or Legendary the player will unlock The Road achievement. If a player gets up to 15,000 points in the meta-game he or she will unlock the Cavalier achievement.
Summary for this level
This level introduces new drivable vehicles to the player and is meant to allow a player, who may be unfamiliar with the game, to have some time to get a feel for the controls and physics of vehicles.
Background
After successfully evacuating the Crow's Nest base,the Master Chief finds his way to a couple of Warthogs and leads a batch of Marines out of an underground tunnel. Once above ground, he must push through the Covenant defenses on foot and in many vehicles, trying to get to the African town of Voi.
Starting Weapons
| Player V Starting Point > |
Mission Start | Rally Point Alpha |
| Master Chief Primary Weapon Solo |
MA5C Assault Rifle | MA5C Assault Rifle |
| Master Chief Secondary Weapon Solo |
BR55HB SR Battle Rifle | BR55HB SR Battle Rifle |
| Master Chief Primary Weapon Co-op |
MA5C Assault Rifle | MA5C Assault Rifle |
| Master Chief Secondary Weapon Co-op |
BR55HB SR Battle Rifle | BR55HB SR Battle Rifle |
| Arbiter Primary Weapon | Type-25 Directed Energy Rifle | Type-25 Directed Energy Rifle |
| Arbiter Secondary Weapon | Type-51 Carbine | Type-51 Carbine |
Transcript
Full Contact Safari
Warning: Hitchhikers may have Jump Packs.
{Gameplay}
The Chief starts to wake up.
The Master Chief comes to in the wreckage of the elevator, with wounded Marines being treated and other Marines trying to regroup. The elevator shaft above is engulfed in flames.
- Commander Miranda Keyes (COM) (Signal with much static): "Chief,Please respond. What is your status? Over. If you can hear me, find transport. Head for the town of Voi."
- Wounded Marine: "Ah! I've got a broken rib."
- Marine Medic: "Hey. You wanna bleed out?"
- Wounded Marine: "No."
- Marine Medic: "Then I've gotta keep pressure on the wound."
On the other side of the underground vehicle maintenance bay, a Marine Sergeant shows up at the other side of the elevator wreckage and begins to handle the situation.
- Marine Sergeant (Reynolds): "(Coughs and coughs) Settle down Marines! Somebody hit the emergency power. (Cough)".
- Marine: "On it, Sergeant."
- Marine: "Another bombing run?"
or
- Marine: "Did we get everyone out sir?"
or
- Marine: "'You think the Brutes know where we are?"
- Marine: "Any word from Charlie 02? We got separated."
- Marine: "Nah, man. Alpha 06. They're all gone too."
- Marine Sergeant (Reynolds): "If you can walk, set your boots on the line."
The Master Chief and any Marines fit for duty form up on the Sergeant on the other side of the maintenance bay, with two Warthogs parked and functional.
- Marine: "What's our situation, Sergeant?"
- Marine Sergeant (Reynolds): "Not sure. Can't reach the Commander. Too far underground. Let's mount up. Get the hell outta these caves."
- Marines: "Yes sir!"
If the Master Chief gets into a Warthog first or opens the door,
- Marine Sergeant (Reynolds): "Chief's got the right idea, Lets mount up, get the hell out of these caves,"
The Master Chief and Marines get in the Warthogs.
- Marine: "I'll get the door sir."
The Marine opens the door (or the Chief can too), and the Warthogs proceed down the tunnel.
- Marine Sergeant (Reynolds): "Second Squad! Coming through!"
The Warthogs take out small resistance at the gate leading out of the caves, and head out.
- Marine Sergeant (Reynolds): "Don't leave any of 'em standing."
or
- Marine Sergeant (Reynolds): "Conserve ammo. Run 'em over!"
- Marine: (Looking at the fleeing jackals) "Look at the little bastards run!"
After taking out a fleeing Lance they observe the massive wreckage from the Mombasa Orbital Elevator, along with a crashed Phantom. The Chief finds a cliff and sees a long line of the elevator wreckage.
- Female Marine (COM): "The Mombasa Space Elevator."
- Marine (COM): "It collapsed when the city got glassed."
- Female Marine (COM): "But the tower was thousands of kilometers high."
- Marine (COM): "Yeah. Well now it's scattered all over the Savannah."
- Female Marine #1 (COM) (Astonished whisper): "Holy crap!"
The Chief listens to a radio transmission from the wreckage of a crashed Phantom
- Unknown Brute Commander (COM): "Chieftains! Rally your packs!"
- Unknown Brute Commander (COM): "Kill all survivors, let none near the crater!"
- Unknown Brute Commander (COM): "The Prophet will soon complete his blessed task!"
The Warthogs continue on.
- Marine Sergeant (Reynolds): "Chief, still can't get the Commander. COMs are a mess. Pelicans are scattered. Best thing now, get some distance between us and the base. Brutes are gonna be looking for survivors."
The Warthogs reach another crashed Phantom and kill the troops around it.
- Unknown Brute Commander (COM): "I see it, pack brothers! The Holy Relic! What fools, to live so long on hallow ground! Never know what lay beneath the surface."
The Warthogs keep pressing on, encountering a Phantom and its many troops. The Phantom leaves and it doesn't take long before the Warthogs overpower the infantry.
- Marine Sergeant (Stacker) (COM): "I repeat: My convoy's been hit. I've got wounded...(static). We're on the Tsavo Highway about...(static)...east of Voi. Someone, anyone, please, respond! (Static and cut-off).
- Marine: "Tsavo Highway is just ahead, Chief."
The Warthogs arrive at the Highway, encountering Brute choppers and several infantry hostiles. One chopper rams and destroys a fully manned attacking Warthog.
If the Chief dismounts the vehicle and goes into the small checkpoint where Sgt. Stacker is located.
- Marine Sergeant (Stacker): "We were en route to Voi Chief. Banshees jumped us, started strafing. Pretty much ruined our day."
After the Covenant who attacked the Supply Convoy is finally defeated, the Warthogs' journey forward into the tunnels is blocked off by a Shield Barrier.
If Stacker's on a Warthog with the Chief.
- Marine Sergeant (Stacker): "Marines in Voi really needed my supplies, Chief. But I'm pretty sure they'll be plenty happy to see you."
If the Chief waits for a while at the shield barrier...
- Marine Sergeant (Stacker): "Take down that barrier Chief. Power Supply should be inside the tunnel."
- Marine Sergeant (Stacker): "Chief, the barrier only works against vehicles. You should be able to walk right through."
The Chief walks through the shield, and destroys its power source.
- Prophet of Truth (broadcast): "“The gods will not begrudge our excavation. By uncovering this relic, we add homage to their glory. When the dust settles, we will all see what I already know: here lies the Path, the start of our Great Journey."
The Warthogs continue along the Tsavo Highway through the tunnel. When they get out and reach a bridge, a Covenant Cruiser soars ahead.
- ONI Recon 111 (COM): "Commander. This is ONI Recon one-eleven. The cruisers above...(static). They found...(static).
- Miranda Keyes (COM): "Say again Recon? You're breaking up."
- ONI Recon 111 (COM): "There's something in the crater, Ma'am. Something beneath the storm."
The Warthogs reach a gap in the bridge and cannot continue. The Master Chief clambers across broken beams and bars and continues on foot. The marines follow.
The Broken Path
Wraiths and Choppers'
- Miranda Keyes (COM): "Master Chief? Finally, a good connection. Truth has excavated a Forerunner Artifact. We have to assume it's the Ark."
- Sergeant Johnson: "Keep pushing to the town of Voi, Chief. Resupply birds will meet you in the next valley."
The Chief finds Marines pinned down and under heavy fire from Brutes and their allies. The Chief and the Marines eventually clear the sector.
- Female Marine: "We got reinforcements Marines!"
- Marine: "Woohoo! Yeah!"
- Marine: "Booyeah!"
- Marine: "Ohhhh yeah HAH!!"
A Phantom approaches with reinforcements.
- Female Marine: "Sir. Recon spotted Covenant armor ahead. Pelicans are inbound with heavy weapons. We need to hold out 'till they arrive."
The Master Chief takes out the Phantom's reinforcements.
- Marine: "Wraith! Get to cover!"
A Wraith from further up the trail arrives. The Chief, lacking heavy weapons or ammo for heavy weapons, has to board the Wraith and neutralize it.
- Female Marine: "Pelicans coming in."
- Johnson (COM): "Brutes have plenty of armor between here and Voi Chief. But this Warthog should help you punch on through."
The Master Chief has a choice of taking one of the Warthogs the Pelicans drop off, or the Wraith that previously attacked if not destroyed. The Tunnel onward on the Tsavo Highway is closed off, so the Chief goes on the trail where the Wraith came from, finding a short tunnel around back onto the Tsavo Highway, but obstructing the way are some Choppers patrolling and soon they are taken out.
Nearly a dozen more Choppers, a few Wraiths and Shade turrets defend the route back onto the highway. Despite being greatly outnumbered and out gunned, the Chief and the Marines clear the zone. The Chief takes a look at the massive storm over the vast crater beyond the cliff.
- Marine (COM): "Look at the size of that thing! Wonder how old it is?"
- Marine (COM): "Don't know. But I do know that ain't a normal storm."
The Chief observes the cruisers over the crater.
- ONI Recon 111 (COM): "Commander, I can see most of it now. Readings are all over the EM spectrum."
- Commander Keyes (COM): "Roger that, Recon. Shut off your gear, fall back. I'll monitor from Kilo 23."
The Chief continues along the Highway.
- Johnson (COM): "Chief. The gate to Voi is dead ahead. Smash the Brute blockade. Open her up!"
- Prophet of Truth (broadcast): My Dreadnought, the vessel that has so long been the focus of our worship, now rests on it's true pedestal. Even now, it's engines spark greater ones below, relics long without power yet ready to fulfill their divine purpose. Stand fast! Keep our enemies at bay! Soon, my brothers, we will all have our reward!
The Master Chief goes on foot and encounters heavy defenses by the Brutes, led by a Chieftain. He eventually clears it. The only thing left standing between the UNSC and Voi is another Shield Barrier in the tunnel. The Chief cuts the power source with ease.
{Cutscene}
Pelicans, including Kilo 23, arrive and drop Warthogs and Marines, Commander Keyes piloting one of them.
- Miranda Keyes: "Lord Hood. We made it."
- Admiral Hood (Video COM): "Music to my ears, Commander. What about the Ark?"
- Miranda Keyes: "Fully uncovered, sir."
- Admiral Hood (Video COM): "Then we don't have much time. Marines... The Prophet of Truth doesn't know it yet, but he's about to get kicked right off his throne. You will take our city back. And drive our enemy into the grave they've been so happily digging. One final effort is all that remains."
The Pelicans fly off. The Master Chief draws his MA5C and walks to one of the Warthogs to proceed to retake Voi back from the Covenant.
Easy Walkthrough
Full Contact Safari
This is a relatively short level, so it shouldn't be too much of a challenge, especially on Easy. Walk out of the flaming elevator shaft, and look to your right. There are Battle Rifles and Shotguns on racks. You have full BR ammo, so no need for those. Give a Marine a Shotgun and take his AR ammo for your own. Now, turn around and get into a Warthog. The Troop Transport one, preferably, so you can pick up additional Marines along the way. Wait for 3 Marines to get on, and drive. It won't be long before you see some Covenant attacking a group of Marines. Run over some, and let your Marines mop up. Go up the stairs and you'll find another Shotgun for your Marine, meaning more AR ammo for yourself. Since there is no turret on your Warthog it is important to give your Marines a good arsenal. Get back to the Hog and drive out. Ah, the sunshine. So nice to see it again. Run over the Brute, and maybe some other Covenant. Move on, and you'll find two Jackal Snipers. Wipe them out. By now, you should have more AR ammo than BR ammo, so switch your Battle Rifle for a Beam Rifle. Give one to a Marine, and take the other one for yourself. Drive on. Don't stop to kill the enemies, just keep going. You'll hear Stacker making a distress call, and a Warthog should be destroyed by a Chopper right about...now. Kill the enemies, and turn left to destroy the shield. Go through the cave, and come out.
The Broken Path
Don't be afraid of the Cruiser, it won't hurt you. You will come across some enemies. Use your Beam Rifle to snipe some, and clear the area. Take a Brute's Fuel Rod, and fire 4 shots at the Phantom that just arrived in the turbines (the eyes). Make sure you shoot the same eye. Your Rod won't have too much ammo, so give it to a Marine. Take back your snipe. Kill the Wraith, I like using Warthogs better. You could keep it, if you want. Drive through a small cave, annihilate two Brutes and their Choppers, and kill the next group of Covenant. Get back on the road, destroy the roadblock, snipe some Brutes, and break the shield. You're done.
Normal Walkthrough
Full Contact Safari
You'll start in an underground cavern after the elevator disaster at the Crow's Nest base. When you start, walk forward a bit, turn right, and go through the door at the end. Open the large door and the far end of the room, and grab which ever Warthog you please. I always take the Troop Transport Warthog. Try playing the level twice, and see which Warthog fits you best.
Once your 'Hog is manned up completely, go through the door. Follow the dimly-lit path, splattering anything in your way. It's especially fun to hit the Brute running up the small hill once you're outside. Turn right up the pathway and splatter anything in your way, once again. You'll soon reach a small area manned by all sorts of Covenant. Splatter all that you can, and continue op the path to the left of the area (it slopes right). You'll get a short message from Sgt. Stacker, and you'll find another large area. Brute Choppers everywhere. Just let your turret (or people in the back) take them out. Then get out, go through the shield door, destroy its core, and head back through.
The Broken Path
The when you meet with the Marines holding off the Jiralhanae and Unggoy, a Phantom comes in and drops reinforcements. A Chieftain, a few Jump Pack Jiralhanae and a few normal Brutes. Once they are dead you should grab the Chieftain's Fuel Rod Gun because a Wraith arrives. Once you take out the Wraith you can either wait on Johnson and Commander Keyes to bring in two Warthogs or you can take the Wraith and use it until you get to the cave. There you might want to use a Brute Chopper or the flipped M12 LRV against the back gate. Only if the two Marines are alive is when you should use it. Otherwise you take a Chopper and then you drive down the second to last stretch of highway. There are two Wraiths scattered around the next area. (Three on Legendary) Once you have killed the ten Choppers and the two Wraiths you can drive up the hill to get to the next area which will take you the final area. You can either drive through the first set of Brutes and go to the next or you can kill them. If you're on Legendary it's best to use one of the Wraiths and get a Marine on the turret. You can get up the steep hill and through the barriers by boosting. Once you have killed most of the Jiralhanae you can destroy the Shield Barrier and then you have beaten the level.
Detailed Walkthrough
The base just blew up and you're stuck in what seems like a basement. Don't try to walk around until you can see, you may walk into fire and die before pulling out a weapon. Walk out of the elevator and take a right to the weapons rack. Grab a Battle Rifle and fill it. Your secondary weapon can either be an the default Assault Rifle or you can grab the Shotgun. We're going to take the Shotgun. Turn left again and head into what seems like a garage. You have two Warthogs, a troop transport and a LAAG hog. We are going to grab the LAAG hog for firepower. Wait for your Marines to mount up. Once they do start driving through the caves.
This little bit of the level was probably designed to help newbies learn the general physics of the Warthog. One thing I have learned from experience is that if you are flipping or only on one side, aim to that side. For example, if you are beginning to roll and are currently on your right set of wheels, stop accelerating and aim left. Although counter-intuitive, this will right the Warthog four out of five times. If you are rolling a bit more violently, wait until you slow down, and then perform the above maneuver. Doing this can prevent possibly catastrophic or fatal rollovers.
Alright we're coming up on the end of the cave. You will see a bunch of Grunts and Jackals assaulting some Marines. Give them a hand. Aim for the left or right of the Covenant formation, then quickly turn to the opposite direction. Let's say you aimed for the left side of their formation, they will dive right. By turning right, you actually have them dive into your path. If you do this perfectly, that entire fire team just died. That is the way if you don't know about the e-brake. (the right trigger in the warthog is the horn, the left is the e-brake. If you drive left, hold the e-brake, and point right, you will power slide or drift. This makes crushing enemies a LOT easier. Get out and take the Plasma Grenades. Come out into daylight, you will see a ridge. Gun straight for it, straight down the middle. Upon landing you find a few Brutes, some Grunts, and some Jackals. Your first priority target is the Brute, as it can hijack your hog, and is more likely to stick you. When he is dead the Grunts will panic. Have your gunner mop them up, and aim the hog at the two Jackals up near the hill. Once everything is dead, continue up hill.
You will then encounter two Sniper Jackals. They aren't much, but don't be cocky. They are good shots, and on Legendary, they wil most likely one shot kill if you are on-foot. Because a Jackal is good at making a quick dive, chances are you won't be able to splatter them, but the turret on the back will ventilate those Jackals nicely. Swap your long range weapon for the sniper. Give you 'Shotgun' position the Sniper with the least charge. Don't be fooled, the AI is extremely accurate. Continue on to another downed Phantom, the Grunts should have some turrets. The best thing to do is plow the hog right into one, destroying the turret and the Grunt. The gunner will be able to take out the other one. Mop up the panicking Grunts. Stop and get off for the equipment and grenades.
Next you move out into a large area with multiple squads. There will be a Shade Turret, and two squads composed of Grunts and Brutes. Take a left and head towards the first squad. Splatter the Brute and anything else. Once they are eliminated, it's time to take out the turret. Come out from behind the hill where the squad was and locate the turret. Plow straight to the hill its on, and drive full throttle into it. Although this sounds suicide, the Warthog almost always wins, even on Heroic. Once they are dead move out to the other squad and let them taste the dirt. Again, stop for equipment and grenades.
You now move past a blockade thing into a small squad with Carbine Jackals. Once nothing is moving head out down the path to the Tsavo Highway. You encounter some Choppers, your gunner will get them. After, try to save a Chopper. Wait for the Drones to show up before you take out the shield, and stick the Shade when you get a chance. Here is where you would want the Chopper. Get in a Chopper and go the the concrete barrier. If you aim right and boost at the right time, you will drive over the broken path. If not reload and try again. Drive over everyone and kill the Brute with the Fuel Rod Gun. Take his Fuel Rod Gun for the Sniper Rifle. Get back in the Chopper and hide.
A Phantom shows up to ruin your party. You have a Brute with a Fuel Rod Gun as well as a large group of Jump pack Brutes. Wait for the Brute with the Fuel Rod Gun to get in range and drive over his ass. Once everyone is dead add his Fuel Rod ammunition to your own. The Wraith should show up now. Go up to it and melee the driver to death but save the vehicle. Now this is the hard decision. You have a Fuel Rod Gun and need another weapon. I suggest you take the HUMAN Sniper Rifle (at the back of the camp where the Trip Mine is also, don't worry there is more ammo ahead), or the AR (in front of the camp) , the BR (same as the sniper), or Shotgun (next to the AR and BR).
Sgt. Johnson now shows up and brings you two Warthogs. However, we are going to drive the Wraith. A gunner should join you and go blast everyone away.
Drive through the cave, you will see two Brutes just standing around. Splatter/blast them. Hop out and look for a Fuel Rod Gun lying on the ground. (keep this gun because sometimes you can start the next level with it) Get in the hog and head to the hardest battle of the level. Ahead there are ten Choppers, two Wraiths and two Shades (varies on the difficulties). Drive around down and begin to work at the Choppers. Go left (beware a Chopper will come behind you) and kill everyone. Blast the shades, Choppers, and the Wraiths away with the plasma mortar. Once you get to the road blockade, there should be a pod to your right with a BR and a Sniper Rifle (this is why I told you to get a Sniper Rifle). Take the BR if you don't have a sniper or keep your AR if you have one.
Fire as fast as the Wraith can cycle. Go for total and utter chaos and destruction. Go to the left, and you can get around that first blockade. Again, fire like mad. Take out the Shade as a first priority, the Chieftain is the second priority. If he throws a power drain continue to fire like crazy. If you are under to much fire, make a run for it. once back in the Wraith, simply fire at any movement you see. If you think everything is dead, check your radar. If all is silent, go through the shield, and give the generator a good smack with your melee. *note if you shoot the generator with the turret from the Chieftain you will not get the weapons you got on The Storm.
Another good way to get through the level is as fast as you can. If you get in the Warthog you can proceed through the entire level in less than ten minutes. You just continue on the Hog until you get to the broken bridge. You can cross this bridge on a Warthog with some difficulty, but it can be done. Use the warthog as a bit of a ram, push a barrier away from the others near it, tipping it over in the process, turn it sideways with the warthog, and push it back against the remaining barriers to become a ramp, position the barrier in the middle of the bridge so it will become a makeshift ramp, if placed against either side your warhog will contact the lights that line the bridge and knock you down, it is necessary to travel back to the dead warthog to begin your run for the jump, if done correctly you can continue on with a warthog. If you do make it continue past where the first wraith and phantom are through the caves. Then you come to the most difficult part of the level. From here you have to destroy the two choppers, then hijack one Wraith and destroy the other. After this you can just continue down the road in the wraith until you reach the final battle. Once you get here clear out the enemies with the wraith, then you have to get out of your vehicle and destroy the shield door, then the level is complete. This way isn't exactly "completing" the level, but you still get the achievement and is really easy.
Trivia
- Tsavo is a region of Kenya close to where the Tsavo and Athi rivers meet and was the place where the Uganda Railway passed over the Tsavo river. The bridge will not be encountered as it is on the other side of Voi.
- In an article on IGN, it is said that Cortana's voice-over tells you about the stranded transport team. However, it is actually the voice of Miranda Keyes, whose new voice actor sounds similar to Cortana.
- It is the first Halo 3 campaign mission to feature some of the usable vehicles.Cite error: Invalid
<ref>tag; invalid names, e.g. too many - Tsavo means 'Place of Slaughter.'
- The ring-shaped debris is the remains of the space elevator in New Mombasa, having collapsed after New Mombasa was destroyed after the slip-space eruption.
- There is a weapons cache on top of the tunnel in the first area where the Pelican drops off two Warthogs, but if you enter it, the Wraith will bombard you from a distance.
- Tsavo is notable in that it was the site of the most famous instance of man eating lion attacks in the late 19th century as detailed in the book "Man-Eaters of Tsavo." More than 140 workers perished in the building of the railway. The event was made into the film The Ghost and the Darkness.
- The Marathon logo is visible on the side of the CCS-Battle cruiser that passes overhead.
- The marine that goes to the power supply will only stand there for a few seconds, then come back and the lever will go up and down by itself.
- Near the end of the level, you can see the ruins of New Mombasa in the distance near the edge of the crater.
- You can jump over the first break of the bridge to completely bypass the Brute-infested area after the gap. There are three ways to do this: drive a Warthog over a carefully-placed Grav Lift, rearrange the barriers (this can be done with either a Warthog or a Brute Chopper), or boost towards the protrusion on the left side of the bridge. Jumping is especially helpful on Legendary. However, if you use the Grav Lift to go over the gap, unusual things may happen. These events may include the Pelican not showing up, the two Brutes who are supposed to pilot the Choppers in the next area being dead with no armor with a fully loaded Fuel Rod Gun next to them, dropped weapons in the next area disappearing and the Phantoms that fly overhead not firing. Those Phantoms will sometimes not drop what they are carrying.
- This is the only stage where the Arbiter is never seen in single player Campaign mode. This is probably because he, in Bungie canon, had been evacuated from the Crow's Nest via Landing Pad Bravo when the Brutes disarmed the bomb.
- In the campaign lobby, Mission Start is labeled as "Warning: Hitchhikers may have jet packs". However, no Jump Pack Brutes appear before Rally Point Alpha. This is also a reference to the last chapter name in the Halo:CE level The Maw: "Warning: Hitchhikers May Be Escaping Convicts."
- If you get close to (or inside of) the crashed Phantoms you can hear snippets of the Brute's radio transmissions.
- In the chapter The Broken Path, if you head into the bunker you can use the Brute's fuel rod cannon to destroy the incoming phantoms; killing many of the Brutes on board and giving you cover to destroy the Wraith.
- If you look at where the CCS Battle Cruiser appears from the cliff after the Drone ambush, a glitch will happen where you will see the side of the cruiser before the ship actually appears.
- This is the first level you can see a Wraith in Halo 3.
- At Bungie's Halo 3 preview event in Seattle, Washington (Close to where Bungie Studios is actually located on the map) Tsavo Highway was shown to the groups that attended the event's meeting.
- At the beginning of the level, if you look at the medic treating the injured marine, he will occasionally click on a data pad in his hand. However there is no data pad to click on.
- On the Halo 3 Limited Edition Disc, one of the employees called Tsavo Highway "Outskirts". This could have been the original name for the level.
- Admiral Hood says at the end of the level "one final effort is all that remains". The Prophet of Truth says this on the speakers in the Halo 2 level High Charity. This is also the name of a song on the Halo 3 OST.
- In the Halo 3 Epsilon, no static effects were added to dialogue. It was possible to hear the complete transmissions from Stacker and ONI Recon 111: "We're on the Tsavo Highway, about five clicks east of Voi." and "The cruisers above the crater. They found something."
- This is the only level throughout the game where the player can wield neither the Energy Sword nor the Gravity Hammer.
- This, "The Storm", and "The Covenant" are the only other levels that have the Troop Transport Warthogs.
- Before heading to the garage in the beginning of the level, you can go to the doorway opposite of the garage entrance and reactivate the entire bases backup power supply from there by pulling a lever in the room.
- Sometimes, Sergeant Stacker's character model will appear instead of Sergeant Reynolds, however all scripted dialogue will remain unchanged. Oddly, even after both sergeants are together, Reynold's voice will still come from Stacker's model, and vice-versa.
- This along with The Ark and Halo are one of the only levels to not feature any Cortana/Gravemind moments. However, Halo does feature a Gravemind moment instead.
- In the area where you rescue Sergeant Stacker, the Choppers that normally ram the Warthog will very rarely miss, and the 'Hog, along with the Marine on the turret, will survive. Oddly, however, if you take Marines to the gap in the highway with this Warthog, they will not automatically get out like usual, and when they do get out, they will not go to jump across the gap.
- In one area, there is a crashed Phantom and if one stands near it, they can hear transmissions such as "Has it been found?" "Yes, wiped out an entire group of Brutes and Grunts." "Well, kill it, you whelps!"
- If you look on all the signs in which it says the distance to Voi and New Mombasa. It will always say that Voi is 17km away and New Mombasa is 124km away. Same for the opposite direction. The distance to New Mombasa is a seven reference: 1+2+4=7.
- It is possible to jump the gap in the bridge with a vehicle if you have a Gravity Lift handy.
Sources
- ^ EGM Magazine, August 2007, page 62
Images
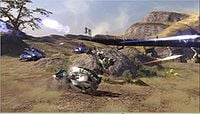
A battle with Brute Choppers.
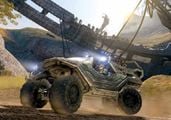
The Chief on the road.
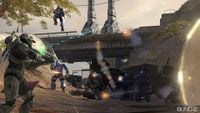
A Battle on Foot.
- Battle Ship.jpg
a CCS-Class Battle Ship patrolling around the Portal.
- Big Ship.jpg
An Assault Carrier near the Portal.


| Preceded by Crow's Nest |
Halo 3 Campaign Missions Tsavo Highway |
Succeeded by The Storm |
Related Links
External


