Valleys of Tears: Difference between revisions
From Halopedia, the Halo wiki
AlertFiend (talk | contribs) No edit summary |
m (Text replacement - "\|(right|thumb)(\|[^\]\n]+)?\|(right|thumb)" to "|thumb$2") |
||
| (7 intermediate revisions by 4 users not shown) | |||
| Line 1: | Line 1: | ||
{{ | {{Status|Canon}} | ||
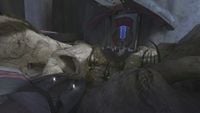
The '''Valleys of Tears'''<ref> | [[File:HTMCC-H2A Valley of Tears A.jpg|thumb|250px|Valley of Tears A.<ref name="anniversarygraphics">''[[Halo 2: Anniversary]]'', campaign level, [[Gravemind (level)|Gravemind]]</ref>]] | ||
The '''Valleys of Tears'''<ref>''[[Halo 2: The Official Game Guide]]'', p. 134</ref> were natural environment modules on the [[Covenant]] [[city|holy city]] ''[[High Charity]]''. They were located between the towers near the edge of the city's main dome, and accessible by [[gravity bridge]]s. Environmental modules known as [[Hanging Gardens]] were located nearby. Ponds in the valleys contained [[Covenant koi]].<ref name="gravemind">''Halo 2'', [[campaign]] level, [[Gravemind (level)|Gravemind]]</ref> | |||
During the first hours of the [[Great Schism]], | ==History== | ||
===Valley of Tears A=== | |||
During the first hours of the [[Great Schism]], the Sangheili-led Covenant took this exposed location, stationing [[Mgalekgolo]] in the center while posting [[Sangheili Honor Guardsman|Sangheili Honor Guardsmen]] and [[Special Operations Sangheili]] on the perimeter. Shortly afterward, the Jiralhanae-led Covenant sought to retake the Valley of Tears A, sending forth [[Jiralhanae]] and [[Kig-yar Sniper]]s. [[John-117]] killed them all during his pursuit of the Prophet of Truth.{{Ref/Reuse|gravemind}} | |||
===Valley of Tears B=== | |||
As with Valley A, it was the site of a battle between the Sangheili-led Covenant and the Jiralhanae-led Covenant during the opening stages of the Great Schism. The Sangheili invaded from the north, while the Jiralhanae invaded from the south. In the center, there was a tremendous fray, with Jiralhanae engaging Sangheili, [[Sangheili Ranger]]s, and black-armored [[Special Operations Unggoy]] armed with [[Pez'tk-pattern fuel rod gun|fuel rod guns]]. Keeping the Sangheili entryway to the valley secure were two [[Stealth Sangheili]] armed with [[Type-1 Energy Weapon/Sword|energy swords]] along with several Unggoy. During his pursuit of Truth, John-117 passed through the valley and eliminated the Covenant in the area.{{Ref/Reuse|gravemind}} | |||
== | ==Layout== | ||
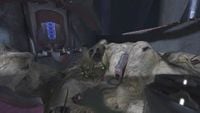
[[File:HTMCC-H2A Valley of Tears B.jpg|thumb|250px|Valley of Tears B.{{Ref/Reuse|anniversarygraphics}}]] | |||
===Valley of Tears A=== | ===Valley of Tears A=== | ||
Valley of Tears A was located between the [[High Council Chamber]] and the [[Mid Tower]]. | Valley of Tears A was located between the [[High Council Chamber]] and the [[Mid Tower]].{{Ref/Reuse|gravemind}} | ||
===Valley of Tears B=== | ===Valley of Tears B=== | ||
Valley of Tears B was located between the Mid Tower and the [[Far Tower]]. | Valley of Tears B was located between the Mid Tower and the [[Far Tower]].{{Ref/Reuse|gravemind}} | ||
==Gallery== | |||
<gallery> | |||
File:HTMCC-H2 Valley of Tears A.jpg|Valley of Tears A as seen in classic ''Halo 2''. | |||
File:HTMCC-H2 Valley of Tears B.jpg|Valley of Tears B as seen in classic ''Halo 2''. | |||
</gallery> | |||
==List of appearances== | ==List of appearances== | ||
| Line 20: | Line 29: | ||
==Sources== | ==Sources== | ||
{{Ref/Sources}} | |||
{{High Charity Locations}} | {{High Charity Locations}} | ||
Latest revision as of 12:54, April 12, 2023

The Valleys of Tears[2] were natural environment modules on the Covenant holy city High Charity. They were located between the towers near the edge of the city's main dome, and accessible by gravity bridges. Environmental modules known as Hanging Gardens were located nearby. Ponds in the valleys contained Covenant koi.[3]
History[edit]
Valley of Tears A[edit]
During the first hours of the Great Schism, the Sangheili-led Covenant took this exposed location, stationing Mgalekgolo in the center while posting Sangheili Honor Guardsmen and Special Operations Sangheili on the perimeter. Shortly afterward, the Jiralhanae-led Covenant sought to retake the Valley of Tears A, sending forth Jiralhanae and Kig-yar Snipers. John-117 killed them all during his pursuit of the Prophet of Truth.[3]
Valley of Tears B[edit]
As with Valley A, it was the site of a battle between the Sangheili-led Covenant and the Jiralhanae-led Covenant during the opening stages of the Great Schism. The Sangheili invaded from the north, while the Jiralhanae invaded from the south. In the center, there was a tremendous fray, with Jiralhanae engaging Sangheili, Sangheili Rangers, and black-armored Special Operations Unggoy armed with fuel rod guns. Keeping the Sangheili entryway to the valley secure were two Stealth Sangheili armed with energy swords along with several Unggoy. During his pursuit of Truth, John-117 passed through the valley and eliminated the Covenant in the area.[3]
Layout[edit]

Valley of Tears A[edit]
Valley of Tears A was located between the High Council Chamber and the Mid Tower.[3]
Valley of Tears B[edit]
Valley of Tears B was located between the Mid Tower and the Far Tower.[3]
Gallery[edit]
Valley of Tears A as seen in classic Halo 2.
Valley of Tears B as seen in classic Halo 2.


List of appearances[edit]
- Halo 2 (First appearance)
- Halo 2: Anniversary
Sources[edit]


