Command Spire
From Halopedia, the Halo wiki

The Command Spire is the Reformation Spire that directs the Reformation in conjunction with the Nexus, a facility directly below. The Command Spire transmits instructions to the other Reformation Spires, including the initialization sequence necessary to fully activate the Spire network, as well as the sequence needed to shutdown the network.
Design
The Command Spire is a more "evolved" version of a Reformation Spire.[1] Unlike the other Reformation Spires, the Command Spire is not directly accessible from the outside. Instead, one must first enter the Nexus through a door at the Spire's base, descend to the Nexus's central chamber, and then ride its gravity lift into the Spire above.[2] During the Reformation, instructions are relayed to the other Spires from the Command Spire's Observation Platform.[3]
Like the other Spires, the Command Spire manufactures raw materials needed to repair the Ring.[3]
History
During the Battle for Zeta Halo, the Banished and the Harbinger sought to utilize the Reformation to restore the Silent Auditorium, which had been destroyed when Cortana sacrificed herself to stop Atriox from gaining control of Zeta Halo. On May 28, 2560, the Harbinger kidnapped Despondent Pyre and extracted her encephalon. Using the Forerunner routines contained within Despondent Pyre's encephalon, the Harbinger constructed a protocol[4] which she used to summon dozens of Reformation Spires, including the Command Spire.[5] The Spires still required an initialization sequence to become fully activated,[6] so the Harbinger traveled to the Command Spire to personally initiate the Reformation.[1] However, because the protocol she'd used to summon the Spires wasn't entirely correct, the Spire network resisted her attempts to start the Reformation.[7]
At the same time, Master Chief John-117 and his AI companion, the Weapon, headed to the Reformation Spire nearest to the Conservatory, where they had first encountered the Harbinger. After defeating the Banished forces surrounding the Spire, the Chief entered the structure through its gravity lift. Once inside, he and the Weapon were greeted by Zeta Halo's Sub-Monitor, Adjutant Resolution, who led them to the Spire's Observation Platform. When the Chief learned about the Spire's purpose, the Spartan-II ordered the Weapon to shut it down. In response, Adjutant Resolution deemed the pair a threat to the Reformation and attacked them. After the Chief defeated Adjutant Resolution, the Weapon discovered that multiple Spires were being deployed. She also discovered that the Harbinger was attempting to activate the Spire network from a remote location, but that the Spires were resisting the latter's efforts because the protocol used to summon them was only partially correct. The Weapon managed to remove the Spire she and the Chief were standing on from the network, as well as trace the source of the activation attempts to the Command Spire, though she inadvertently revealed her presence to the Harbinger in the process.[8]
After the Spartan Killers Hyperius and Tovarus failed to kill the Master Chief, the Harbinger instructed Escharum to have his forces protect the Command Spire while the Reformation was underway. She also sought to learn more about the Spartan's ally.[9]
When the Chief and the Weapon arrived at the Command Spire, they discovered that the Harbinger had altered the Forerunner sequence needed to open the door at its base, making entry impossible. The sabotage forced the Chief and the Weapon to reconstruct a pure version of the sequence by gathering data from a network of nearby Forerunner communication beacons. During this time, the Harbinger spied on the Weapon and determined that she could utilize the UNSC AI's routines in conjunction with those from Despondent Pyre's encephalon to break through the Spire network's resistance.[1]
After reconstructing the Forerunner sequence and opening the door, the Weapon determined that in order to get into the Command Spire itself, they would first have to descend into the Nexus below and access its gravity lift. The Chief fought his way to the Nexus's central chamber and restored power to the lift. When the Weapon tried to activate the lift, the Harbinger sprung a trap and hacked the Weapon, intent on using her to start the Reformation. The Weapon, in turn, used her link to the Harbinger to try to steal Despondent Pyre's encephalon. Despite the Master Chief's attempt to delete the Weapon - an effort which the Weapon herself stopped - both the Harbinger and the Weapon succeeded in their respective goals. The Weapon reactivated the Nexus's gravity lift and the Chief rode it into the Command Spire.[2]
Within the Command Spire, the Master Chief witnessed the Reformation at work as the facility's machinery produced building blocks from pure energy. He battled numerous Banished troops, Skimmers, and Aggressor Sentinels as he made his way to the top, before eventually reaching the elevator that would take him to the Observation Platform. There, he encountered Adjutant Resolution who had survived their initial confrontation. The Sub-Monitor, now equipped with an improved battle chassis, tried to stop the Spartan, but the Chief defeated him again. He then took the elevator to the Observation Platform, where he fought and defeated a trio of Banished Phantoms. The Chief then deployed the Weapon, who used Despondent Pyre's encephalon to shut down all the Spires and end the Reformation.[3]
With the Spire network deactivated, the Chief contacted Fernando Esparza and requested pickup. The Weapon, who was still angry with the Chief for his earlier attempt to delete her, refused to go with him, opting to stay behind in the Command Spire instead. However, as Echo 216 approached the Observation Platform, Sangheili Blademaster Jega 'Rdomnai appeared inside the Pelican's cockpit and hijacked the dropship. Unable to stop Jega from kidnapping Esparza, the Master Chief ordered the Weapon to track the dropship and open a portal that would get them as close as possible to wherever Jega was heading. Despite the risks, the Weapon opened a portal, which teleported them to the Repository.[3]
Gallery
Concept art
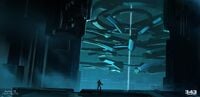
Concept art of the Command Spire.

Concept art of a building block being forged within the Command Spire.


Screenshots
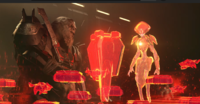
Escharum and the Harbinger prepare to defend the Command Spire.
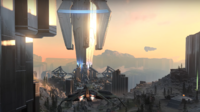
A Wasp approaches the Command Spire.
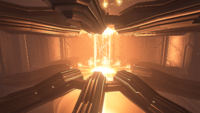
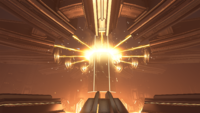
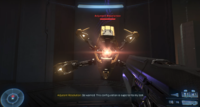
The Command Spire's Reformation machinery active.
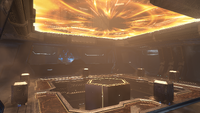
Material passing through the active Reformation machinery in the Command Spire.
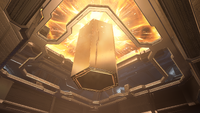
A finished building block produced inside the Command Spire.
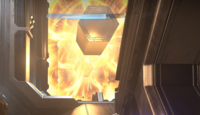
A building block being transported through the Command Spire.
More building blocks being transported through the Command Spire.
Adjutant Resolution returns and confronts the Chief inside the Command Spire.
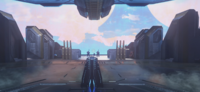
The Command Spire's observation platform.

The Command Spire after it was deactivated.


List of appearances
- Halo Infinite (First appearance)
Sources
- ^ a b c Halo Infinite, campaign mission Reformation (Halo Infinite): The Sequence
- ^ a b Halo Infinite, campaign mission Reformation (Halo Infinite): Nexus
- ^ a b c d Halo Infinite, campaign mission Reformation (Halo Infinite): The Command Spire
- ^ Halo Infinite, campaign mission Connections: Spire (Halo Infinite level): "This structure has been activated using a protocol that's far older than anything I've ever seen." - The Weapon
- ^ Halo Infinite, campaign mission Connections: Conservatory
- ^ Halo Infinite, campaign mission Connections: Spire (Halo Infinite level): "Soon the sequence will be sent and the Reformation can begin." - Adjutant Resolution
- ^ Halo Infinite, campaign mission Connections: Spire (Halo Infinite level): "The protocol that triggered all this wasn't exactly correct. It worked... well, it started the process." - The Weapon
- ^ Halo Infinite, campaign mission Connections: Spire (Halo Infinite level)
- ^ Halo Infinite, campaign mission Graveyards: Pelican Down (Halo Infinite level)


