Chasm Ten: Difference between revisions
From Halopedia, the Halo wiki
m (Poor quality edit: use of unprofessional vernacular for a wiki, absence of links, and improper formatting. Also, strategy sections are something we're in the process of doing away with due to their inherent subjectiveness instead of basis in fact.) Tag: Manual revert |
|||
| (23 intermediate revisions by 13 users not shown) | |||
| Line 1: | Line 1: | ||
{{ | {{Status|Gameplay}} | ||
{{Multiplayer map infobox | |||
|pagelabel=Firefight map | |||
{{Multiplayer | |pagegamelabel=ODST | ||
|image = [[File:A ChasmTen.jpg|300px]] | |image = [[File:A ChasmTen.jpg|300px]] | ||
|name = Chasm Ten | |name = Chasm Ten | ||
|game = ''[[Halo 3: ODST]]'' | |game = ''[[Halo 3: ODST]]'' | ||
|devname=<code>l200</code> | |||
|location = [[New Mombasa Data Center|Data Center]], under [[New Mombasa]], [[Earth]] | |location = [[New Mombasa Data Center|Data Center]], under [[New Mombasa]], [[Earth]] | ||
|terrain = Cavern, walkways | |terrain = Cavern, walkways | ||
|weapons = *[[M41 Surface-to-Surface Rocket Medium Anti-Vehicle/Assault Weapon|Rocket Launcher]] | |weapons = *[[M41 Surface-to-Surface Rocket Medium Anti-Vehicle/Assault Weapon|Rocket Launcher]] | ||
*[[Sniper Rifle System 99D-S2 Anti-Matériel|Sniper Rifle]] | *[[Sniper Rifle System 99D-S2 Anti-Matériel|Sniper Rifle]] | ||
| Line 18: | Line 18: | ||
|equipment = | |equipment = | ||
|power-ups = | |power-ups = | ||
|gametypes = [[Firefight]] | |gametypes = [[Firefight (Halo 3: ODST)|Firefight]] | ||
|playernumber = 1-4 Players | |playernumber = 1-4 Players | ||
}} | }} | ||
{{Article quote|Fight in the infested underground.}} | |||
'''Chasm Ten''' is a [[Firefight]] map in ''[[Halo 3: ODST]]''. Based off the [[Campaign]] level [[Data Hive]], it is set inside the [[Superintendent]]'s underground data facility. | '''Chasm Ten''' is a [[Firefight (Halo 3: ODST)|Firefight]] map in ''[[Halo 3: ODST]]''. Based off the [[Campaign]] level [[Data Hive]], it is set inside the [[Superintendent]]'s underground data facility. | ||
== Overview == | == Overview == | ||
Chasm Ten is a remarkably large map, consisting of two opposing walls, divided by a deep chasm, and connected by a number of bridges. The side on which players spawn starts out with a number of machine gun [[turret]]s, as well as | Chasm Ten is a remarkably large map, consisting of two opposing walls, divided by a deep chasm, and connected by a number of bridges. The side on which players spawn starts out with a number of machine gun [[AIE-486H machine gun|turret]]s, as well as an [[M41 SPNKR]] and [[SRS99-AM sniper rifle]]s located in some tunnels. The map layout also boasts an additional upper level, which can be accessed by air-vents. The upper level also contains machine gun turrets on the player side. Players can expect to be attacked from the front, as well as from the sides. The map especially is a strategy map. Do you want to be downstairs where weapons lie in safety, and you have better defense? Or upstairs where you gain a greater view, and grenades won't be raining down from above? | ||
In spite of this not technically being a 'night' map, [[Visual Intelligence System, Reconnaissance|VISR]] mode can be of great use to players trying to spot enemies in the distance, as well as weapons and ammo. | |||
==Weapons== | ==Weapons== | ||
The side the players start on has all of the weapons | The side the players start on has all of the weapons on the map. [[rocket launcher]]s are found downstairs in a dispenser on the wall. Extra ammunition for rocket launchers are found directly across the map (across the bridge). [[Sniper rifle]]s can be found upstairs on both sides of the map, resting against the wall. Sniper Rifle ammunition can be found, again, across the map (look for them near the monster closets on the side wall). [[Machine gun turret]]s can be found both upstairs and downstairs. The two turrets downstairs are slightly exposed on their sides. The ones upstairs are in perfect view of any enemy who comes up via the two [[gravity lifts]]. They, however, lack protection and are vulnerable to grenades. The spare weapons, grenades and [[health packs]] downstairs are found inside the base, allowing the player to grab them without resistance. The weapons, grenades and health packs upstairs, however, are on the outside where awaiting enemies are, possibly making it difficult for the player to gain access to these items. | ||
==Achievements== | ==Achievements== | ||
Chasm Ten is unlocked by completing the [[Data Hive]] mission. | Chasm Ten is unlocked by completing the [[Data Hive]] mission. The '[[Firefight: Chasm Ten (achievement)|Chasm Ten]]' achievement can also be unlocked on this map if players manage to score over 200 000 points during a [[Firefight (Halo 3: ODST)|Firefight]] match. | ||
==Gallery== | ==Gallery== | ||
{{Linkbox|gallery=yes}} | |||
<gallery widths="150" orientation="landscape"> | <gallery widths="150" orientation="landscape"> | ||
File:HMCC_H3ODST_ChasmTen_Map.jpg|Chasm Ten map. | |||
File:Chasm Ten.png|A bird's eye view of Chasm Ten. | File:Chasm Ten.png|A bird's eye view of Chasm Ten. | ||
File:ChasmTen Weapons.png|Weapon and Ammo Locations. | File:ChasmTen Weapons.png|Weapon and Ammo Locations. | ||
</gallery> | </gallery> | ||
{{Levels}} | {{Levels|ODST|mode=yes}} | ||
Latest revision as of 00:44, September 15, 2023
| Chasm Ten | |
|---|---|

| |
| Map overview | |
|
Game: |
|
|
Map file name (?): |
|
| Lore information | |
|
Location: |
Data Center, under New Mombasa, Earth |
| Gameplay overview | |
|
Terrain: |
Cavern, walkways |
|
Recommended number of players: |
1-4 Players |
|
Recommended gametype(s): |
|
| “ | Fight in the infested underground. | ” |
Chasm Ten is a Firefight map in Halo 3: ODST. Based off the Campaign level Data Hive, it is set inside the Superintendent's underground data facility.
Overview[edit]
Chasm Ten is a remarkably large map, consisting of two opposing walls, divided by a deep chasm, and connected by a number of bridges. The side on which players spawn starts out with a number of machine gun turrets, as well as an M41 SPNKR and SRS99-AM sniper rifles located in some tunnels. The map layout also boasts an additional upper level, which can be accessed by air-vents. The upper level also contains machine gun turrets on the player side. Players can expect to be attacked from the front, as well as from the sides. The map especially is a strategy map. Do you want to be downstairs where weapons lie in safety, and you have better defense? Or upstairs where you gain a greater view, and grenades won't be raining down from above?
In spite of this not technically being a 'night' map, VISR mode can be of great use to players trying to spot enemies in the distance, as well as weapons and ammo.
Weapons[edit]
The side the players start on has all of the weapons on the map. rocket launchers are found downstairs in a dispenser on the wall. Extra ammunition for rocket launchers are found directly across the map (across the bridge). Sniper rifles can be found upstairs on both sides of the map, resting against the wall. Sniper Rifle ammunition can be found, again, across the map (look for them near the monster closets on the side wall). Machine gun turrets can be found both upstairs and downstairs. The two turrets downstairs are slightly exposed on their sides. The ones upstairs are in perfect view of any enemy who comes up via the two gravity lifts. They, however, lack protection and are vulnerable to grenades. The spare weapons, grenades and health packs downstairs are found inside the base, allowing the player to grab them without resistance. The weapons, grenades and health packs upstairs, however, are on the outside where awaiting enemies are, possibly making it difficult for the player to gain access to these items.
Achievements[edit]
Chasm Ten is unlocked by completing the Data Hive mission. The 'Chasm Ten' achievement can also be unlocked on this map if players manage to score over 200 000 points during a Firefight match.
Gallery[edit]

|
Browse more images in this article's gallery page. |
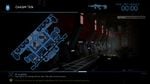
Chasm Ten map.
A bird's eye view of Chasm Ten.
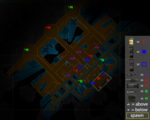
Weapon and Ammo Locations.


| |||||||||||||||||


