Assault on the Control Room (conflict): Difference between revisions
From Halopedia, the Halo wiki
m (Text replacement - "<ref name="([^"=>]+)" ?\/>" to "{{Ref/Reuse|$1}}") |
SpartanLeet (talk | contribs) No edit summary |
||
| (8 intermediate revisions by 4 users not shown) | |||
| Line 1: | Line 1: | ||
{{ | {{Status|Canon}} | ||
{{Battle infobox | {{Battle infobox | ||
|prev=[[Battle of the Silent Cartographer]] | |prev=[[Battle of the Silent Cartographer]] | ||
| Line 6: | Line 6: | ||
*[[Battle of Alpha Base]] | *[[Battle of Alpha Base]] | ||
|name=Assault on the Control Room | |name=Assault on the Control Room | ||
|image=[[File: | |image=[[File:ScorpionControlRoom.png|300px]] | ||
|conflict=[[Human-Covenant | |conflict=[[Human-Covenant War]] | ||
|date=September 20, [[2552]]<ref name="raven">[https://www.halowaypoint.com/en-us/news/thats-so-raven ''Halo Waypopint'': Canon Fodder - That's So Raven]</ref><ref name="ConflictTimeline">[https://www.halowaypoint.com/en-us/universe/timeline/the-halo-conflict ''Halo Waypoint: The Halo Confict - Timeline''] ([[Archive:Halo Waypoint/2014 to 2020/Universe/Timeline/The Halo Conflict|Archive]])</ref><ref name="conflict">''[[The Halo Conflict]]''</ref> | |date=September 20, [[2552]]<ref name="raven">[https://www.halowaypoint.com/en-us/news/thats-so-raven ''Halo Waypopint'': Canon Fodder - That's So Raven]</ref><ref name="ConflictTimeline">[https://www.halowaypoint.com/en-us/universe/timeline/the-halo-conflict ''Halo Waypoint: The Halo Confict - Timeline''] ([[Archive:Halo Waypoint/2014 to 2020/Universe/Timeline/The Halo Conflict|Archive]])</ref><ref name="conflict">''[[The Halo Conflict]]''</ref> | ||
|place=[[Installation 04]], around the [[Control Room (Installation 04)|Control Room]] | |place=[[Installation 04]], around the [[Control Room (Installation 04)|Control Room]] | ||
| Line 17: | Line 17: | ||
*[[Cortana]] | *[[Cortana]] | ||
|commanders2=*[[Sangheili Zealot|Zealot]] [[Field Master]]s | |commanders2=*[[Sangheili Zealot|Zealot]] [[Field Master]]s | ||
|forces1=*Pelicans | |forces1=*[[D77-TC Pelican|Pelicans]] | ||
*[[ | *1 [[M12 Chaingun Warthog]] | ||
* | *[[030569|1]] [[M808B Scorpion]] | ||
*[[UNSC Marine Corps|Marine]] squads | |||
* | **[[Fireteam Zulu]] | ||
*1 [[SPARTAN-II Program| | *1 [[SPARTAN-II Program|Spartan-II]] | ||
* | |forces2=*{{Pattern|Dextro Xur|Spirit}}s | ||
| | *{{Pattern|Karo'etba|Ghost}}s | ||
*{{Pattern|Is'belox|Banshee}}s | |||
*{{Pattern|Zurdo|Wraith}}s | |||
*[[Sangheili]] | *[[Sangheili]] | ||
*[[Kig-Yar]] | *[[Kig-Yar]] | ||
*[[Mgalekgolo]] | *[[Mgalekgolo]] | ||
*[[ | *[[Unggoy]] | ||
|casual1= *1 Pelican | |casual1= *1 Pelican | ||
*Multiple Marine squads | *Multiple Marine squads | ||
|casual2= *Most | |casual2= *Most forces}} | ||
<center>''This article is about the battle in 2552. For the Halo: Combat Evolved campaign level, see [[Assault on the Control Room|here]]''</center> | <center>''This article is about the battle in 2552. For the Halo: Combat Evolved campaign level, see [[Assault on the Control Room|here]].''</center> | ||
The '''Assault on the Control Room''' was an engagement within the [[Battle of Installation 04]] | The '''Assault on the Control Room''' was an engagement within the [[Battle of Installation 04|Battle of]] [[Installation 04]] in which [[John-117]] fought his way through heavy [[Covenant]] opposition in order to reach the installation's [[Control Room (Installation 04)|control room]], assisting several surviving [[UNSC Marine Corps|Marine]] [[squad]]s in the process. | ||
==Prelude== | ==Prelude== | ||
Following the [[Raid on the Truth and Reconciliation|Raid on the ''Truth and | Following the [[Raid on the Truth and Reconciliation|Raid on the ''Truth and Reconciliation'']] the previous day, UNSC forces had learned that "[[Installation 04|Halo]]" was a weapon, and the [[Covenant]] intended to control it. The UNSC launched an effort to find the megastructure's control room, intending to use it themselves against the Covenant, led by Spartan [[John-117]]. On September 20, 2552, [[D77-TC Pelican|Pelicans]] ''[[Echo 419]]'' and ''[[Bravo 022]]'' deployed a squad of [[UNSC Marine Corps|Marines]] along with the Spartan onto an island containing the ring's map room, referred to by the Covenant as the "Silent Cartographer". A [[Battle of the Silent Cartographer|pitched battle]] ensued, with John ultimately reaching the map room and determining the control room's location. The map indicated the control room would be accessible through the ring's honeycomb network of underground tunnels, prompting ''Echo 419'' to pick up the Spartan and proceed to make their way through the tunnels to the region in which the control room was located.{{Ref/Level|CE|[[The Silent Cartographer]]}}{{Ref/Novel|Id=tf5|TF|Chapter=5}} | ||
==The battle== | ==The battle== | ||
''Echo 419'' inserted the Master Chief | [[File:AotCRIntroCEA.png|thumb|left|250px|''Echo 419'' preparing to deploy John-117.]] | ||
''Echo 419'' inserted the Master Chief on an underground platform, as close to Halo's control room as it could get. The Spartan disembarked there, catching several Covenant troops off-guard before fighting his way through several rooms full of more enemy troops, soon exiting out of a door onto a large bridge crossing over a canyon. At that moment, a Pelican dropship flew overhead, and John picked up an SOS from [[Fireteam Zulu]], one of the units operating out of [[Alpha Base (Installation 04)|Alpha Base]]. John quickly took control of a nearby {{Pattern|Mamua'uda|Shade}} and used it to clear out all of the nearby Covenant forces before fighting his way to the other side, killing an [[Energy sword (fiction)|energy-sword]]-wielding [[Sangheili]] [[Sangheili Zealot|Zealot]] near the opposite door. Fighting through several more rooms and descending on a lift, he eventually made it into the snowy valley where the surviving members of Fireteam Zulu were under heavy assault from Covenant troops including multiple Shade turrets, {{Pattern|Karo'etba|Ghost}}s and a {{Pattern|Zurdo|Wraith}}. John reached the surviving Marines and helped them repel their attackers{{Ref/Novel|Id=TF6|TF|Chapter=6}} | |||
[[File:HCEA ZuluVsCovies.png|thumb|250px|Fireteam Zulu engaging Covenant forces.]] | |||
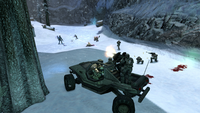
With the valley secure, John and the remnants of Fireteam Zulu pushed into the next valley, assisting another fireteam of Marines against Covenant forces near a crashed Pelican. With evacuation not possible at the time, the surviving Marines joined John on his push towards the control room. Mounting up in the nearby [[M808B Scorpion]], [[030569]], John and the Marines advanced, engaging a Covenant armored force and then entered a network of underground tunnels and chasms, fighting through fortified Covenant positions before re-emerging in another canyon. Although most of the Marine squads and fireteams around the control room had been wiped out, John-117 discovered another surviving squad under attack by [[Mgalekgolo]]. John quickly assisted the Marines against the Hunters as well as a {{Pattern|Dextro Xur|Spirit}} dropship's troops. The UNSC forces attacked another Covenant position, the Marines moving up once John took care of the enemy Shades, clearing a [[landing zone]]. With evac finally available, the surviving Marines held their position, leaving the Spartan and Cortana to proceed alone{{Ref/Level|Id=AOTCR|CE|[[Assault on the Control Room]]}}{{Ref/Reuse|TF6}} | |||
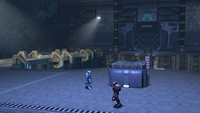
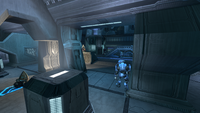
[[File:HCEA ChiefAndCortana.png|thumb|left|250px|John-117 and Cortana inside the control room.]] | |||
The Master Chief continued to fight his way towards the control room, moving through numerous rooms and passageways and across several outdoor bridges while battling heavy opposition from Covenant troops. He eventually reached the control room, the exterior of which had been heavily fortified by the Covenant. John was forced to fight his way up the numerous ramps leading to the entrance, engaging dozens of hostiles as he went until he reached the top. The entrance was guarded by a Sangheili Zealot and his troops but they were all taken out in moments by John's usage of a commandeered Shade. With all Covenant troops in the vicinity neutralized, John moved into the control room. He inserted Cortana into the control room's [[The Core|Core]], where the AI proceeded to absorb vast amounts of data from Halo's systems, and she quickly deduced that the "weapons cache" that [[Captain]] [[Jacob Keyes|Keyes]] was searching for was in fact a [[Flood]] [[Flood containment facility|containment facility]]. Realising the peril the Captain was in, Cortana ordered John to stop Keyes from investigating the facility. He quickly headed back for Echo 419, leaving Cortana in the mainframe.{{Ref/Reuse|TF6}}{{Ref/Reuse|AOTCR}} | |||
==Aftermath== | |||
Following John-117's departure, the Covenant would proceed to send a large force to re-take the control room, fortifying it heavily. They would later come into conflict with [[Aggressor Sentinel|Sentinel]]s and the [[Flood]].{{Ref/Level|Id=tb|CE|[[Two Betrayals]]}} John-117 would proceed with ''Echo 419'' to the Flood containment facility, and would eventually discover the [[Outbreak at the Containment Facility|outbreak]] of the parasite there.{{Ref/Level|CE|[[343 Guilty Spark (level)|343 Guilty Spark]]}} He would later return to the control room with the installation's [[monitor]], [[343 Guilty Spark]], intending to activate the ring in order to stop the Flood before being stopped by Cortana who told the Spartan about the true purpose of Halo as a last-ditch attempt to stop the Flood by wiping out all sentient life in the galaxy.{{Ref/Reuse|tb}}{{Ref/Novel|Id=TF9|TF|Chapter=9}} | |||
During her time in the control room, Cortana would absorb enormous amounts of information about the [[Halo Array]] and the [[Forerunner]]s as well as the [[Flood]]. The sheer amount of data cut into the AI's processing systems, slowing her down and causing her to display uncharacteristic behavior which became a significant factor while on board the ''[[Ascendant Justice]]'' following the destruction of Installation 04.{{Ref/Novel|FS}} John noticed Cortana's behavioral changes shortly after reuniting with her after his return to the control room.{{Ref/Novel|Id=TF10|TF|Chapter=10}} | |||
==Gallery== | |||
<gallery> | |||
File:HCEA PelicanUnderFire.png|Fireteam Zulu's Pelican under attack by a Banshee. | |||
File:HCEA ChiefAndZulu.png|John-117 assisting Marines in combat against Covenant ground troops. | |||
File:HCEA PatrollingCovies.png|Covenant forces patrolling in an underground tunnel. | |||
File:HCEA SpiritDeployingTroops.png|A Spirit deploying Covenant troops. | |||
File:HCEA ZuluVsHunters.png|Several Marines engaging Mgalekgolo. | |||
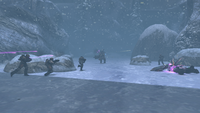
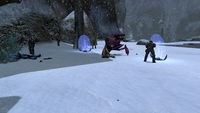
File:HCEA SnowBattle.png|Marines fighting to secure a landing zone for extraction. | |||
File:HCEA ZuluAwaitingExtraction.png|The surviving Marines awaiting extraction. | |||
File:HCEA SleepyCovies.png|Covenant troops inside a room near the control room. | |||
File:HCEA CoviesOnBridge.png|Covenant troops patrolling a pair of outdoor bridges. | |||
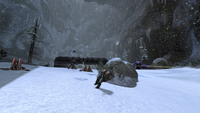
File:HCEA HuntersKilledMarines.png|A Mgalekgolo pair near several dead Marines. | |||
File:HCEA ShadeMowdown.png|John-117 using a Shade to eliminate Covenant troops guarding the control room's entrance. | |||
</gallery> | |||
==List of appearances== | ==List of appearances== | ||
Latest revision as of 07:08, March 8, 2024
|
Previous: |
|||||||||||||||||||
|
Concurrent: |
|||||||||||||||||||
|
Next: |
|||||||||||||||||||
| Assault on the Control Room | |||||||||||||||||||
|---|---|---|---|---|---|---|---|---|---|---|---|---|---|---|---|---|---|---|---|

| |||||||||||||||||||
|
Conflict: |
|||||||||||||||||||
|
Date: |
|||||||||||||||||||
|
Location: |
Installation 04, around the Control Room | ||||||||||||||||||
|
Outcome: |
UNSC victory
| ||||||||||||||||||
| |||||||||||||||||||
The Assault on the Control Room was an engagement within the Battle of Installation 04 in which John-117 fought his way through heavy Covenant opposition in order to reach the installation's control room, assisting several surviving Marine squads in the process.
Prelude[edit]
Following the Raid on the Truth and Reconciliation the previous day, UNSC forces had learned that "Halo" was a weapon, and the Covenant intended to control it. The UNSC launched an effort to find the megastructure's control room, intending to use it themselves against the Covenant, led by Spartan John-117. On September 20, 2552, Pelicans Echo 419 and Bravo 022 deployed a squad of Marines along with the Spartan onto an island containing the ring's map room, referred to by the Covenant as the "Silent Cartographer". A pitched battle ensued, with John ultimately reaching the map room and determining the control room's location. The map indicated the control room would be accessible through the ring's honeycomb network of underground tunnels, prompting Echo 419 to pick up the Spartan and proceed to make their way through the tunnels to the region in which the control room was located.[4][5]
The battle[edit]

Echo 419 inserted the Master Chief on an underground platform, as close to Halo's control room as it could get. The Spartan disembarked there, catching several Covenant troops off-guard before fighting his way through several rooms full of more enemy troops, soon exiting out of a door onto a large bridge crossing over a canyon. At that moment, a Pelican dropship flew overhead, and John picked up an SOS from Fireteam Zulu, one of the units operating out of Alpha Base. John quickly took control of a nearby Mamua'uda-pattern Shade and used it to clear out all of the nearby Covenant forces before fighting his way to the other side, killing an energy-sword-wielding Sangheili Zealot near the opposite door. Fighting through several more rooms and descending on a lift, he eventually made it into the snowy valley where the surviving members of Fireteam Zulu were under heavy assault from Covenant troops including multiple Shade turrets, Karo'etba-pattern Ghosts and a Zurdo-pattern Wraith. John reached the surviving Marines and helped them repel their attackers[6]

With the valley secure, John and the remnants of Fireteam Zulu pushed into the next valley, assisting another fireteam of Marines against Covenant forces near a crashed Pelican. With evacuation not possible at the time, the surviving Marines joined John on his push towards the control room. Mounting up in the nearby M808B Scorpion, 030569, John and the Marines advanced, engaging a Covenant armored force and then entered a network of underground tunnels and chasms, fighting through fortified Covenant positions before re-emerging in another canyon. Although most of the Marine squads and fireteams around the control room had been wiped out, John-117 discovered another surviving squad under attack by Mgalekgolo. John quickly assisted the Marines against the Hunters as well as a Dextro Xur-pattern Spirit dropship's troops. The UNSC forces attacked another Covenant position, the Marines moving up once John took care of the enemy Shades, clearing a landing zone. With evac finally available, the surviving Marines held their position, leaving the Spartan and Cortana to proceed alone[7][6]

The Master Chief continued to fight his way towards the control room, moving through numerous rooms and passageways and across several outdoor bridges while battling heavy opposition from Covenant troops. He eventually reached the control room, the exterior of which had been heavily fortified by the Covenant. John was forced to fight his way up the numerous ramps leading to the entrance, engaging dozens of hostiles as he went until he reached the top. The entrance was guarded by a Sangheili Zealot and his troops but they were all taken out in moments by John's usage of a commandeered Shade. With all Covenant troops in the vicinity neutralized, John moved into the control room. He inserted Cortana into the control room's Core, where the AI proceeded to absorb vast amounts of data from Halo's systems, and she quickly deduced that the "weapons cache" that Captain Keyes was searching for was in fact a Flood containment facility. Realising the peril the Captain was in, Cortana ordered John to stop Keyes from investigating the facility. He quickly headed back for Echo 419, leaving Cortana in the mainframe.[6][7]
Aftermath[edit]
Following John-117's departure, the Covenant would proceed to send a large force to re-take the control room, fortifying it heavily. They would later come into conflict with Sentinels and the Flood.[8] John-117 would proceed with Echo 419 to the Flood containment facility, and would eventually discover the outbreak of the parasite there.[9] He would later return to the control room with the installation's monitor, 343 Guilty Spark, intending to activate the ring in order to stop the Flood before being stopped by Cortana who told the Spartan about the true purpose of Halo as a last-ditch attempt to stop the Flood by wiping out all sentient life in the galaxy.[8][10]
During her time in the control room, Cortana would absorb enormous amounts of information about the Halo Array and the Forerunners as well as the Flood. The sheer amount of data cut into the AI's processing systems, slowing her down and causing her to display uncharacteristic behavior which became a significant factor while on board the Ascendant Justice following the destruction of Installation 04.[11] John noticed Cortana's behavioral changes shortly after reuniting with her after his return to the control room.[12]
Gallery[edit]
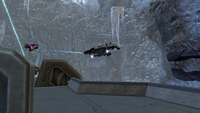
Fireteam Zulu's Pelican under attack by a Banshee.
John-117 assisting Marines in combat against Covenant ground troops.
Covenant forces patrolling in an underground tunnel.

A Spirit deploying Covenant troops.
Several Marines engaging Mgalekgolo.
Marines fighting to secure a landing zone for extraction.
The surviving Marines awaiting extraction.
Covenant troops inside a room near the control room.
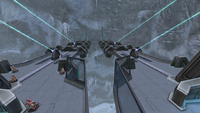
Covenant troops patrolling a pair of outdoor bridges.
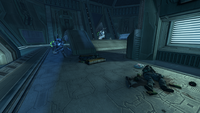
A Mgalekgolo pair near several dead Marines.
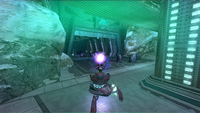
John-117 using a Shade to eliminate Covenant troops guarding the control room's entrance.


List of appearances[edit]
- Halo: Combat Evolved (First appearance)
- Halo: The Flood
- Halo: Combat Evolved Anniversary
Sources[edit]
- ^ Halo Waypopint: Canon Fodder - That's So Raven
- ^ Halo Waypoint: The Halo Confict - Timeline (Archive)
- ^ The Halo Conflict
- ^ Halo: Combat Evolved, campaign level The Silent Cartographer
- ^ Halo: The Flood, chapter 5
- ^ a b c Halo: The Flood, chapter 6
- ^ a b Halo: Combat Evolved, campaign level Assault on the Control Room
- ^ a b Halo: Combat Evolved, campaign level Two Betrayals
- ^ Halo: Combat Evolved, campaign level 343 Guilty Spark
- ^ Halo: The Flood, chapter 9
- ^ Halo: First Strike
- ^ Halo: The Flood, chapter 10
| ||||||||||||||


