Alpha Site: Difference between revisions
From Halopedia, the Halo wiki
NightHammer (talk | contribs) m (→Sources) |
m (Text replacement - "\| *hide[abcd] *= *[^\n]*\n" to "") |
||
| (28 intermediate revisions by 12 users not shown) | |||
| Line 1: | Line 1: | ||
{{ | {{Status|Gameplay}} | ||
{{Disambig header|the Firefight map|other uses|Alpha Site (disambiguation)}} | {{Disambig header|the Firefight map|other uses|Alpha Site (disambiguation)}} | ||
{{Multiplayer | {{Multiplayer map infobox | ||
|pagegamelabel=ODST | |||
|pagelabel=Firefight map | |||
|name=Alpha Site | |name=Alpha Site | ||
|image=[[File:ODST Firefight AlphaSite03.jpg|300px]] | |image=[[File:ODST Firefight AlphaSite03.jpg|300px]] | ||
|game=''[[Halo 3: ODST]]'' | |game=''[[Halo 3: ODST]]'' | ||
|location=[[ONI Alpha Site|ONI Alpha Base]], [[New Mombasa]] [[New Mombasa Sector 10|Sector 10]] | |devname=<code>sc130</code> | ||
|location=[[ONI Alpha Site (location)|ONI Alpha Base]], [[New Mombasa]] [[New Mombasa Sector 10|Sector 10]] | |||
|terrain=UNSC building, Interior, Metal | |terrain=UNSC building, Interior, Metal | ||
|weapons=*[[M90 Close Assault Weapon System|Shotgun]] | |weapons=*[[M90 Close Assault Weapon System|Shotgun]] | ||
| Line 16: | Line 19: | ||
|equipment= none | |equipment= none | ||
|power-ups= none | |power-ups= none | ||
|gametypes=[[Firefight]] | |gametypes=[[Firefight (Halo 3: ODST)|Firefight]] | ||
|playernumber=1-4 Players | |playernumber=1-4 Players | ||
}} | }} | ||
{{Article | {{Article quote|Fight in the close-quarters ONI interior.}} | ||
'''Alpha Site''' is a map for the [[Firefight]] game type in ''[[Halo 3: ODST]]''. It is unlocked by completing the [[ | '''Alpha Site''' is a map for the [[Firefight (Halo 3: ODST)|Firefight]] game type in ''[[Halo 3: ODST]]''. It is unlocked by completing the [[ONI Alpha Site]] level in [[Campaign]]. | ||
==Layout== | ==Layout== | ||
Alpha Site's general layout is a baseball-diamond shaped battle area, with players spawning on one side (the inner complex) and enemies dropping from Phantoms on the other (outer complex). There is a [[Sniper rifle|Sniper Rifle]] that spawns on this level, as well as a [[Shotgun]]. | Alpha Site's general layout is a baseball-diamond shaped battle area, with players spawning on one side (the inner complex) and enemies dropping from Phantoms on the other (outer complex). There is a [[Sniper rifle|Sniper Rifle]] that spawns on this level, as well as a [[Shotgun]]. The map was revealed first in the 7/31/09 Bungie Weekly Update.{{Ref/Site|URL=http://halo.bungie.net/News/content.aspx?type=topnews&link=BWU073109|Site=Bungie.net|D=31|M=07|Y=2009}} It takes place in the interior of the [[ONI Alpha Site (location)|ONI Alpha Base]]. | ||
The map was revealed first in the 7/31/09 Bungie Weekly Update. | |||
==Tips== | ==Tips== | ||
*There is a good tactic on this map to survive for a very long time, even on more challenging difficulties. The players have to enter the elevator and stay at the corners of the elevator. When [[Jiralhanae|Brutes]] show up, they will try to melee the ODSTs through the glass, but they will not damage the players. However, with a well-aimed melee, the player can hit the enemy through the glass via aiming at the weapon of the Brute. Also, while an enemy is hitting against the glass, another player can simply go behind the target and assassinate him (An excellent tactic for [[Jiralhanae Chieftain|Brute Chieftains]] armed with [[ | ===Standard Firefight=== | ||
*There is a good tactic on this map to survive for a very long time, even on more challenging difficulties. The players have to enter the elevator and stay at the corners of the elevator. When [[Jiralhanae|Brutes]] show up, they will try to melee the ODSTs through the glass, but they will not damage the players. However, with a well-aimed melee, the player can hit the enemy through the glass via aiming at the weapon of the Brute. Also, while an enemy is hitting against the glass, another player can simply go behind the target and assassinate him (An excellent tactic for [[Jiralhanae Chieftain|Brute Chieftains]] armed with [[Gravity hammer (fiction)|Gravity Hammers]]). | |||
*If playing cooperatively, the above strategy is especially effective. If an enemy enters the elevator, the player who is not being targeted by the enemy can quickly assassinate the intruder. | *If playing cooperatively, the above strategy is especially effective. If an enemy enters the elevator, the player who is not being targeted by the enemy can quickly assassinate the intruder. | ||
*A simple | *A simple strategy is to use the side of the map that enemies do not spawn at as your "turf" as it has two of the power weapons, tons of normal ammo, and excellent cover and field of fire, as well as no attacks from behind to worry about. However, be careful as enemies can still throw grenades at you while being harder to read - this can be especially important when Catch is on. | ||
*The sniper rifle is very effective on this map to use in the above strategy. | *The sniper rifle is very effective on this map to use in the above strategy, though you may need to push to the enemy dropoff points for more ammo. | ||
*Weapons placed in the elevator do not | *Alternatively, highly aggressive play can be even more effective as enemies come in predictable spawns and will not be reinforced by map hazards. Some well timed Plasma Grenades or Firebombs plus a liberal barrage of power weapons can end an incoming wave in seconds while racking up high multikills for points. The Phantom turret gunners can be dangerous though, so either kill them before closing in or quickly leave after the initial damage is done. | ||
*On Legendary, it is advised to be hold near the pillars ahead of the elevator as they provide decent cover while giving a quick fallback route if there is too much pressure. Grenades can be highly effective on enemies funneled into the close half of the map. | |||
*Weapons placed in the elevator do not despawn between sets/waves/rounds. A great strategy is to place any weapons that you will want to use later on (Rockets, Sniper Rifle, Gravity Hammers, Fuel Rod Cannons) in that elevator, and then grabbing what you need when it is time. | |||
*In addition, players can "dump" as many weapons that can be handy for later, including extra ammunition for Rockets, Shotgun, and Sniper Rifles that only appeared on each round. This would benefit in a long-term battle, especially if finding ammunition would become difficult due to Famine Skull when conducting either Season 3 Challenge or Vidmaster Challenge that shares the same title, Endure. | |||
*Due to multiple advantages offered by the map, Alpha Site is one of the favorite Firefight levels, practically to gain achievements [[Vidmaster Challenge: Endure]]. | |||
===Floodfight=== | |||
*This map, however, is not recommended for Floodfight if the player wants to gain achievements Gravetender, a Floodfight version of [[Vidmaster Challenge: Endure]]. Since the map lack cover from [[Aggressor Sentinel]], it would be difficult to defend such a position as there was a lack of defenses from attack from above. | |||
**Heavy improvisation strategy is required since Flood Forms and Sentinels would appear from the elevator. Additionally, players may stumble upon Flood Combat Forms wielding heavy ordinances, making some close-quarter combat must proceed with caution. | |||
*Seizing Flamethrower inside the elevator is recommended to gain more advantage in defense of every weapon drop. Use it to cover one of your teammates to stock up on Rockets, Sniper, and Shotgun ammunition and dump it inside the elevator. The Flood may spawn there, but any weapons dropped there would be similar to the normal firefight. | |||
*In the events of combating Sentinels, quick work is recommended to avoid heavy damage or losses. One of the weapons must be at least a Plasma weapon to drain its shield quickly and would be more challenging if Tilt Skull is on. | |||
*Guard the spawning area at all costs, as it would be your only line of defense. To combat Sentinel, lure them into your spawn area and finish it off as soon as possible. | |||
==Gallery== | ==Gallery== | ||
{{Linkbox|gallery=yes}} | |||
<gallery> | <gallery> | ||
File:HMCC_H3ODST_AlphaSite_Map.jpg|Alpha Site map. | |||
File:Alpha Site.png|A bird's eye view of Alpha Site. | File:Alpha Site.png|A bird's eye view of Alpha Site. | ||
File:AlphaSite Weapons and Ammo.png|Weapon Locations | File:AlphaSite Weapons and Ammo.png|Weapon Locations | ||
File:HTMCC-H3ODST-InfectedMajor.png|A [[Sangheili Major]] [[Flood combat form]] on Alpha Site in ''[[Halo: The Master Chief Collection]]''. | |||
</gallery> | </gallery> | ||
==Sources== | ==Sources== | ||
{{Ref/Sources}} | |||
{{Levels| | {{Levels|ODST|mode=yes}} | ||
Latest revision as of 14:09, September 10, 2023
| Alpha Site | |
|---|---|

| |
| Map overview | |
|
Game: |
|
|
Map file name (?): |
|
| Lore information | |
|
Location: |
|
| Gameplay overview | |
|
Terrain: |
UNSC building, Interior, Metal |
|
Recommended number of players: |
1-4 Players |
|
Recommended gametype(s): |
|
| “ | Fight in the close-quarters ONI interior. | ” |
Alpha Site is a map for the Firefight game type in Halo 3: ODST. It is unlocked by completing the ONI Alpha Site level in Campaign.
Layout[edit]
Alpha Site's general layout is a baseball-diamond shaped battle area, with players spawning on one side (the inner complex) and enemies dropping from Phantoms on the other (outer complex). There is a Sniper Rifle that spawns on this level, as well as a Shotgun. The map was revealed first in the 7/31/09 Bungie Weekly Update.[1] It takes place in the interior of the ONI Alpha Base.
Tips[edit]
Standard Firefight[edit]
- There is a good tactic on this map to survive for a very long time, even on more challenging difficulties. The players have to enter the elevator and stay at the corners of the elevator. When Brutes show up, they will try to melee the ODSTs through the glass, but they will not damage the players. However, with a well-aimed melee, the player can hit the enemy through the glass via aiming at the weapon of the Brute. Also, while an enemy is hitting against the glass, another player can simply go behind the target and assassinate him (An excellent tactic for Brute Chieftains armed with Gravity Hammers).
- If playing cooperatively, the above strategy is especially effective. If an enemy enters the elevator, the player who is not being targeted by the enemy can quickly assassinate the intruder.
- A simple strategy is to use the side of the map that enemies do not spawn at as your "turf" as it has two of the power weapons, tons of normal ammo, and excellent cover and field of fire, as well as no attacks from behind to worry about. However, be careful as enemies can still throw grenades at you while being harder to read - this can be especially important when Catch is on.
- The sniper rifle is very effective on this map to use in the above strategy, though you may need to push to the enemy dropoff points for more ammo.
- Alternatively, highly aggressive play can be even more effective as enemies come in predictable spawns and will not be reinforced by map hazards. Some well timed Plasma Grenades or Firebombs plus a liberal barrage of power weapons can end an incoming wave in seconds while racking up high multikills for points. The Phantom turret gunners can be dangerous though, so either kill them before closing in or quickly leave after the initial damage is done.
- On Legendary, it is advised to be hold near the pillars ahead of the elevator as they provide decent cover while giving a quick fallback route if there is too much pressure. Grenades can be highly effective on enemies funneled into the close half of the map.
- Weapons placed in the elevator do not despawn between sets/waves/rounds. A great strategy is to place any weapons that you will want to use later on (Rockets, Sniper Rifle, Gravity Hammers, Fuel Rod Cannons) in that elevator, and then grabbing what you need when it is time.
- In addition, players can "dump" as many weapons that can be handy for later, including extra ammunition for Rockets, Shotgun, and Sniper Rifles that only appeared on each round. This would benefit in a long-term battle, especially if finding ammunition would become difficult due to Famine Skull when conducting either Season 3 Challenge or Vidmaster Challenge that shares the same title, Endure.
- Due to multiple advantages offered by the map, Alpha Site is one of the favorite Firefight levels, practically to gain achievements Vidmaster Challenge: Endure.
Floodfight[edit]
- This map, however, is not recommended for Floodfight if the player wants to gain achievements Gravetender, a Floodfight version of Vidmaster Challenge: Endure. Since the map lack cover from Aggressor Sentinel, it would be difficult to defend such a position as there was a lack of defenses from attack from above.
- Heavy improvisation strategy is required since Flood Forms and Sentinels would appear from the elevator. Additionally, players may stumble upon Flood Combat Forms wielding heavy ordinances, making some close-quarter combat must proceed with caution.
- Seizing Flamethrower inside the elevator is recommended to gain more advantage in defense of every weapon drop. Use it to cover one of your teammates to stock up on Rockets, Sniper, and Shotgun ammunition and dump it inside the elevator. The Flood may spawn there, but any weapons dropped there would be similar to the normal firefight.
- In the events of combating Sentinels, quick work is recommended to avoid heavy damage or losses. One of the weapons must be at least a Plasma weapon to drain its shield quickly and would be more challenging if Tilt Skull is on.
- Guard the spawning area at all costs, as it would be your only line of defense. To combat Sentinel, lure them into your spawn area and finish it off as soon as possible.
Gallery[edit]

|
Browse more images in this article's gallery page. |
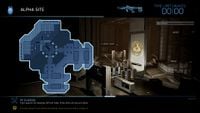
Alpha Site map.
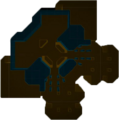
A bird's eye view of Alpha Site.
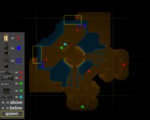
Weapon Locations
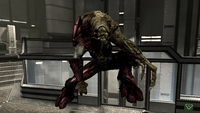
A Sangheili Major Flood combat form on Alpha Site in Halo: The Master Chief Collection.


Sources[edit]
- ^ Bungie.net (Retrieved on Jul 31, 2009) [archive]
| |||||||||||||||||


