
Snowbound
From Halopedia, the Halo wiki
| Snowbound | |
|---|---|
 | |
| Map overview | |
|
Game: |
|
|
Map file name (?): |
|
| Lore information | |
|
Location: |
|
| Gameplay overview | |
|
Terrain: |
Covenant structures in icy terrain built over a Forerunner installation. |
|
Map layout: |
Semi-symmetrical |
|
Recommended number of players: |
2-8 |
|
Recommended gametype(s): |
|
| “ | Hostile conditions did not prevent the Covenant from seeking salvage on this buried Forerunner construct. | ” |
Snowbound is a medium-sized multiplayer map in Halo 3.
Universe and lore[edit]

- Main article: Strilun IV
Snowbound is set in a snowy Forerunner area with two large Covenant bases at either end of the map. The two bases are joined underground by a cave, revealing a deep network of Forerunner structures underground. The planet the map is set on is a former Forerunner world controlled by the Covenant, not far from human-occupied space.[3] On the horizon, two celestial bodies can be seen. The Covenant base is surrounded by a perimeter of Shuku-pattern sentry turrets that fire upon anything in range.
Overview[edit]
Layout[edit]
Snowbound is a medium-sized, semi-symmetrical map with two bases. The bases, known as High Base and Low Base, are connected by an underground tunnel network. Much fighting takes place in or around the shield doors found inside the bases. Rocky outcroppings are located along the southern and western edges of the map (Rock Side); Shuku-pattern sentry turrets prevent players from exiting the map via its otherwise-unblocked northern and eastern edges (Tundra Side). When players venture too close to the map's boundaries, an alarm sounds, warning them to return to the bases before the turrets open fire.
 Snowbound Map.
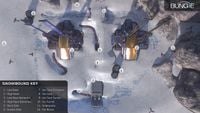 Callouts of Snowbound at the time of the Halo 3 Beta.
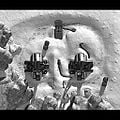 A birds-eye view of Snowbound.


Callouts[edit]
- Low Base - Low Base is one of the two Covenant bases on the map. This base, which is located on the eastern side of the map, appears to be fully functional, though it has apparently been abandoned. It is often referred to by players as "BR Spawn" because of the two battle rifles that spawn on its outer rear walls. Inside the base, there is a Spartan Laser, two Paegaas Workshop Spikers, and a bubble shield. Outside the base, a carbine, a Spiker, and a Mauler spawn to the south; an active camo spawns towards the north. On top of the base, there is a needler and a pair of plasma grenades.
- High Base - Directly adjacent to Low Base, High Base offers a different set of weapons. High Base's lights flicker and buzz, implying that it has become damaged. The large sphere in the center of the base appears broken, and icicles hang from the base's exterior, implying that its heating system has stopped working. Whether this damage is the result of the base's abandonment or something else is unknown.
- High Base is commonly referred to as "Sniper Spawn" or "Carbine Base" due to the carbine and beam rifle it contains. Behind the base, players can find a battle rifle or a Okarda'phaa-pattern plasma rifle around the rocky terrain. A Mauler lies to the north of the base, and an overshield to the south. Inside, there are two plasma rifles, a beam rifle, and a power drain. On top of the base, there is a plasma pistol and a pair of plasma grenades.
- Low Base Batteries
- High Base Batteries
- Rock Side
- Tundra Side
- Ice Cave Entrance - On the opposite side end the Underpass, lies the Ice Cave's main entrance, with its distinctive overhang and large shield door.
- Ice Cave - Predominantly known as the "Shotgun Spawn" in Lone Wolves or the "Sniper Spawn" in Team Slayer, heavy fighting occurs in this cold and icy cave. This area sees frequent carnage due to its high traffic, tight quarters, and position between the High and Low Bases. To the immediate south is a narrow, elevated opening with no shield (Ice Cave Tunnel). On the western side of the cave's interior is a tunnel to the High Base; opposite that is a tunnel to the Low Base. Directly north is the Main Entrance, which is protected by a larger shield door.
- Entering the Ice Cave from the Bases or the Ice Cave Tunnel is extremely risky. The main entrance is very defensible, as it affords the player with a full view of the cave's three most-used entrances and its shield door provides protection. Above the Ice Cave's main entrance spawns a Brute Shot (top), as well as a Spiker to the west and a Mauler to the east. An often seen tactic on this map is to hide on the other side of a shield door with the shotgun or Mauler and kill players as they pass through.
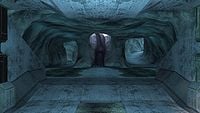 Ice Cave, with three paths shown including Ice Cave Tunnel (center), while the others go to the bases.

- Ice Cave Tunnel - In the center of the map, the Ice Cave Tunnel provides access to the Ice Cave, which in turn provides access to the interiors of both bases. A common tactic is to blindly toss grenades into the map's lower levels from this area, turning the underground corridors and tight spaces into grenade-powered deathtraps.
- Ice Tunnel