Zurdo-pattern Wraith: Difference between revisions
From Halopedia, the Halo wiki
| Line 83: | Line 83: | ||
===''Halo 3'' and ''Halo 3: ODST''=== | ===''Halo 3'' and ''Halo 3: ODST''=== | ||
Two different versions of the Wraith appears in ''Halo 3''. New features include visible lights, increased speed and a more accurate line of fire. However, the exposed exhaust port represents an extremely vulnerable spot in the armor, making it possible for the first time to destroy a Wraith with melee attacks from behind the tank with no direct melee attacks to the driver. A strong hit to the core after removing its cover causes a violent chain reaction of explosions. The tank has a subtle greenish shine to it and an embedded latticework that glimmers in the light. The most dramatic design change added an exposed topside gunnery position with a 270° view, allowing for better defense against enemy | Two different versions of the Wraith appears in ''Halo 3''. New features include visible lights, increased speed and a more accurate line of fire. However, the exposed exhaust port represents an extremely vulnerable spot in the armor, making it possible for the first time to destroy a Wraith with melee attacks from behind the tank with no direct melee attacks to the driver. A strong hit to the core after removing its cover causes a violent chain reaction of explosions. The tank has a subtle greenish shine to it and an embedded latticework that glimmers in the light. The most dramatic design change added an exposed topside gunnery position with a 270° view, allowing for better defense against enemy infantry and boarders. Boarding is made more difficult in that now boarders have both a pilot, and gunner to kill before gaining control of the vehicle. The boost feature is no longer as effective taking longer for the vehicle to achieve its optimum boost speed, although having the same top speed as its ''Halo 2'' counterpart, the tank has difficulty traversing high angles and its reversing capability is often inadequate. If boarded from behind or on the front of the cockpit the driver cannot exit the vehicle, another difference from the ''Halo 2'' version. | ||
===''Halo: Reach''=== | ===''Halo: Reach''=== | ||
Revision as of 20:20, May 29, 2011
| This article does not meet the wiki's general standards and/or standards on layouts. You can help by cleaning this article. |
Template:Vehicle Infobox The Type-26 Assault Gun Carriage[1], commonly identified as the Wraith by the UNSC, is the Covenant's main heavy assault vehicle for ground engagements.
Specifications
Design details

The Type-26 Assault Gun Carriage is the primary armored ground vehicle used by the Covenant.[2] The Covenant deploy the Wraith as a heavy assault vehicle in tactical ground engagements, to provide anti-armor and anti-infantry firepower, and also use the vehicles weapons platform to bring down structures[3] in the way of ground forces attempting to advance in a area.
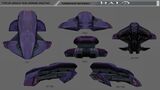
Like all Covenant vehicles, the Type-26 AGC's design is a sleek, bulbous design more akin to an insect or an aircraft than a ground vehicle. The Type 26 AGC is composed of four major components: The chassis is the first and major component and consists of the cockpit, which include the controls that move the tank, the controls that align the mortar on target, and one in the center that arms and fires the main battery. Holographic control surfaces and displays show the pilot a 360-degree view outside the Wraith.[4] Underneath is its propulsion system consisting of a Boosted Gravity Propulsion Drive[5], the chassis also contains the necessary systems that power all other systems on the vehicle. Two wide lateral fins are the second major component to the Type-26 AGC, the fins stabilize the vehicle on terrain, as well as provide the vehicle thrust to attain limited boost for enhanced maneuverability.[5] The third major component is the rudders which control the turning of the vehicle, which utilize two independent propulsion drives to help turn the vehicle in the desired direction. The fourth major component is the Type-26 AGC's main weapon, the heavy mortar cannon. The huge bulk of the Wraith is well shielded by an armored shell that is nearly two feet thick and made up of a polymer that is not understood by human physicists.[1]
Piloted by a single occupant, who controls all vehicle and weapons systems, the Type-26 AGC is a highly maneuverable vehicle able to traverse many different terrains. The Type-26 AGC like all Covenant vehicles uses a form of anti-gravity propulsion drive to cushion and absorb almost all of the recoil caused by the heavy mortar cannon.[1] The Wraith's large size and its ability to provide covering fire it from the massive Plasma Mortar makes it an extremely dangerous vehicle on the battlefield.
Armaments
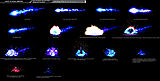
The main weapon of the Type-26 AGC is the Heavy Plasma Mortar.[6] The Type-26 AGC's plasma emitter is attached to a fixed mounting, in order to fire in a specific direction the vehicle must rotate to face the target directly.[1] The plasma mortar works by creating a large, compressed, magnetically encapsulated blob of superheated plasma and fired at a high velocity, once fired, the bolt is magnetically guided in a ballistic trajectory until it strikes the ground or target. When the bolt hits, the magnetic bubble collapses and the plasma rapidly expands from its compressed state creating a superheated explosion, that will vaporize everything within twenty meters of impact.[7] Titanium battleplate, concrete, or flesh is instantly obliterated by the superheated white fire. Anything just outside of the kill zone is at risk of injury or death — after the initial impact, the plasma begins to cool and thermal expansion takes over, creating a wave of fire traveling outward that can travel away from the initial blast zone, infantry caught in the flame can be burned alive and if not caught in the flames can suffer heat trauma, the concussive force released from the resulting explosion can splinter bones and destroy vital organs[8]. Flammable materials are especially at risk of igniting due to the intense heat release and can cause further damage. As the resulting temperatures cool, the impact zone is nothing but a glass-smooth surface.
The secondary weapon is a medium plasma weapon that is used as a anti-infantry weapon. All Type-26 AGC's in service up to 2549 were equipped with two automated plasma cannons.[3] These plasma cannons mounted on each wing, and are operated autonomously, it is not understood what method the system uses to designate and fire upon an enemy. All Type-26 AGC's in service after 2549 are equipped with a Type-52 Directed Energy Support Weapon fixed to a ring mount that is operated by a gunner,[9] the role of the Type-52 DESW as a anti-infantry weapon means that the firepower produced by this weapon is considerably high, able to penetrate flesh with considerably gruesome results. The Type-52 DESW functions like most plasma based weapons used by the Covenant by rapidly cycling, loading, ignition, and release of plasma at high velocities. The plasma is contained and guided by a electromagnetic bottle which guides the plasma until it either travels too far away from the magnetic source and dissipates, or strikes its intended target. Against infantry, the lethality of the Type-52 DESW is severe as injuries inflicted to infantry with light body armor are severe fourth-degree burns, this level of injury completely chars all flesh, leaving only bone tissue. Body fluids along with moist tissue and flesh would be subjected to flash vaporization, and fluids trapped in organs or arteries in addition to the rapid expansion of heat would cause ruptures or small steam explosions causing additional damage to the body.
Advantages
The Type-26 AGC is the Covenant’s most destructive mobile armor. Its huge bulk is well shielded from small arms fire and is resistant to medium explosive weapons, its ability to provide covering fire to infantry and armor alike, in addition to dealing heavy damage to structures, infantry and armor alike makes it a inestimably dangerous thing to go up against in ground battles. Its ability to be deployed with the aid of dropships makes insertions into battlefield fairly easy — with a boost drive attached the Wraith can temporarily attain a speed boost for fast insertions, or to plow through enemy infantry, armor or obstructions in the way of the tank. Its mortar cannon provides devastating damage to anything in its ways and is known for its physiological effects on humans at the mere sight of one.[7]
Disadvantages
The Type-26 AGC's main disadvantage is its slow speed, because of the vehicle's massive weight. While the boost drive on the vehicle can propel the vehicle to high speed the maneuverability of the vehicle is compromised — because the gravity propulsion drive does not contain anything to counter the vehicle's moving mass it is possible for the vehicle to run into anything from friendly vehicles to infantry to even propelling itself off a ledge or into a ditch. Wraiths also encounter difficulty traversing inclines and pushing through multiple barricades because of its weight and the brief nature of its boosts. Like most tanks, the Type-26 AGC has a dead area, a zone in which the mortar cannon cannot fire without risking damaging or destroying itself.[10] The slow speed and cumbersome nature of the Wraith makes it prone to boarding action — while the front of the tank is harder to board because of the Type-52 DESW, the rear is most susceptible to boarding because of a weak spot in the rear. A small rotating cylinder exhaust port in the back is a vulnerable spot that if hit with a medium explosive device can damage the tank severely. The gunner operating the Type-52 DESW is also an easy target for marksman and sniper fire; because of the massive cannon right behind the gunner the turret ring cannot traverse a full 360 degrees.
Operational history
The Wraith has been in service to the Covenant for over a century,[11] and has served in countless engagements during the Human-Covenant War. After the retaking of Harvest in 2526 by Admiral Cole, the Covenant, attempting to scout and recover an artifact, deployed multiple Wraiths during the assault on Harvest.
Throughout the war the Covenant deployed Wraiths during ground campaigns against civilian and military targets. Wraiths would commonly target civilian evacuation transports still on the ground and platforms and structures leading to them, or would fire and kill large groups of civilians crowded together. In 2531 during the first assault on the colony world Arcadia, multiple Wraiths were used in this situation to kill panicking civilians attempting to flee the Covenant invasion. The tanks assisted in destroying structures and platforms holding civilians waiting for evacuation. In addition, the tanks were used against UNSC military forces attempting to assist with evacuation efforts.
As the war dragged on, ground campaigns conducted by the Covenant continued to employ the Wraith as their main heavy armored vehicle. During the assault on Algolis the Wraiths were called in to weaken military forces attempting to protect and destroy valuable data. The UNSC was able to hold off the Covenant just long enough and all ground forces were eventually destroyed with the detonation of a nuclear weapon attached to a prototype armor suit.
As the war with humanity was reaching its apex, the Covenant began updating and building up their military campaign against humanity. A new model of the Wraith was introduced to help address some issues with older models. During the invasion of Sigma Octanus IV in July of 2552 the Covenant deployed numerous tanks to take out strategic areas on the planet including military bases and civilian structures. No sooner had that battle finished the Covenant launched a surprise assault on Reach, humanity's heavily fortified epicenter of military and economic power outside of Earth. Multiple divisions of Wraith tanks were employed to inflict mass casualties on civilian and military forces alike. Their campaign was successful destroying major military and civilian transports, structures and killing countless in the process.
However when the UNSC Pillar of Autumn escaped, many Covenant ships followed to discover Halo, with its discovery the Covenant rushed to destroy the human ship as fast as possible, however when the Autumn crash landed the Covenant was forced to land on the ring and hunt down the humans. During the campaign on Halo the Covenant deployed Wraith's to protect structures and destroy human encampments. Their campaign ultimately failed when Halo was destroyed by SPARTAN-117.
During the opening of the Battle of Earth, the Prophet of Regret's carrier managed to land in the city of New Mombasa. In the short but bloody campaign the Covenant was able to land armor and troops into the city, Wraiths quickly moved in to cut off civilian evacuation by the city's rail system. With civilians cut off the Covenant began systematically destroying anything they could before the Prophet of Regret's ship jumped out of New Mombasa destroying parts the city. In the aftermath of Regret's retreat the full scale invasion of Earth began, the Covenant laid waste to many parts of the planet and Wraiths were on the forefront of the ground assault.
As the Battle for Earth raged on SPARTAN-117 with the full support of the UNSC In Amber Clad launched a counter-strike against regret who had jumped to Installation 05. Wraiths were deployed in the same manner as they were on Installation 04, however with the threat of the UNSC attempting to stop regret the Covenant relied on more aggressive tactics against their enemy using Wraith's to do anything possible to stop the advance of SPARTAN-117. The subsequent outbreak of the Flood and internal conflict that consumed the Covenant, however, left all involved to fend for themselves, after the conclusion of the battle for Installation 05 the Covenant reorganized and made a final push offensive on Earth.
With the uncovering of the Portal, the Covenant moved all their troops and armor to prevent the UNSC military from getting close to it. They deployed Wraiths to dispatch military forces attempting to break through their formation. After the opening of the portal and the arrival at Installation 00 the Covenant deployed all their assets in a last ditch effort to stop humanity and activate the remaining Halo installations. Wraiths were front and center in this operation, although ultimately, lost to their human enemies.
Changes
Halo: Combat Evolved
Introduced in Halo: Combat Evolved, the Wraith tank first appears on Assault on the Control Room, the player is not able to drive the tank at all in the game. This version of the Wraith has no anti-personnel weapons, and the visual design encompasses a more purple color scheme then later versions, the mortar design is also different from other games looking more like a tube, rather than the plasma emitter itself. On Normal difficulty, the Wraith can survive about two to three direct rocket hits before being destroyed. While formidable, it is not without weaknesses. Wraiths can be flipped, knocking the Sangheili driver out of the vehicle and rendering it useless. Just like the Halo: Combat Evolved Ghost, the Wraith floats noticeably higher above the ground than its Halo 2 and Halo 3 counterparts.
Halo 2
In Halo 2, the Wraith received a graphical overhaul and its color scheme is more of a blueish color and is now drivable by the player. In addition, the Wraith now has two weapons: the standard plasma mortar and two automated Plasma Cannons. However, the player cannot utilize these turrets themselves, meaning that the Wraith is somewhat less effective in the player's hands. The turrets auto-target any enemy within range, making boarding a Wraith more difficult. In Halo 2 when a player boards a Wraith, they must wait a few second delay before being able to fire the Wraith's Plasma Mortar. The Halo 2 Wraith also includes a boost drive, capable of tripling the tank's speed for about one second and requires five seconds to recharge. Though this can be used to travel faster, it is commonly used to run over enemies who are getting too close and is extremely effective due to the Wraiths reverse speed being identical to a Spartan or Sangheili running speed.
Halo 3 and Halo 3: ODST
Two different versions of the Wraith appears in Halo 3. New features include visible lights, increased speed and a more accurate line of fire. However, the exposed exhaust port represents an extremely vulnerable spot in the armor, making it possible for the first time to destroy a Wraith with melee attacks from behind the tank with no direct melee attacks to the driver. A strong hit to the core after removing its cover causes a violent chain reaction of explosions. The tank has a subtle greenish shine to it and an embedded latticework that glimmers in the light. The most dramatic design change added an exposed topside gunnery position with a 270° view, allowing for better defense against enemy infantry and boarders. Boarding is made more difficult in that now boarders have both a pilot, and gunner to kill before gaining control of the vehicle. The boost feature is no longer as effective taking longer for the vehicle to achieve its optimum boost speed, although having the same top speed as its Halo 2 counterpart, the tank has difficulty traversing high angles and its reversing capability is often inadequate. If boarded from behind or on the front of the cockpit the driver cannot exit the vehicle, another difference from the Halo 2 version.
Halo: Reach
The Wraith in Halo: Reach received a visual upgrade and is a much more green-blue in color, with a greater iridescent sheen, and a larger, more electrically charged shot. It appears to be much stronger in terms of firepower and armor, being able to destroy Scorpions in single accurate hits, and the arc of its shot is greatly reduced and is slightly faster, making it a far more deadly vehicle. However, its plasma turret now overheats like all turrets. The main gun of the Wraith can also be destroyed, rendering the Wraith useless. Unggoy are now the main operators of the plsama turret in Campaign and Firefight, which greatly simplifies matters for players as they are much easier to kill than Halo 3's Brute gunners. Whenever a wraith is hit with a Plasma Pistol's EMP shot, the Wraith mortar will fold closed and be temporarily disabled. Because of the game's revamped physics engine, a Wraith boosting into other (smaller) vehicles will destroy them.
Tactics
Campaign
- The Wraith's mortar is extremely powerful and will severely damage any person or vehicle it hits. However, it is slow to reload, so you do have time between shots to score some big hits of your own. Because of the Wraith’s thick armor, the Rocket Launcher is an ideal weapon against the massive tank. If you don't have a Rocket Launcher, jump in a Covenant Banshee or Ghost and fire away. A player can also destroy a Wraith with a few well-thrown Plasma Grenades. Keep some distance as well; the mortar shots are easier to avoid when they're lobbed at far-away targets.
- In Halo 2, two small automatic weapons on the Wraith’s hood offer additional protection against nearby infantry. If, however, you manage to evade these and jump on the vehicle, you can assault the driver with melee attacks.
- On higher difficulties in Halo 2, throwing grenades into the back will not destroy the Wraith, but will kill the enemy driving it after a few explosions. This is more effective compared to punching the driver at the front, as it requires less time.
- A good way to take out the Wraith, although risky, is to get in a Warthog's drivers seat and position a gunner in the back. drive the warthog in a circle around the Wraith; your gunner will do the work for you.
- In Halo: Reach the player can commandeer the Wraith by killing its gunner and operating the plasma turret, rather than boarding the vehicle. The driver will then exit the vehicle and can be killed by the player. This allows the player to commandeer the Wraith intact, without damaging it.
Multiplayer
- If you manage to get close to it you can board the Wraith and throw a grenade in the cockpit or engine structure, which will completely destroy the tank. An alternative is to beat the driver out without destroying the tank, which instead renders it operational, though this comes at a risk; another player can shoot you off the Wraith.
- The Wraith has different armor strengths at different points on their body. Aim the rocket launcher high up at the face of the tank near the mortar cannon. The bottom-front section of the tank is the strongest point. The tank's rear is also the weakest point on the entire vehicle. If you aim at the right spot you'll save a rocket or two.
- When using the Wraith, it fires better on a vantage point rather then upwards. It does best at closer range eliminating smaller vehicles.
Trivia
- It is wrongly stated in the Halo 3 manual that the Wraith has dual-auto firing cannons. It only has them in Halo 2. It is also wrongly stated in the Halo 2 manual that the player can shoot the Wraith's plasma cannons while driving.
- In Halo: Combat Evolved, it is possible to snipe the driver out of the Wraith during the level Two Betrayals, but you still cannot drive it. Also, the same applies for the Wraith after the player leaves the tunnel in Assault on the Control Room, if the player steals a Ghost and heads out to the lake area where the Wraith normally is (while ignoring the enemies), he can see a Sangheili making a mad dash for the Wraith.
- If a player boosts the Wraith by tapping the left trigger and then uses the main gun by tapping the right trigger, the plasma mortar will go a longer distance than it normally would. This is known as the "Boost Shot."
- In Halo 2, Rtas 'Vadum is shown driving a Wraith without the main cannon in the firing position, meaning it can be folded into the Wraith at the driver's discretion.
Gallery
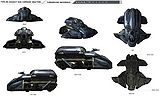
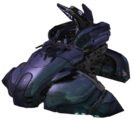
Reference of an inactive Type-26 as it appears in Halo: Reach.
Reference of an active Type-26 as it appears in Halo: Reach.
Beta render of an inactive Wraith as it appears in Halo: Reach.
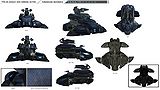
Reference of the heavy plasma mortar fired by the Type-26 AGC.
Reference of the Type-26 AGC as it appears in Halo: Combat Evolved.
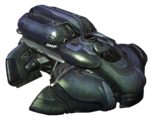
- Wraith Full.jpg
The Wraith as it appears in Halo: Combat Evolved
- Halo3-WraithMortarTank.png
The Wraith in Halo 3, unoccupied.
The Wraith as it appears in Halo 3
- HW wraith.jpg
The Wraith as it appears in Halo Wars
- 1206873195 Wraith.jpg
The Halo 2-era Wraith.


List of appearances
- Halo: Combat Evolved (First appearance)
- Halo 2
- Halo 3
- Halo Wars
- Halo 3: ODST
- Halo: Reach
- Halo: The Fall of Reach
- Halo: The Flood
- Halo: First Strike
- Halo: Ghosts of Onyx
- Halo: Evolutions - Essential Tales of the Halo Universe
- Halo: Uprising
- Halo: Blood Line
- Halo Legends
Sources
- ^ a b c d Cite error: Invalid
<ref>tag; no text was provided for refs namedENC - ^ Bungie.net Halo: Reach Ordnance Page
- ^ a b Halo 2: Special Collector's Edition Manual page 17
- ^ Halo: First Strike page 113
- ^ a b Halo 2 Manual page 19
- ^ Halo: Reach Manual page 9
- ^ a b Halo: First Strike page 112
- ^ Halo: Evolutions, "Palace Hotel", page 351
- ^ Halo: Reach Career Stats
- ^ Halo: The Flood page 184
- ^ Halo Legends The Duel
Related Links
- Scorpion Tank - UNSC equivalent of the Wraith
- Type-52 Anti Aircraft Artillery - An anti-air variant of the Wraith


