Control Room (Installation 05): Difference between revisions
From Halopedia, the Halo wiki
No edit summary |
mNo edit summary |
||
| Line 2: | Line 2: | ||
{{ratings}} | {{ratings}} | ||
<center>''Where you looking for the [[Control Room (Installation 04)|Control Room of Installation 04]]?''</center> | <center>''Where you looking for the [[Control Room (Installation 04)|Control Room of Installation 04]]?''</center> | ||
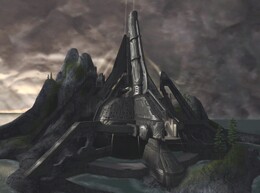
[[Image:Control Room3.jpg|thumb| | [[Image:Control Room3.jpg|thumb|260px|The Control Room of Installation 05]] | ||
{{quote|What is that place?|[[Arbiter (character)| The Arbiter]]}} | {{quote|What is that place?|[[Arbiter (character)| The Arbiter]]}} | ||
{{quote|Where the [[Councilor]]s were meant to watch the consecration of the [[Index|Icon]]: the start of the [[Great Journey]].| [[Rtas 'Vadumee]]}} | {{quote|Where the [[Councilor]]s were meant to watch the consecration of the [[Index|Icon]]: the start of the [[Great Journey]].| [[Rtas 'Vadumee]]}} | ||
| Line 9: | Line 9: | ||
== History == | == History == | ||
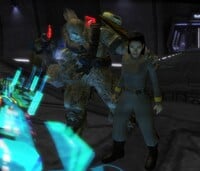
[[Image:MirrandaBruteMan.jpg|thumb| | [[Image:MirrandaBruteMan.jpg|thumb|right|200px|[[Tartarus]] attempts to force [[Commander]] [[Miranda Keyes]] into activating [[Installation 05|Halo]].]] | ||
Prompted by the [[Prophet of Truth]], [[Tartarus]] brought [[343 Guilty Spark (Monitor)|343 Guilty Spark]] and [[Commander]] [[Miranda Keyes]] to the control room in order to activate the ring, initiating the [[Great Journey]]. Before he could force Keyes to activate the panel, however, the [[Arbiter (character)|Arbiter]] arrived, teaming up with [[Avery Johnson|Sergeant Major Johnson]] and other [[Sangheili]] troops. After trying to convince Tartarus to change his mind, Tartarus instead forced the [[Index]] into the panel, activating the primary firing systems. A battle began between the Sangheili and the [[Jiralhanae]], which ended after Tartarus and his troop's died, but Keyes was able to deactivate the ring. There is also a noticeable design difference from Installation 04's control room, in there being 3 rings, or levels, to it. | Prompted by the [[Prophet of Truth]], [[Tartarus]] brought [[343 Guilty Spark (Monitor)|343 Guilty Spark]] and [[Commander]] [[Miranda Keyes]] to the control room in order to activate the ring, initiating the [[Great Journey]]. Before he could force Keyes to activate the panel, however, the [[Arbiter (character)|Arbiter]] arrived, teaming up with [[Avery Johnson|Sergeant Major Johnson]] and other [[Sangheili]] troops. After trying to convince Tartarus to change his mind, Tartarus instead forced the [[Index]] into the panel, activating the primary firing systems. A battle began between the Sangheili and the [[Jiralhanae]], which ended after Tartarus and his troop's died, but Keyes was able to deactivate the ring. There is also a noticeable design difference from Installation 04's control room, in there being 3 rings, or levels, to it. | ||
== Gameplay == | == Gameplay == | ||
This is the location of the final level and a boss battle in [[Halo 2]]. In the game, the player must jump from the ledge where Johnson snipes, down to the gears of the control room that are charging up the Halo Ring. In the center of it, there is a large [[gravity lift]] that takes you to the top, regardless of where you are. There are three "stories" to this part and on them are numerous gun crates to assist in battling [[Tartarus]]. [[Elites]] will attempt to aid you in defeating Tartarus, but they will fall in vain to the [[Fist of Rukt]]. On higher difficulties, Brutes will jump down to aid their Chieftain. To get down to lower levels, one must jump down to them. | This is the location of the final level and a boss battle in [[Halo 2]]. In the game, the player must jump from the ledge where Johnson snipes, down to the gears of the control room that are charging up the Halo Ring. In the center of it, there is a large [[gravity lift]] that takes you to the top, regardless of where you are. There are three "stories" to this part and on them are numerous gun crates to assist in battling [[Tartarus]]. [[Elites]] will attempt to aid you in defeating Tartarus, but they will fall in vain to the [[Fist of Rukt]]. On higher difficulties, Brutes will jump down to aid their Chieftain. To get down to lower levels, one must jump down to them. | ||
== Appearances == | |||
*[[Halo 2]] | |||
**[[Uprising (Level)|Uprising]] | |||
**[[The Great Journey (Level)|The Great Journey]] | |||
== See Also == | == See Also == | ||
| Line 19: | Line 24: | ||
*[[Control Room (Installation 04)|Alpha Halo's control room]] | *[[Control Room (Installation 04)|Alpha Halo's control room]] | ||
[[Category:Installation 05]] | [[Category:Installation 05]] | ||
Revision as of 17:57, February 7, 2009
- "What is that place?"
- — The Arbiter
- "Where the Councilors were meant to watch the consecration of the Icon: the start of the Great Journey."
- — Rtas 'Vadumee
Installation 05's Control Room was the site that controlled all of the Installation's operations. The Control Room is located on an island off the coast of a larger island in the middle of a large sea. Exact whereabouts are not known.
History
Prompted by the Prophet of Truth, Tartarus brought 343 Guilty Spark and Commander Miranda Keyes to the control room in order to activate the ring, initiating the Great Journey. Before he could force Keyes to activate the panel, however, the Arbiter arrived, teaming up with Sergeant Major Johnson and other Sangheili troops. After trying to convince Tartarus to change his mind, Tartarus instead forced the Index into the panel, activating the primary firing systems. A battle began between the Sangheili and the Jiralhanae, which ended after Tartarus and his troop's died, but Keyes was able to deactivate the ring. There is also a noticeable design difference from Installation 04's control room, in there being 3 rings, or levels, to it.
Gameplay
This is the location of the final level and a boss battle in Halo 2. In the game, the player must jump from the ledge where Johnson snipes, down to the gears of the control room that are charging up the Halo Ring. In the center of it, there is a large gravity lift that takes you to the top, regardless of where you are. There are three "stories" to this part and on them are numerous gun crates to assist in battling Tartarus. Elites will attempt to aid you in defeating Tartarus, but they will fall in vain to the Fist of Rukt. On higher difficulties, Brutes will jump down to aid their Chieftain. To get down to lower levels, one must jump down to them.

