
Construct
From Halopedia, the Halo wiki
| Construct | |
|---|---|

| |
| Map overview | |
|
Game: |
|
|
Map file name (?): |
|
| Lore information | |
|
Location: |
|
| Gameplay overview | |
|
Terrain: |
|
|
Map layout: |
Asymmetrical |
|
Recommended number of players: |
2-8 |
|
Recommended gametype(s): |
|
| “ | Vast quantities of water and other raw materials are consumed in creating even the smallest orbital installations. | ” |
Construct is a Halo 3 multiplayer map that takes place at one of the Ark's "spokes". Its large asymmetric design makes it great for Slayer and Team Slayer gametypes.
Universe and lore[edit]
Construct is set in the same Forerunner structure as that housing the Cartographer in the campaign level The Ark, likely set above or below the area in which John-117 fights Cethegus at the end of the mission. Looking out from the map, the same waterfalls, ocean and view of the Ark's superstructure can be seen.
Overview[edit]
Layout[edit]
This level may appear symmetrical, but on closer inspection is really asymmetrical in nature. Construct has three distinct levels, each connected by a series of ramps and gravity lifts. As a result of its unique nature, Construct has a variety of weapons and equipment. The upper level can be reached by the main yellow gravity lift at the far side of the level (opposite the ocean) and two smaller, purple lifts. Also, two ramps extending up to hold the sword arm can be used to gain access to the upper level. A long, narrow channel stretches out overlooking the vast ocean below and the main level of the construct.
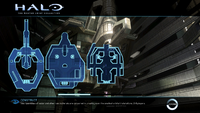 Construct Map.
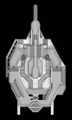 A bird's-eye view of Construct.


Lower Level[edit]
The lowest level of Construct is split into 2 sections, that are similar in shape to a plus (+) sign. The main corridor leads to the middle level at one end, and the yellow gravity lift at the other. Players can find a power drain upon entrance to the yellow gravity lift. The smaller corridor intersects the main corridor at its center, and offers a ramp (one on each side), up to the middle level. A Spartan Laser and missile pod exist on each side of the small corridor on the ramps leading to the middle level, and the corridor leading to the Spartan Laser spawn also has a Brute Shot.
A flamethrower is present at this intersection. A small, c-shaped hallway connects the main corridor to the smaller corridor, which goes behind the purple gravity lifts. A Mauler can be found in each of these small hallways. Players also have the ability of reaching the top level via the yellow and purple gravity lifts from this low level.
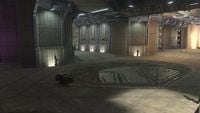 The lowest level of Construct with the Flamethrower in sight.

Middle Level[edit]
The middle level is almost synchronous with the lowest level due to the ramps connecting these two levels. A portion of the middle level has been removed, offering a quick drop into the lowest level if a player chooses to not use the ramps. Players can also access the yellow and purple gravity lifts from this level of the map as well. This is the highest level of the map where the gravity lifts can be used, as they only travel upwards.
This level of the map, can often see fighting, but is mainly used as the "transport" level, getting players to their destination quicker. Players can also choose a slower and possibly safer route than the gravity lifts by traveling up the ramps. The main ramps circle around the yellow gravity lift and lead all the way to the top level. The map's second Brute Shot spawn lies on these ramps. There is also a way to get over the purple beams without dying. This tip will be a great tip for escaping enemies and killing them from a high view. First you must jump to a small edge and jump on the bigger edge above it. Then you must jump over the purple beam or power jump.
Note: An alternate route to the energy sword is a long narrow sloped ramp (which is quite possibly a support strut) next to both of the purple lifts on this section of Construct, it leads to the sides of the ramp that leads to the large walkway that leads to the sword.
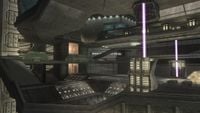 A view of the middle level and partial view of the upper level.

Upper Level[edit]
Remarkably, this area of the map sees practically all the action that takes place. This is for several reasons: first, there is little to no cover on the lower levels. Second, nearly the entire supply of weapons is located here, and third, the three power lifts lead to here and it is often of good strategy to camp at the top of these lifts in hopes of killing a player as they come up it (in such a situation the player already there has a distinct advantage over the player coming up the lift). There are three main areas of the upper level as well. The "yellow lift zone" contains the area where players exit the yellow gravity lift, as well as the paths leading to the purple lift zones. The second zones on the upper level are the "purple lift zones," which occur at two ends of the top level. The final aspect of the upper level is the long walkway extending into and outside the main parts of the map, containing the sniper rifle at one end and the energy sword on the other.
Yellow Lift Zone[edit]
In this zone, players can trap the opposing team from entering the top level of the structure via the yellow gravity lift or the ramps. It is often the object of much fighting as one team tries to storm the upper level, while the other team attempts to hold them off. A good tactic for those traveling up the lift is to destroy the fusion cores that are on the walls of each side of the yellow zone. On the left of players, as they're looking into the lift, are the ramps that lead up to the top level from the bottom. This is by far the most sought after position in the entire level. The purple lifts provide two ways to assault the yellow lift zone from either side but it is possible to defend this zone if the players stick one or both of the two following areas:
- The "angled" hallway to the right (if you are looking at the yellow lift) of the lift. Though people watch for defenders in this hallway the defender often has the advantage because he sits stationary waiting for an attacker to come into view while the attacker must be ready to train their sights on the defender when it slips into view.
- The overhang over the ramp to the left (if you are looking at the yellow lift) of the lift. You can cover both the ramp leading up, as well one of the purple lift zones from this position. If you start taking heavy fire just put the semi-transparent wall in between you and the attacker.