Halo 5: Guardians skulls: Difference between revisions
From Halopedia, the Halo wiki
(→Iron) |
|||
| Line 85: | Line 85: | ||
==== Iron ==== | ==== Iron ==== | ||
<div class="floatright"><youtube width="300" height="250">S2OlWOCZu1I</youtube></div The Ubication for the 3 possible loactions of the skull> | |||
{{Article Quote|On solo, player death results in the mission restarting. On cooperative play, player death results in reversion to previous checkpoint}} | {{Article Quote|On solo, player death results in the mission restarting. On cooperative play, player death results in reversion to previous checkpoint}} | ||
Revision as of 12:11, May 22, 2017

Halo 5: Guardians skulls are game modifiers featured in Halo 5: Guardians with the appearance of a human skull. The skulls are the same from Halo: Reach and Halo 4. Just like in previous installments like Halo 3 and Halo: Combat Evolved Anniversary skulls are collectibles that the player will be awarded with an achievement for finding the first and the last of them, and can also be accessed in the campaign menu after claiming them in the levels in which they're found.[1]
Campaign Skulls
Score Attack Reference
| Skull Name | Multiplier | Short Description |
|---|---|---|
| Iron | 3x | Teammate dead = Reload checkpoint. Everyone dead = Restart level. |
| Black Eye | 1.5x | No auto-shield regeneration. Only melee attacks cause shields to recharge. |
| Tough Luck | 1.5x | Grenades, Needler fire, projectiles (ie. Rocket Launcher, and Fuel Rod Cannon) and vehicular charges are evaded more skillfully by the AI. enemies go Berserk more often and Grunts will run away for less time, turn around and attack again the player. |
| Catch | 1.5x | NPCs throw many more grenades at an alarming rate. NPCs always drop two grenades when dying. |
| Fog | 1.5x | Motion Tracker is fully disabled. |
| Famine | 2x | Dropped weapons have much less ammunition/charge. |
| Thunderstorm | 1.5x | All enemies are promoted to higher ranks. (More experience) |
| Tilt | 2x | Enemy defensive resistances/weaknesses are amplified. |
| Mythic | 2x | All NPC's health allocation is doubled. |
IWHBYD (I Would Have Been Your Daddy) Skull
Level: Osiris
Icon: A skull marked with a double helix.
Effect: Rare dialog is more common, and vice versa.
Directions:
- Go to the very first Forerunner door on the level before using the Artemis for the first time.
- Look to the left towards a ledge and clamber onto it.
- Look towards the air battle there will be a triangular ledge where the skull lies.
Black Eye
Level: Blue Team
Icon: A skull marked with a smaller skull with a bruise under one eye.
Effect: Your Energy Shield will not recharge until you perform a melee hit. The Energy Sword and Gravity Hammer's RT attacks count as melee attacks. The shock-wave created by the Gravity Hammer will also recharge your shield.
Point Multiplier: 1.5x
Directions:
- In the reactor room, go to the far left of the reactor, where there are a few ammo boxes and a pipe, clamber onto the pipe.
- Walk all the way to the end of the pipe, which will lead you to a small, dark room.
- On the floor there should be a breakable piece of ground. Ground Pound it, and that should make you fall to another room.
- Once inside, go towards the left, there should be a small pipe with the skull resting on it for you to pick up.
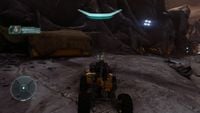
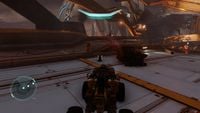
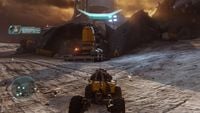
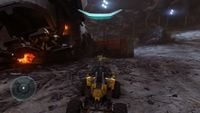
Iron
Level: Glassed
Icon: A skull marked with a hammer.
Effect: If you die while playing solo, you will respawn at the very beginning of the level. If any player dies while playing Co-op, all players will respawn to the last checkpoint. This is similar to what would happen when playing Co-op on Legendary in Halo 2, but it is slightly more harsh on the players.
Point Multiplier: 3x
Directions:
- After you gain access to the Corp Scorpion and go through some arched rocks, you may see a cargo ship flying and being pursued by a Phaeton.
- Shoot at the Phaeton until you destroy it.
- When you destroy it, you will hear the Grunt Birthday Party sound effect which means the skull will appear in one of three places.
Blind
Level: Unconfirmed
Icon: An eye with the pupil crossed out.
Effect: Your entire Heads-Up Display is disabled. You can't see your weapon, shield meter, motion tracker or ammo/grenades.
Directions:
- After entering the underground facility, you'll find a forklift which you have to climb.
- Climb a bow that's next to the wall and look behind you where there is a cat walk.
- Climb said cat walk and go to the end of it.
- At the end you will find a small cave where you need to crouch, just walk inside.
- You will find the skull lying in there.
Thunderstorm
Level: Evacuation
Icon: A skull marked with a lightning bolt.
Effect: All enemies and allies are promoted to the highest available rank. Elites will be Elite Warriors, Grunts will be Grunts Heavy, Crawlers will be Alpha Crawlers.
Point Multiplier: 1.5x
Directions: For you to get the skulls you need to destroy 5 cones in 2 minutes or less.
- The first of the cones is located close to the door where the level Unconfirmed begins, after you go through it, you have to go the left where a rock ledge and a metal stairway are, you'll find the cone next to boxes with a blanket on them.
- Second cone is before you go inside the tunnel where Governor Sloan says ¨This is Governor Sloan broadcasting on all frequencies. People, if you are still planetside, make your way to the space elevator right now. Final shuttles are departing with or without you.¨ There, you will find to the right next to some stairways the cone for you to destroy.
- Third is where the Prometheans destroy the bridge, next to a destroyed Warthog, you will find the cone.
- Fourth will be around the section with a yellow pillar and a few boxes.
- Fifth & final cone will be next to a destroyed cargo ship and a red box covered with a blanket.
- Once you have destroyed the cones, you must go to almost the end of the level where the Guardian begins throwing pulses, there you will find the skull buried, but with its top exposed for you to see.
Cone 1

Cone 2
Cone 3
Cone 4
Cone 5


Grunt Birthday Party
Level: Reunion
Icon: A skull marked with a candle.
Effect: If a Grunt is shot in the head with any headshot-capable weapon (such as the DMR, Beam Rifle, Carbine, Sniper Rifle or Magnum), a popping sound is heard, colorful confetti explodes out of it, and a sound clip of children cheering from the game Hurray!"can be heard in the background. When the Grunt's head explodes, their backpack will usually explode.
Directions:
- In the section of the mission on a cliff where there are some Covenant examining a crashed Phantom simply, walk towards the right and go inside the tunnel.
- After coming out of it, you will see some covenant boxes, and even an Energy sword, walk left and see the grunt singing & holding the skull.
- Walk behind the Grunt, and it will say ¨action button-punt¨ for you to kick the Grunt of the ledge.
- Halo 5 Skull 1 - Mission 7 Reunion - Grunt Birth Day Party (2).jpg
The skull once dropped.
Fog
Level : Reunion
Icon: A skull marked with a swirl of fog.
Effect: Your Motion tracker is disabled completely.
Point Multiplier: 1.5x
Directions:
- When Cortana says: "The Gateway to the Forerunner Domain. You'll be the first organics to enter since the fall of the Forerunners. I admit, after the crash here, I didn't think I'd see you again." simply walk right where you can see a Guardian in the sky.
- Walk towards a Forerunner structure similar to a Beam emitter.
- Go all the way through the path on it.
- At the end of it you will find the skull there for you to claim.
Mythic
Level: Swords of Sanghelios
Icon: A skull marked with a circle with a smaller circle in it.
Effect: All of the Covenant you encounter have twice the amount of health and shields.
Point Multiplier: 2x
Directions:
- After you get out of the Sangheilli temple and you see the chapter name: ¨Hornet's Nest¨ you will see some dropships flying by.
- Look backwards and look towards a collapsed column and begin to climb it.
- Once you're in the top of it look to the left where you will see a small ceiling and now you will have to jump to reach it.
Note: You might have to do some trick jumping such as sprinting-jump-aiming-thrust forward-clamber.
Catch
Level: Enemy Lines
Icon: A skull marked with an image of a Plasma Grenade.
Effect: All AI-controlled units throw grenades more often, where applicable. It should be noted that characters will throw an unlimited amount of grenades at their enemies. The skull actually does seem to increase the number of Kamikaze Grunts.
Point Multiplier: 1.5x
Directions:
- Once you've gained access to the phaeton land on the left platform of the Kraken and go through the entrance there.
- Once you see a small ledge that sometimes has sniper Jackals, turn left.
- Board one of the Banshees in the hangar that you will find there, and fly it to another ledge that is sort of hidden in the ceiling.
- Once in there you will simply find the skull on the left of it, in a corner.
Cowbell
Template:Article Quote Level: Battle of Sunaion
Icon: A skull marked with a cowbell.
Effect: Physics impulses are increased. Explosions and melee attacks launch characters and objects farther, but the damage is not affected.
Directions:
- Where the Warden Eternal appears, simply walk towards the guardian.
- let your self fall into a ledge with a bunch of debris.
- walk to the part close to the ocean, and you will find there the skull.
Tilt
Level: Genesis
Icon: A skull marked with a smaller skull with a hole in its head.
Effect: All enemy weaknesses and resistances double. Thus Covenant weapons deal more damage to shields but less to health, while UNSC weapons do less damage to shields but remarkably more to health
Point Multiplier: 2x
Directions:
- After defeating Warden Eternal, go to the hill that is on the right which is the tallest of them.
- Climb all the way to the top.
- The skull will be there waiting on the edge of the hill.
Famine
Level: The Breaking
Icon: A skull marked with a smaller skull. The smaller skull seems to have a line between it and some dots (food). This describes the obvious traits of a famine.without teeth.
Effect: All weapons that are dropped by enemies or are scripted to spawn on the ground (e.g., near a crashed Pelican or group of dead bodies) have halved or reduced ammunition or charge. However, weapons found in cases still have the standard amount of ammo.
Point Multiplier: 2x
Directions:
- After Cortana intervenes in the Warden's attack, simply go behind section into a curved corridor.
- Behind them will be a small section where the skull is located.
Tough Luck
Level: Guardians
Icon: A skull marked with a three-leafed clover.
Effect: Enemies dodge Grenades, Needles, slow moving projectiles and vehicle assaults with a greater success rate.
Point Multiplier: 1.5x
Directions:
- Method A: Go behind the Gamma core to a Forerunner door, climb the chunks of snow that are on the right of it and walk all the way towards the crashed Pelican, then to the left you'll see some blocks of ice in them, and the Tough Luck skull.
- Method B: On the Alpha Core, next to the Mantis is another path which you can go through so you can reach the crashed Pelican and claim the skull.
Trivia
- Until one of Halo 5's updates you could not revive teammates nor be revived when the Iron skull was turned on.


.jpg)