Raid on Installation 08: Difference between revisions
From Halopedia, the Halo wiki
Iota Eta Pi (talk | contribs) mNo edit summary |
SPARTAN-4628 (talk | contribs) No edit summary |
||
| Line 45: | Line 45: | ||
*Installation 00 | *Installation 00 | ||
}} | }} | ||
The '''Raid on Installation 04B''' was a small engagement between the [[United Nations Space Command|UNSC]]-[[Covenant separatists|Covenant separatist]] alliance, [[the Flood]] and later the [[Forerunner]] [[Sentinel]]s acting under [[343 Guilty Spark]]'s orders. It took place immediately after the [[Raid on High Charity|raid]] on [[High Charity]] and marked the end of the [[Battle of Installation 00]]. <ref>'''[[Halo 3]]''', campaign level ''[[Halo (level)|Halo]]''</ref> | The '''Raid on Installation 04B''' was a small engagement between the [[United Nations Space Command|UNSC]]-[[Covenant separatists|Covenant separatist]] alliance, [[the Flood]] and later the [[Forerunner]] [[Sentinel]]s acting under [[343 Guilty Spark]]'s orders. It took place immediately after the [[Raid on High Charity|raid]] on [[High Charity]] and marked the end of both the [[Battle of Installation 00]] and the [[Human-Covenant War]].<ref>'''[[Halo 3]]''', campaign level ''[[Halo (level)|Halo]]''</ref> | ||
==Background== | ==Background== | ||
Revision as of 17:29, January 22, 2012
Template:Battle The Raid on Installation 04B was a small engagement between the UNSC-Covenant separatist alliance, the Flood and later the Forerunner Sentinels acting under 343 Guilty Spark's orders. It took place immediately after the raid on High Charity and marked the end of both the Battle of Installation 00 and the Human-Covenant War.[1]
Background
Battle of Installation 00
- Main article: Battle of Installation 00
After realizing that the Prophet of Truth had gained access to the Ark, a joint UNSC-Covenant separatist attack force was sent through the Portal to combat the Covenant loyalist force there, and stop the Covenant form activating the Halo Array and destroying all sentient life in the galaxy.
The combined forces of the UNSC-separatist alliance was enough to completely destroy the Loyalist forces and prevent the Halo Array from firing. However, the arrival of the Flood hive on High Charity changed the course of the battle. John-117 set out for High Charity. His goal was to retrieve a copy of Installation 04's index from the captured AI Cortana and fire off the newly rebuilt Halo, completely destroying the Flood in and around the Ark.
Raid on High Charity
- Main article: Raid on High Charity
John-117 landed in High Charity and combated Flood forces deep into their hive. After fighting through waves of Flood forms, he retrieved Cortana, and therefore, the activation index she acquired during the events of the original Battle of Installation 04. The SPARTAN then set High Charity's secondary reactors to explode. He met up with Thel 'Vadam, who had also ventured into the hive to help him, and they took off in a Pelican to activate Installation 04B and destroy the Flood. As they left, High Charity exploded, killing nearly all of the Flood there. Meanwhile, the human and separatist survivors from Installation 00 were evacuated to the separatist assault carrier Shadow of Intent which headed back to Earth through the portal.
Battle
John-117 piloted the damaged Pelican and crash-landed the dropship nearby the Installation's control room. At the same time, Sergeant Major Avery Johnson landed the UNSC Forward Unto Dawn on the Installation, far away from the control room. On foot, John, along with Cortana and Thel 'Vadam, made their way to the control room. The Gravemind, succumbing from the damage inflicted upon him from the High Charity explosion, sent waves of Flood dispersal pods to prevent the activation of the Installation. The SPARTAN and the Arbiter fought through the Flood forces as they progressed to the top of the tower, with some assistances from the Sentinels and Sergent Johnson. Once at the top, the team met up with the sergeant, secured the area and entered the control room.
Once inside, the team hesitantly tried to activate the Installation immediately. 343 Guilty Spark, after realizing that firing the partially-completed Installation would destroy the megastructure as well as the Ark, turned against the team. His initial attack mortally wounded the sergeant and blasted the former Arbiter out of the control room. John-117 was severely injured by the initial blast to the point of draining his shield. The SPARTAN was locked into a battle with the rampant Monitor and struggled to destroy it. The mortally wounded Sergeant Johnson took the rogue Monitor by surprise with his Spartan Laser, temporarily incapacitated the Forerunner construct. John, seizing the moment, used the sergeant's Spartan Laser to destroy Guilty Spark. John tended to the grievously wounded sergeant, whose dying words being "send me out, with a bang." Cortana gave her condolence and activated the Installation using the Activation Index.
As the team exited the control room, they find themselves having to battle against the Sentinels and the Flood. The team made their way out of the vicinity of the tower and commandeered an abandoned Warthog left behind by Sergeant Johnson. With the vehicle, the team rode to the Forward Unto Dawn as fast as they could, passing through a labyrinth of construction tunnels, and collapsing platforms. The team eventually made it to the Dawn by crash-landing into the ship's cargo bay. Thel quickly climbed to the bridge and started piloting the ship to safety, while John struggled to hold on in the cargo bay of the vessel. As they approached the Portal, the Installation fired.
Aftermath
This battle marked the end of the Flood threat. As the incomplete Installation 04B fired, it obliterated the Ark, along with all Flood and Sentinel forces as well as any surviving Covenant forces present on both constructs.[2]
While Forward Unto Dawn was entering the Portal the field collapsed, severing the ship in two. The bow, with Thel inside, made it to the exit coordinates above Earth and crashed into the Southern Ocean. The stern section was less fortunate; John and Cortana were trapped in the wreckage as it drifted towards an unidentified planet.
Gallery

John-117, Thel 'Vadam and Cortana approach Installation 04B on a Pelican while the Shadow of Intent looms below.
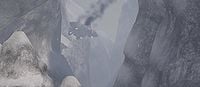
The Pelican crash-landing in the installation's canyons.
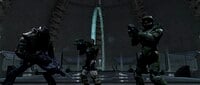
The trio enters the Control Room.
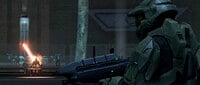
Guilty Spark mortally wounds Johnson.
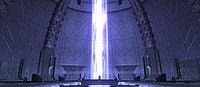
The replacement Halo is activated.

John-117 and the Arbiter race through the collapsing Halo.


List of appearances
- Halo 3 (First appearance)
- Halo Legends


