Jiralhanae Jumper: Difference between revisions
From Halopedia, the Halo wiki
m (moved Jump Pack Jiralhanae to Jiralhanae Jumper: As per EVG's Brute page.) |
No edit summary |
||
| Line 1: | Line 1: | ||
{{Era|HCW}} | {{Era|HCW}} | ||
{{Covenant Rank Infobox | {{Covenant Rank Infobox | ||
|name= | |name=Jiralhanae Jumper | ||
|imageBG=#f0f0f0 | |imageBG=#f0f0f0 | ||
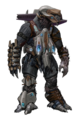
|image=[[File:JumpPackBrute.png|300px]] | |image=[[File:JumpPackBrute.png|300px]] | ||
|species=[[Jiralhanae]] | |species=[[Jiralhanae]] | ||
|weapons=*[[Brute Plasma Rifle]] | |weapons=*[[Type-25 Directed Energy Rifle/Jiralhanae variant|Brute Plasma Rifle]] | ||
*[[Plasma Rifle]] | *[[Type-25 Directed Energy Rifle|Plasma Rifle]] | ||
*[[Brute Spiker]] | *[[Type-25 Carbine|Brute Spiker]] | ||
*[[Brute Shot]] | *[[Type-25 Grenade Launcher|Brute Shot]] | ||
*[[Covenant Carbine]] | *[[Type-51 Carbine|Covenant Carbine]] | ||
*[[Fuel Rod Gun]] | *[[Type-33 Light Anti-Armor Weapon|Fuel Rod Gun]] | ||
|equipment=*[[Jump Pack]] | |equipment=*[[Jump Pack]] | ||
*[[Radar Jammer]] | *[[Radar Jammer]] | ||
| Line 18: | Line 17: | ||
*[[Power Drain]] | *[[Power Drain]] | ||
*[[Spike Grenades]] | *[[Spike Grenades]] | ||
|vehicles= | |vehicles= | ||
|role= | |role= | ||
|notable= | |notable= | ||
| Line 28: | Line 23: | ||
}} | }} | ||
The '''Jump Pack Jiralhanae''' is a [[Jiralhanae]] [[rank]].<ref>'''[[Halo 3]]''' Service Record</ref> | The '''Jiralhanae Jumper''',<ref>'''[[Halo: The Essential Visual Guide]]''', ''page 25''</ref> better known as "'''Jump Pack Jiralhanae'''", is a [[Jiralhanae]] specialist [[rank]].<ref>'''[[Halo 3]]''' Service Record</ref> | ||
==Description== | ==Description== | ||
On their dorsal sides, | On their dorsal sides, the Jiralhanae Jumper carry jump packs for increased mobility. They serve as the Jiralhanae counterpart to [[Sangheili Ranger]]s, but unlike the Rangers whom were met in a low-gravity environment, they are not capable of complete aerial tactical maneuvering; rather, their jump packs propel them on an immense jump to a greater distance. | ||
They most commonly use [[Radar Jammer]]s, [[Flare]]s and [[Trip Mines]], flying in and dropping them near their opponents. Their jump packs do not break down with the rest of their [[Jiralhanae power armor]] when heavily damaged, so they may continue their airborne assaults until they are killed | They most commonly use [[Radar Jammer]]s, [[Flare]]s and [[Trip Mines]], flying in and dropping them near their opponents. Their jump packs do not break down with the rest of their [[Jiralhanae power armor]] when heavily damaged, so they may continue their airborne assaults until they are killed. | ||
==Appearances== | ==Appearances== | ||
They utilize jump packs on the battlefield and wear a strikingly obvious dark blue armor, similar to the Ranger | They utilize jump packs on the battlefield and wear a strikingly obvious dark blue armor, similar to the Sangheili Ranger. | ||
In ''[[Halo 3: ODST]]'', there appears to be different | In ''[[Halo 3: ODST]]'', there appears to be different Jumper ranks. There are red and gold colored armor, with the ranks being red for major and gold for captain. During Campaign, Gold Jump Packs appear on harder difficulties or with the Thunderstorm Skull enabled. | ||
==Combat== | ==Combat== | ||
Jiralhanae Jumpers will often use their high mobility to get behind and out-flank their enemies. As such, it is imperative to listen for the sounds of their jump packs and quickly locate and eliminate them. One of their main weaknesses is they generally stay in the same position upon landing and before take off. The large number of blue lights on their chest can betray a Jiralhanae Jumper's position and are a good aiming aid for a player, particularly when one is using a more accurate weapon, like the [[BR55HB SR Battle Rifle|Battle Rifle]], or Covenant [[Carbine]]. Also, when flying, they appear unable to fire their weapons. It can occur, however, that they begin throwing a [[Spike Grenade|grenade]] before lifting off, completing this action when airborne. | |||
Jiralhanae Jumper normally use such weapons as [[Spikers]], [[Brute Shots]], and more often than not, Carbines. It would be smart to bring mid-to-long range weapons, such as a Carbine or [[BR55HB SR Battle Rifle|Battle Rifle]]. Even better is to obtain a Sniper or Beam Rifle, and then kill as many as you can before entering the area. | |||
Upon being defeated, if the final shot or melee attack made contact with the jump pack, the jump pack will malfunction and rocket the Brute forwards a short distance. This also works when they are sniped out of the air, and when assassinated. | Upon being defeated, if the final shot or melee attack made contact with the jump pack, the jump pack will malfunction and rocket the Brute forwards a short distance. This also works when they are sniped out of the air, and when assassinated. | ||
===Tips=== | ===Tips=== | ||
Jiralhanae Jumper are not extremely challenging in small numbers, though they can be overwhelming in large forces, especially with the catch skull on meaning that all they have to do is fly, land, spam some grenades and fly off again so quick reflexes and decent sniping skills are required to counter that. However, their jump is very predictable, so the player can easily look up and run under the Brute, then assassinate him when he lands. It is recommended for you not to use an automatic weapon while they are soaring through the air. However, turrets are very useful in taking them out. Precision weapons are much more effective. Also, on the level [[Crow's Nest (Level)|Crow's Nest]], Jiralhanae Jumper have [[Trip Mines]], and placing one down under the spot where they are about to land is usually an instant kill. However, players can accidentally step on their own activated Trip Mines. | |||
==Trivia== | ==Trivia== | ||
*If one is infected by the [[Flood]], it will lose its jump pack. This is because there aren't separate models for the different types of [[Combat Forms]]. However, a [[Combat Form]] would most likely be able to use such technology, if the Flood had absorbed enough Brutes that know how to operate the jump packs. | *If one is infected by the [[Flood]], it will lose its jump pack. This is because there aren't separate models for the different types of [[Combat Forms]]. However, a [[Combat Form]] would most likely be able to use such technology, if the Flood had absorbed enough Brutes that know how to operate the jump packs. | ||
*If a | *If a Jiralhanae Jumper goes berserk, it will fly at the player and try to hit the player on the head, killing the player upon impact. | ||
==Gallery== | ==Gallery== | ||
<gallery> | <gallery> | ||
File:H3 - Jumppack Concept.png|Concept art for the | File:H3 - Jumppack Concept.png|Concept art for the Jiralhanae Jumper. | ||
File:1216011570 JumpPack.jpg|A | File:1216011570 JumpPack.jpg|A Jiralhanae Jumper in mid-flight. | ||
File:Brute Jumpack Demonstration.jpg|Jiralhanae can attain incredible heights with their jump packs. | File:Brute Jumpack Demonstration.jpg|Jiralhanae can attain incredible heights with their jump packs. | ||
File:95008105-Full.jpg|A red-armored | File:95008105-Full.jpg|A red-armored Jiralhanae Jumper. | ||
File:95006350-Full.jpg|A gold-armored | File:95006350-Full.jpg|A gold-armored Jiralhanae Jumper. | ||
</gallery> | </gallery> | ||
Revision as of 07:06, November 6, 2011
Template:Covenant Rank Infobox
The Jiralhanae Jumper,[1] better known as "Jump Pack Jiralhanae", is a Jiralhanae specialist rank.[2]
Description
On their dorsal sides, the Jiralhanae Jumper carry jump packs for increased mobility. They serve as the Jiralhanae counterpart to Sangheili Rangers, but unlike the Rangers whom were met in a low-gravity environment, they are not capable of complete aerial tactical maneuvering; rather, their jump packs propel them on an immense jump to a greater distance.
They most commonly use Radar Jammers, Flares and Trip Mines, flying in and dropping them near their opponents. Their jump packs do not break down with the rest of their Jiralhanae power armor when heavily damaged, so they may continue their airborne assaults until they are killed.
Appearances
They utilize jump packs on the battlefield and wear a strikingly obvious dark blue armor, similar to the Sangheili Ranger.
In Halo 3: ODST, there appears to be different Jumper ranks. There are red and gold colored armor, with the ranks being red for major and gold for captain. During Campaign, Gold Jump Packs appear on harder difficulties or with the Thunderstorm Skull enabled.
Combat
Jiralhanae Jumpers will often use their high mobility to get behind and out-flank their enemies. As such, it is imperative to listen for the sounds of their jump packs and quickly locate and eliminate them. One of their main weaknesses is they generally stay in the same position upon landing and before take off. The large number of blue lights on their chest can betray a Jiralhanae Jumper's position and are a good aiming aid for a player, particularly when one is using a more accurate weapon, like the Battle Rifle, or Covenant Carbine. Also, when flying, they appear unable to fire their weapons. It can occur, however, that they begin throwing a grenade before lifting off, completing this action when airborne.
Jiralhanae Jumper normally use such weapons as Spikers, Brute Shots, and more often than not, Carbines. It would be smart to bring mid-to-long range weapons, such as a Carbine or Battle Rifle. Even better is to obtain a Sniper or Beam Rifle, and then kill as many as you can before entering the area.
Upon being defeated, if the final shot or melee attack made contact with the jump pack, the jump pack will malfunction and rocket the Brute forwards a short distance. This also works when they are sniped out of the air, and when assassinated.
Tips
Jiralhanae Jumper are not extremely challenging in small numbers, though they can be overwhelming in large forces, especially with the catch skull on meaning that all they have to do is fly, land, spam some grenades and fly off again so quick reflexes and decent sniping skills are required to counter that. However, their jump is very predictable, so the player can easily look up and run under the Brute, then assassinate him when he lands. It is recommended for you not to use an automatic weapon while they are soaring through the air. However, turrets are very useful in taking them out. Precision weapons are much more effective. Also, on the level Crow's Nest, Jiralhanae Jumper have Trip Mines, and placing one down under the spot where they are about to land is usually an instant kill. However, players can accidentally step on their own activated Trip Mines.
Trivia
- If one is infected by the Flood, it will lose its jump pack. This is because there aren't separate models for the different types of Combat Forms. However, a Combat Form would most likely be able to use such technology, if the Flood had absorbed enough Brutes that know how to operate the jump packs.
- If a Jiralhanae Jumper goes berserk, it will fly at the player and try to hit the player on the head, killing the player upon impact.
Gallery
Concept art for the Jiralhanae Jumper.

A Jiralhanae Jumper in mid-flight.
- Brute Jumpack Demonstration.jpg
Jiralhanae can attain incredible heights with their jump packs.
- 95008105-Full.jpg
A red-armored Jiralhanae Jumper.
- 95006350-Full.jpg
A gold-armored Jiralhanae Jumper.


List of appearances
- Halo 3 (First appearance)
- Halo 3: ODST
- Halo: Uprising
- Halo Wars
Sources
- ^ Halo: The Essential Visual Guide, page 25
- ^ Halo 3 Service Record


