Halo 3 skulls: Difference between revisions
From Halopedia, the Halo wiki
(→Fog) |
No edit summary |
||
| Line 27: | Line 27: | ||
'''Directions''': It's in the same room you start in. Hanging down from the ceiling is a large pipe. Jump up onto this pipe, and on the end of it is the skull. | '''Directions''': It's in the same room you start in. Hanging down from the ceiling is a large pipe. Jump up onto this pipe, and on the end of it is the skull. | ||
'''Icon''': A skull marked with a bruise under one eye. | '''Icon''': A skull marked with small skull with a bruise under one eye. | ||
'''Effect''': Your personal energy shield will no longer recharge normally. To do this you must melee an enemy with any weapon other than the Energy Sword. | '''Effect''': Your personal energy shield will no longer recharge normally. To do this you must melee an enemy with any weapon other than the Energy Sword. | ||
| Line 63: | Line 63: | ||
'''Level''': [[Floodgate]] | '''Level''': [[Floodgate]] | ||
'''Directions''': | '''Directions''': After playing through the level for a short while, you will hear a marine yell “There! Over There!” If you look up to the right, you will see a single Flood combat form. Shoot it before it jumps away, and the skull will be launched, so it may take several tries to have the skull land on the ground. Shooting too early will leave the skull on the rooftop. | ||
'''Icon''': A skull marked with a swirl of fog. | '''Icon''': A skull marked with a swirl of fog. | ||
| Line 77: | Line 77: | ||
'''Directions''': Shortly before you reach the area where Johnson flies down and contacts Captain Miranda Keyes, you will notice a small fork, the other path leading to your future destination. Pass through here, and head to the end of the stretch with the platform overhead. At the end, turn left and you will see a boulder. Use it to climb onto the platform, and walk to the last of the supports going up. It has an opening over the slanting part of the platform, and the skull is in there. Use a grenade or deployable cover to get there. If you prefer, you can come back to here after getting the Scorpion and then get the skull. | '''Directions''': Shortly before you reach the area where Johnson flies down and contacts Captain Miranda Keyes, you will notice a small fork, the other path leading to your future destination. Pass through here, and head to the end of the stretch with the platform overhead. At the end, turn left and you will see a boulder. Use it to climb onto the platform, and walk to the last of the supports going up. It has an opening over the slanting part of the platform, and the skull is in there. Use a grenade or deployable cover to get there. If you prefer, you can come back to here after getting the Scorpion and then get the skull. | ||
'''Icon''': A skull marked with a smaller skull. | '''Icon''': A skull marked with a smaller, black, skull. | ||
'''Effect''': All weapons that are dropped by enemies or a scripted to spawn on the ground (e.g., near a downed Pelican) will have halved ammunition or charge. | '''Effect''': All weapons that are dropped by enemies or a scripted to spawn on the ground (e.g., near a downed Pelican) will have halved ammunition or charge. | ||
| Line 101: | Line 101: | ||
'''Directions''': The skull is at the top of the large circular room where Cortana asks your name, and says it’s very nice to meet you (your screen and movement don’t change for this one). To the left of the room will be some small, somewhat fungal, growths on the walls. Using these, jump up onto a platform. There will be some more nearby, so use those to get to a large circular platform with the skull on it. The skull will not be there after you retrieve Cortana. | '''Directions''': The skull is at the top of the large circular room where Cortana asks your name, and says it’s very nice to meet you (your screen and movement don’t change for this one). To the left of the room will be some small, somewhat fungal, growths on the walls. Using these, jump up onto a platform. There will be some more nearby, so use those to get to a large circular platform with the skull on it. The skull will not be there after you retrieve Cortana. | ||
'''Icon''': | '''Icon''': A skull marked with a smaller skull with a hole in its head. | ||
'''Effect''': Enemy resistances are greatly increased. Where a particular type of weapon normally does slightly reduced damage (e.g., projectiles against Brute armor, or plasma against Brute flesh), it will be reduced greatly with this skull's effect. | '''Effect''': Enemy resistances are greatly increased. Where a particular type of weapon normally does slightly reduced damage (e.g., projectiles against Brute armor, or plasma against Brute flesh), it will be reduced greatly with this skull's effect. | ||
| Line 155: | Line 155: | ||
'''Level''': [[The_Covenant_(Level)|The Covenant]] | '''Level''': [[The_Covenant_(Level)|The Covenant]] | ||
'''Directions''': After the Arbiter kills the Prophet of Truth, walk to the end of the bridge with the Halo holograms and clear the Flood. “1” is the ring closest to the entrance, “4” is the damaged ring, and “7” is ring closest to Truth. Jump through the rings in the order: 4 6 5 4 5 3 4. If done correctly the rings should all flash, and the skull will appear on the small bridge leading to the platform with Truth’s body. | '''Directions''': After the Arbiter kills the Prophet of Truth, walk to the end of the bridge with the Halo holograms and clear the Flood. “1” is the ring closest to the entrance, “4” is the damaged ring, and “7” is ring closest to Truth. Jump through the rings in the order: 4 6 5 4 5 3 4. If done correctly the rings should all flash, and the skull will appear on the small bridge leading to the platform with Truth’s body. Note that in some cases you may need to complete the level after getting the skull to unlock it, unlike with the others. This is not always the case, however, but it’s best to not take chances. | ||
'''Icon''': A skull marked with a double helix. | '''Icon''': A skull marked with a double helix. | ||
Revision as of 18:38, October 24, 2007
Summary
A Skull in Halo 3 is an Easter egg designed to make the game more challenging or interesting. The skulls resemble those in the multiplayer game variant “Oddball”, and can be used as weapons in much the same way but they lack information text to pick them up. They are usually hidden out of the way, so one must search for them, or else know where they are, to get them.
Do note that in order to obtain any of the skulls, you have to begin the level from the beginning, on Normal or higher difficulty. In most cases, you do not have to finish the level after first picking up the skull, so can simply save and quit; nor do you need to carry the skull after picking it up. After you first pick the skull up, you merely need to press X at the level selection screen to select whether or not you want it, or any others, active.
“Gold Skulls” will grant you achievements when you first get them, but “Silver Skulls” will not. They are differentiated on the selection screen by their background, but are identical in-game. In the Campaign Scoring mode, activating gold skulls will grant you a multiplier to the points you receive, depending on the skull/s.
List of Known Gold Skulls
Iron
Level: Sierra 117[1]
Directions: This skull is at the end of the level. It is located on the roof of the building to the left of the building where Sergeant Johnson is being held captive (facing the entrance). You can get up by jumping onto the pipes. Go all the way to the end of the rooftop, and the skull will be there.
Icon: A skull marked with a stylized drawing of a hammer.
Effect: If you die while playing solo, you will restart at the beginning of the level (you cannot revert to the last checkpoint at any time). If any player dies while playing co-operative, you will reset to the last checkpoint.
Point Multiplier: 3x
Black Eye
Level: Crow's Nest[1]
Directions: It's in the same room you start in. Hanging down from the ceiling is a large pipe. Jump up onto this pipe, and on the end of it is the skull.
Icon: A skull marked with small skull with a bruise under one eye.
Effect: Your personal energy shield will no longer recharge normally. To do this you must melee an enemy with any weapon other than the Energy Sword.
Point Multiplier: 1.5x
Tough Luck
Level: Tsavo Highway[1]
Directions: At the point in the level when the Covenant Battlecruiser flies overhead, there is a large pipe to your left following the road. Get up (there is a ladder), go to the yellow junction, and jump down onto a support beam. Go to the end of this beam, and jump to the cliff to your left to find the skull.
Icon: A skull marked with three clovers.
Effect: Enemies dodge grenades and vehicle assaults with a far greater success rate.
Point Multiplier: 1.5x
Catch
Directions: In the outdoor area with an AA Wraith, some Ghosts, and later a normal Wraith, there is a silo-like building to the end of the cliff. Get up onto it (using a vehicle and a grenade or an ally), and the skull will be there. Note that if both Wraiths are destroyed, the skull will disappear.
Icon: A skull marked with a stylized drawing of a plasma grenade.
Effect: AI controlled units will throw more grenades, where applicable.
Point Multiplier: 1.5x
Note: There is a glitch in some games where this skull will not appear, even if the other instructions have been followed. In such an event, you should complete the entire campaign on at least Normal difficulty.
Fog
Level: Floodgate
Directions: After playing through the level for a short while, you will hear a marine yell “There! Over There!” If you look up to the right, you will see a single Flood combat form. Shoot it before it jumps away, and the skull will be launched, so it may take several tries to have the skull land on the ground. Shooting too early will leave the skull on the rooftop.
Icon: A skull marked with a swirl of fog.
Effect: Your motion sensor is no longer visible.
Point Multiplier: 1.5x
Famine
Directions: Shortly before you reach the area where Johnson flies down and contacts Captain Miranda Keyes, you will notice a small fork, the other path leading to your future destination. Pass through here, and head to the end of the stretch with the platform overhead. At the end, turn left and you will see a boulder. Use it to climb onto the platform, and walk to the last of the supports going up. It has an opening over the slanting part of the platform, and the skull is in there. Use a grenade or deployable cover to get there. If you prefer, you can come back to here after getting the Scorpion and then get the skull.
Icon: A skull marked with a smaller, black, skull.
Effect: All weapons that are dropped by enemies or a scripted to spawn on the ground (e.g., near a downed Pelican) will have halved ammunition or charge.
Point Multiplier: 2x
Thunderstorm
Level: The Covenant[1]
Directions: After you get into a Hornet for the first time, fly to the first tower you see to your right (the one the Elites disabled). The skull is on the top of the ramp that overlooks the ocean.
Icon: A skull marked with a lightning bolt.
Effect: All enemies will be promoted to their next available rank, where applicable.
Point Multiplier: 1.5x
Tilt
Directions: The skull is at the top of the large circular room where Cortana asks your name, and says it’s very nice to meet you (your screen and movement don’t change for this one). To the left of the room will be some small, somewhat fungal, growths on the walls. Using these, jump up onto a platform. There will be some more nearby, so use those to get to a large circular platform with the skull on it. The skull will not be there after you retrieve Cortana.
Icon: A skull marked with a smaller skull with a hole in its head.
Effect: Enemy resistances are greatly increased. Where a particular type of weapon normally does slightly reduced damage (e.g., projectiles against Brute armor, or plasma against Brute flesh), it will be reduced greatly with this skull's effect.
Point Multiplier: 2x
Mythic
Directions: Hug the right wall from the very beginning of the level. Soon you will reach a cave with a dead end, and the skull is on the floor.
Icon: A skull marked with a swirl.
Effect: All enemies health will double.
Point Multiplier: 2x
List of Known Silver Skulls
Blind
Level: Sierra 117[1]
Directions: After the first enemy encounter, head to the cliff (two Phantoms will drop troops off). To the right will be a rocky outcrop with the skull clearly on it.
Icon: A skull marked with an eye.
Effect: Your HUD and weapon are no longer visible.
Cowbell
Directions: In the middle of the area where you fight the Scarab there is a structure with portable gravity lifts and a Brute Chopper. Get one of the lifts. After defeating the Scarab, continue on until you pass the room with a lot of explosive plasma containers. In the hallway after this room, there is a tall section with openings above the turning point of the hall, and the skull is in the top one of these. Use the gravity lift to get there (place the lift around the middle of the ramp). If you don’t succeed, revert to your previous checkpoint and try again.
Icon: A skull marked with a cowbell.
Effect: The force of explosions is increased.
Grunt Birthday Party
Level: Crow's Nest[1]
Directions: After the encounter with a Drone swarm, you will soon reach an area with Drones coming out of pipes to the side. Head to the end of the tunnel, but don’t drop straight down. Instead walk off then straight backwards and you’ll enter a hidden room in the side of the wall. The skull is here.
Icon: A skull marked with a candle.
Effect: If a Grunt is shot in the head, confetti will explode out of it (this causes damage), and a cheer will be heard.
I Would Have Been Your Daddy
Level: The Covenant
Directions: After the Arbiter kills the Prophet of Truth, walk to the end of the bridge with the Halo holograms and clear the Flood. “1” is the ring closest to the entrance, “4” is the damaged ring, and “7” is ring closest to Truth. Jump through the rings in the order: 4 6 5 4 5 3 4. If done correctly the rings should all flash, and the skull will appear on the small bridge leading to the platform with Truth’s body. Note that in some cases you may need to complete the level after getting the skull to unlock it, unlike with the others. This is not always the case, however, but it’s best to not take chances.
Icon: A skull marked with a double helix.
Effect: Unlocks new, often humorous, dialogue for the AI.
Special Effects (Pictures)
- 2737147-Full.jpg
Grunt Birthday.
- 2778992-Full.jpg
More exploding Grunts.
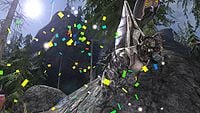
Close up of an exploding grunt.
- OverkillGrunts.jpg
4 grunts exploding.

Video
Gold Skulls Locations <youtube width="350" height="350>9WrXr4Aa3Bs</youtube>
Silver Skulls 3/4 Locations <youtube width="350" height="350>roXCIh2Rz60&NR</youtube>
Silver Skull IWHBYD Location <youtube width="350" height="350>LLOm7olquhk</youtube>
Guide to all 13 Halo 3 Skulls <youtube width="350" height="350">XIE7I2OPgyA</youtube>


