Guardian (map)
From Halopedia, the Halo wiki
Template:Multiplayer Map Infobox Template:Article Quote Guardian is a Halo 3 multiplayer map. Reminiscent of Halo 2 multiplayer maps Lockout and Ascension, Guardian is a medium sized level comprised of catwalks and small rooms, which make the level feel smaller than it actually is. Its asymmetric layout makes it great for Slayer and Team Slayer gametypes, while its central platform makes for interesting games of King of the Hill.
Layout
Guardian is set in an ancient Forerunner complex surrounded by a lush, dense jungle that is believed to be the Drone home world Palamok. The map is multi-leveled, with walkways, and paths connecting all areas of the map. The map is split into four key areas, with the centre acting as a connection point between them all. The level is fairly simple in design, so the learning curve is short. It is a very good map for free-for-all multiplayer games.
In aesthetics, the layout recalls a mixture of Lockout and Ascension; it retains the central area and size of Ascension, and its layout and weapon spawns are very reminiscent of Lockout. However, unlike Lockout, the scenery between areas of the map changes noticeably, so players do not get lost as easily.
Sniper Tower
At one end of the map players can find the Sniper Rifle, an Overshield, and a Needler, hence the "Sniper Tower". The Sniper Rifle sits on the bottom level, in the hallway leading to the center. Here, players have a clear view to the opposite site of the map and the Yellow Lift, which is a good place to snipe from.
There is a small winding ramp on the tower that leads up to higher ground, and gives players a view of the entire upper portion of the map. To balance the tower out and prevent camping, a Plasma Battery has been placed at the top. Players have access to the Center Platform from above and below, as well as the Green Area via a walkway some players have labeled it as "The Elbow," due to its "L" shape.
A common trick is to detonate the Plasma Batteries at the apex of a jump, propelling the player up onto the tree above, and allowing for an unprecedented view, of the map.
Blue Room
The "Blue Room" is properly named, due to the soft blue lights giving the room an ambient look. This room is adjacent, but slightly off centre from the Yellow Lift and the Centre Platform. Like the other key areas, it can be accessed from multiple directions. Inside the room, players will find 2 Plasma Batteries. There is also a Flare and a Mauler located here, as well as an SMG on the ramp leading into the room. An archway allows players to jump into the Yellow Lift, either above or below. As players move from the Blue Room to the centre, there is an impenetrable glass wall allowing players cover from enemy fire. Players may also travel downward to the lower level. Next to the archway is an L-shaped hallway that leads directly to the Yellow Lift's upper level, and contains explosive Power Cores built into the wall. Players may also drop to the "Shotgun hall" from here.
Some have said that the blue nebula is a slip space portal, but no one really knows what it is really for, aside from decoration.
Below Blue Room
Below the Blue Room, or "Bottom Blue", there is a whole new subsection. Players will find the Shotgun in a short hallway reminiscent of the "Green Hallway" in Lockout. However, the hallway is shorter and can be approached from more angles, from above as well as on the same level. Walkways and paths lead to the Yellow Lift's lower level. Moving in the opposite direction, players can take a small Gravity Lift up to the "Sniper Tower" to catch any player’s off-guard. However, using this lift at the start of a Team Slayer game is unwise, as the other team will definitely have control of the Overshield.
Yellow Lift
The "Yellow Lift" is directly opposite the Sniper Tower, and is on the other side of the Centre Platform. Modeled after the "Blue Lift" from Lockout, players can travel upwards from the lower level. Players may also drop down from the upper level via two "holes" on either side of the lift. Another common trick is for players to send grenades up the lift first, sometimes scoring a stick with a plasma grenade. There is a small walkway that connects the lower levels of the Yellow Lift and Centre Platform. On the upper level, players can move in 4 main directions (or retreat into the "holes" on the side of the lift).
A Battle Rifle spawns on the top level giving players some range against snipers. The player can choose to go to their left, pick up a Active Camouflage power-up. If the player travels to their right, they can jump into the Blue Room, which can be tricky, or drop on opponents below. They can also take the longer way around by the power cores; this route adds more safety and discretion, as long as the power cores are not detonated.
Green Area
Not much action occurs in the Green Area, partially because the only weapon that spawns here is the Brute Shot. Like the Centre Platform, this area is essentially another means of connecting all areas and walkways together. In the centre sits an old dead tree stump in which players can grab a Bubble Shield and then jump to the Centre Platform. The Green Area is connected to the Sniper Tower by means of "The Elbow" walkway. In addition, players may take a small gravity lift jump up to the Yellow Room's ledge (by the camouflage). This area also leads underneath the Centre Platform, and is a more discreet route.
Centre Platform
The Centre Platform is the main area of Guardian and the main means of player transportation. While no weapons spawn on the upper level, a Gravity Hammer does spawn in the room underneath, making it a key area. Also, less known to some players, in a Team Hammers match (Or any other match where the Gravity Hammer is present), one can set a bubble shield in the middle of the Centre Platform, making it an ideal spot to control when grenades can not be thrown into the circle and forcing other players to come into the middle. This also can give it the name called by many people who utilize this strategy: "The Circle of Fun" or to the victims of this tactic "The Circle of Death". Since this area is a transportation zone, it sees a lot of action. Players can reach the Centre Platform from all the key areas by means of walkways or jumping. Above players can see a Forerunner style structure, which is accessible via grenade-jump off the elbow with help from the plasma battery, a Gravity Hammer bounce, or by going into Forge and positioning a Gravity Lift, just right.
Matchmaking Adjustments
Guardian has been slightly altered for Matchmaking. All three of the Maulers and the Flare have been removed. In addition, invisible barriers have blocked off some areas, such as the ledge above the Active Camo spawn.
Strategies
- A second strategy to get to the console is to put gravity down to 50% in the game settings menu, and then just jump.
- To get an unprecedented Sniping spot, use the same trick with the Plasma Batteries, but this time jump on top of them. At the apex of the jump, shoot the Plasma Battery. This will propel the player up the tree, granting a view of almost the entire level.
- When running up the ramp that leads to the Overshield Spawn, the player can run along the right side of it and jump off, if done properly, the player can get downstairs into the Sniper Spawn and hopefully avoid the Overshield player on free-for-alls at the same time.
- When at the sniper tower and about to snipe, the sniper should make sure to remove the Plasma Battery with a grenade or a weapon so that it cannot be used against them.
- In the Overshield room, it is possible to be wedged high into the corner of the room between the doorway that leads to the centre of the map and the doorway that leads to the ramp (Jump and crouch). If players have their look centered they will not see you. It is recommended to have a shotgun here.
- If you are at the Sniper side of the map at the start of a team game, the Sniper of the team is advised to guard the Hammer until a team-mate can grab under cover of the Sniper.
- If you are at the Blue Room side of the map at the start, picking up the Shotgun and man-cannoning over to the Sniper area is a good way to disable the sniper and give your team a good start, but watch out for someone with the Overshield.
- When in the Sniper Tower, if you don't plan on using the Plasma Battery to get height or kill an enemy that comes up the ramp, destroy it if you want a safe sniping spot.
- While on the second floor of the yellow room, you can drop down through the gap and assassinate unsuspecting passersby.
- A proven strategy for starting off a Team based game well goes like this (but it will only work if you spawn on the bridge, close to the Sniper Rifle): In Team Doubles, player 1 would head for the man cannon and pick up Brute Shot, while the other player rushes Sniper Rifle as quick as possible. Player 1 uses his Brute Shot to: a. Kill the opponent(s) who rush(es) Active Camouflage, or b. Secures Active Camouflage for himself, keeping the enemy at bay with his Brute Shot. In the meantime, the second player either: a. Uses Sniper Rifle to provide cover for Player 1 or b. Uses Overshield and Sniper to deal with any opponents who travel over to the Sniper post. The Overshield should only be used when you know someone heading towards the Sniper, and at the last moment, the OS can be used for its 3-4 second invulnerability to take out 1 or both opponents, even if they carry over Shotgun.
- A cool jump: While you are on the pathway from Elbow to S2 (Sniper Tower, Second floor), you can jump from where you are to hammer spawn. This takes a little skill, and may take some practice to perform.
- When playing Team SWAT, when you spawn at elbow don't move and look towards Blue Lift (Lift that goes to Sniper Tower). Usually your opponents will go there, allowing kills in the very beginning of the game. This goes vise versa- if you spawn at blue side then just look towards elbow.
- When playing Team SWAT, when you spawn at blue side go to the pathway that leads from bottom blue to bottom gold. Look towards the lift at Jungle. Usually there will be someone going up the lift, allowing you a kill if you able to pull it off.
- If you start at Overshield, grab the Carbine and Shield and head up the elbow to the Fusion Core and Plasma Grenades. Throw a frag at the core, turn around, and jump. Since you have overshields, the blast will not kill you, and if done right you can land on the odd shaped thing that juts out from the Yellow lift building. This can be done in about 10 seconds, and it offers a 180-degree view of the centre area and doors. If you crouch, you can maintain this area until your ammo runs out, often with the opposite team trying to figure out how they are dying.
- If you get the Gravity Hammer then head to the yellow lift and wait at the top and hide in the corners of the room and wait for people to come.
- If you have the Hammer, just wait at its respawn spot (Hammers are effective in close and tight areas) to get some easy kills on those looking for a Hammer.
- In forge hide in the hidden tree stump ledge and no-one can shoot you.
Forge
- Using Gravity Lifts, you can allow the players to move from the lower to the upper "decks" of the level with out having to go to the ramps.
- It is possible to stick objects to the ceiling of the blue room.
Trivia
- Guardian may possibly be in the swamps of Installation 04. It may also take place on Palamok, the Yanme'e homeworld.
- "Guardian" was first seen as a reference in the hexadecimal code of the Halo 3 Beta. Later, it was confirmed to be in the final game of Halo 3 when it was detailed in an issue of Electronic Gaming Monthly magazine and an article in the Japanese magazine Famitsu.
- The September 2007 issue of EGM stated that Guardian is the map "Jub-Jub" that Bungie referred to numerous times in their weekly updates, an undying love reference to the Ewok's dialogue in Star Wars: Return of the Jedi.
- This is an interesting map to play sniping matches on as there are at the same time many twists and turns and head-on encounters.
- Guardian may have something to do with the mysterious entities that can inexplicably kill players in Multi player.
- There are a number of indistinct voices whispering in the background.
- The Dinosaur Birds can be seen on this map and can be closely examined by Forge or theatre. They can also be shot and killed with any long/medium range precision weapon.
- In the Machinima Marlin the Elite, Marlin's grandmother lives here.
- There may also be a link between the name "Jub-Jub", the Dinosaur Birds and Lewis Carroll's poem Jabberwocky, which contains the lines "Beware the Jabberwock, my son! The jaws that bite, the claws that catch! Beware the Jubjub bird, and shun The frumious Bandersnatch!"
- Like Narrows, Foundry, Valhalla, and Sandtrap, there have been numerous reports of a ghost haunting the map. This ghost wields a Spartan Laser, which is strange, as the Spartan Laser does not spawn on this map.
- A picture of Guardian appears in Wired. [1]
- The terrain around the map resembles the same terrain as the planet Dagobah in the Star Wars films.
- There is a hidden face on Guardian. To find it, one must overload the map and go into theatre mode and go behind the structure. Above the yellow lift is a black smiley.[2]
- Even easier to find are the faces that appear in the middle of the keystone shaped protrusions on the doorways in the map. One can see these faces by either using the binocular or getting a scoped weapon and looking directly in the middle of these keystones. The easiest to find is the one on the doorway from Blue Hallway to Gold room, and the one on the doorway from Middle to Sniper Tower.
- If one listens careful, one can hear the screeches made by the Dino-Birds in the background.
- If players jump below the proto-man-cannons, they will levitate beneath them. This is an excellent sniping spot and may be a Carney hole. If the player moves inward, they will be shot to the center of the map. If they move outward, they will plummet to their death.
- Due to Matchmaking adjustments, Guardian has so far been the only Halo 3 map in Matchmaking that only has one equipment spawn point, the Bubble Shield, as the Flare on this map was removed.
- When examining the Centre Platform, players can notice that the entire platform and lower compartment is almost identical to the Blood Gulch bases with the exception for lack of the stairs leading to the roof. In addition the walkway to the Blue Room is coincidently placed of the location of the "magnum platform" from the roof of the base. Plus, the location of the original green teleporters being located on the spot of the open section leading to the "Green Area". In addition, the location of the original two base ramps being replaced with walkways leading to the Gravity Lift room and the Sniper tower. And finally, the lower entrance to the "Green Area" is located on the same spot as the original front base entrance.
- The Grav Lift in this map uses the same sound effect as one of the background creatures on the planet Malestare from the Star Wars franchise.
Gallery
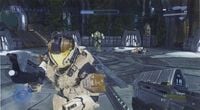
Players fight on Guardian's center platform.
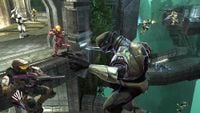
A free-for-all on Guardian.
- Mediagur.jpg
Player wielding a Mauler, overlooking the center platform.
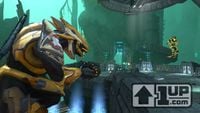
An Elite model wielding a Mauler.
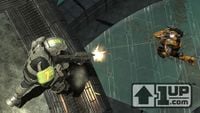
A Spartan attacks an Elite from above.


References
- ^ Wired Magazine- Issue Sept. 2007 - Pg 145
- ^ http://www.youtube.com/watch?v=jiNKesnHlXk
Related Pages


