Mombasa Streets: Difference between revisions
From Halopedia, the Halo wiki
Ultra Force (talk | contribs) m (Link added to 'Bungie.net') |
No edit summary |
||
| Line 35: | Line 35: | ||
== Plot == | == Plot == | ||
The level starts six hours after the Squad's failed orbital insertion, in the occupied [[New Mombasa City Centre | The level starts six hours after the Squad's failed orbital insertion, in the occupied [[New Mombasa City Centre]]. Some time after [[the Rookie]] wakes up, exits his [[Single Occupant Exoatmospheric Insertion Vehicle|pod]] and starts to explore the city, the [[Superintendent (Construct)|Superintendent]] will contact him via a public phone and upload a map of the city to his [[Visual Intelligence System, Reconnaissance|VISR]] navigation database. After finding the final beacon and completing the last flashback level, the Rookie will receive a distress signal from [[Captain (Navy)|Captain]] [[Veronica Dare|Dare]], who is pinned down in the data center under the city. At this point, the city will be mostly locked, with only a way to the nearest underground entrance, where the Rookie will descend into the depths of the city.<ref name="ods"/> | ||
{{clear}} | {{clear}} | ||
== Transcript == | == Transcript == | ||
Revision as of 14:40, February 6, 2010
Template:Ratings Template:Under Construction
|
Prev: |
|
|
Next: |
Data Hive (chronologically) |
| Mombasa Streets | |
|---|---|

| |
|
Game: |
|
|
Player: |
|
|
Date: |
|
|
Location: |
|
 |
Halopedia has a walkthrough guide for this level; see Mombasa Streets/Walkthrough. |
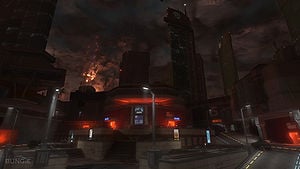
Mombasa Streets is the second campaign level of Halo 3: ODST, and serves as "the hub", an open-world environment used to access flashback missions. It is set in the city of New Mombasa.[1]
Summary
Unique as a Halo game level, this level is an open world environment, which contains "beacons", objects left by or noted by the Rookie's squad members, which trigger "flashback" levels, explaining previous events. In addition to the beacons, the level also has additional content, such as Audio Logs and Supply Caches.
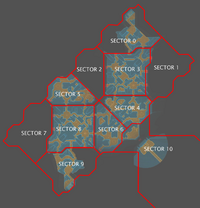
The city map provided by the Superintendent highlights points of interest, such as the "beacon" objects. The Superintendent also guides the player into the right direction using the city's plentiful digital signs and billboards.
During the first playthrough, some areas in the city are inaccessible, and the player is forced to play the flashbacks in chronological order. Completing flashbacks unlocks more areas in the city, allowing the player to progress to the next beacon. Once game is completed, the city is fully unlocked for exploration.[1]
Plot
The level starts six hours after the Squad's failed orbital insertion, in the occupied New Mombasa City Centre. Some time after the Rookie wakes up, exits his pod and starts to explore the city, the Superintendent will contact him via a public phone and upload a map of the city to his VISR navigation database. After finding the final beacon and completing the last flashback level, the Rookie will receive a distress signal from Captain Dare, who is pinned down in the data center under the city. At this point, the city will be mostly locked, with only a way to the nearest underground entrance, where the Rookie will descend into the depths of the city.[1]
Transcript
Text appears on black screen:
The Rookie
Occupied city center
6 hours after drop
The Rookie slowly opens his eyes in his pod. There is static interference in his visor, and multiple cracks in his pod's windows. The screens that are still working are filled with static. A Covenant Phantom flies in the background.
Shortly after the dropship passes, the Rookie activates four bolts to release his pod door open. The pod is on the edge of a short building, but, having no other choice, the Rookie hops out, only to fall about 10-20 feet to ground, injuring him slightly. If the game is being played in cooperative mode, the bolts section is skipped, and the hatch is popped automatically, as is the Rookie jumping out.
Cutscene After Final Flashback
After the Rookie has discovered the final clue, he picks up a transmission.
Dare (Radio): Can anyone hear me? This is Captain Veronica Dare!
The Rookie puts his hand to the comlink on his helmet.
Dare (Radio): My beacon is active - need immediate assistance! Someone, please respond!
The Rookie looks up to see a Phantom passing by and activating its searchlight. He then readies his SMG and moves out.
After the cutscene, the rest of the sectors in the level will be locked down, and the nearest underground entrance will be marked with a beacon.
Final Cutscene
After the Rookie makes his way to the underground entrance.
The Rookie enters the underground tunnel and stops at the edge of an empty elevator shaft leading deep underground. He glances down to see just how deep the shaft is, holsters his SMG, jumps over the shaft to grab an elevator support cable. He hesitates for a moment but soon begins to slowly rappel down.
Beacons
There are six beacons around the level, each an object related to a squadmate. The following is a list of the locations of these beacons, and the flashback levels they trigger, in chronological order.
| Location | Object | Character | Level | Time |
| Sector 5, room overlooking Tayari Plaza | Dare's Recon helmet | Buck | Tayari Plaza | Immediately after drop (16:06) |
| Sector 9, in front of New Mombasa Uplift building | Damaged F-99 Drone optics package | Dutch | Uplift Reserve | 30 minutes after drop (16:36) |
| Sector 4, building overlooking Kizingo Boulevard | Destroyed Gauss turret | Mickey | Kizingo Boulevard | 90 minutes after drop (17:36) |
| Sector 10, near destroyed bridge to ONI Alpha Site | Remote detonator | Dutch | ONI Alpha Site | 2 hours after drop (18:10) |
| Sector 3 | Sniper Rifle (bent, hanging from a power line.) | Romeo | NMPD HQ | 3 hours after drop (19:14) |
| Sector 0, entrance to Kikowani Station | Biofoam canister | Buck | Kikowani Station | 5 hours after drop (21:01) |
Trivia
- This is the first non-linear open-world level ever in a Halo game, and the largest open environment Bungie has ever created. Additionally, this level is the only level in Halo 3: ODST which does not unlock an achievement upon beating it on Normal or above. This is probably because of the fact that this is a free roaming level.
- On this level, there are several graffiti markings where you can read BELIEVE, maybe being a reference to the marketing campaign for Halo 3 of the same name. There is other graffiti in the city, some of which read "YOU LOOT, I SHOOT", "KINSLER IZ A THUG","UNSC=LIARS", "FASCISTS", "REMEMBER REACH", "MILITIA AIN'T WORTH SPIT!", and "GLASS THIS!".
- After entering the building next to the first locked weapons cache, search the floor surrounding the door leading to the first courtyard. When searching the floor, you will find a box of cereal labeled, Web-O's. The mascot on the front of the box is a picture of a gorilla with a cowboy hat. This character is recognized by Bungie employees and Bungie.net members as, "The Webmaster" (one of Bungie's many inside jokes). In the right corner below him the phrase, "Your Host LOVES 'em!" can be seen, a reference to how Bungie.net is hosted by a webmaster.
- On the left side of the second floor of ONI Building's lobby, there are two photo IDs on the floor in the mess of papers. The photos on the two IDs are of Martin O'Donnell and Shi Kai Wang. In addition, the ID inside the front door entrance has a photo of Shishka. In fact, all of the IDs found laying around in the lobby on both the first and second floor are of Bungie employees that served a major role in ODST's development.
- The entire BSP (the level geometry itself) is not rendered at once because of engine limitations - this is why Bungie put in blast doors and walls in between sectors. Furthermore, some of the BSPs are identical - Sectors 4 & 5, 3 & 8, and 0 & 9.[2] The only noticeable difference is that you cannot enter the building in sector 4 as you did the one in sector 5, and another being the Uplift Nature Reserve in sector 9. Also, when you open a blast door, the BSP loads, but, for example, if you enter sector 8, it will load the sector 3 BSP since they are one and the same. Note that scenery items are not included in the BSP, since no part of the BSP is movable.
Sources
