
Deployable cover: Difference between revisions
m (Reverted edits by Max2107 (Talk) to last version by An elite '92) |
BaconShelf (talk | contribs) m (→Sources) |
||
| (84 intermediate revisions by 52 users not shown) | |||
| Line 1: | Line 1: | ||
{{ | {{Status|Canon}} | ||
{{Weapon infobox | |||
{{Weapon | |name=Deployable cover | ||
|image=[[ | |image=[[File:Deployable Cover.jpg|300px]] | ||
| | |manufacturer= | ||
| | |series= | ||
|type=[[Equipment]] | |type=[[Equipment]] | ||
| | |cost= | ||
| | |variant= | ||
| | |service=[[Human-Covenant War]] <br> [[Great Schism]] | ||
|length= | |||
|width= | |||
|height= | |||
|weight={{Convert|30.8|lb|kg|disp=flip|Sp=us}}{{Ref/Book|Id=Enc09|Enc09|Page=341}} | |||
|ammotype= | |||
|capacity= | |||
|feed-title=Duration | |||
|feed=Single use (infinite duration in campaign; 30 seconds in Multiplayer) | |||
|operation= | |||
|rate= | |||
|velocity= | |||
|optics= | |||
|range= | |||
}} | }} | ||
The ''' | The '''deployable cover''' is a form of [[Covenant]] [[equipment]].{{Ref/Reuse|Enc09}}{{Ref/Game|Id=H3|H3|Deployable Cover in-game equipment}} Among [[United Nations Space Command]] personnel, the equipment has acquired a number of colloquial nicknames including "'''DC'''", "'''One-Way Wall'''", "'''One-Way Mirror'''", "'''One-Way Sign'''", and "'''Walking Shield'''".{{Ref/Reuse|Enc09}} | ||
== Overview == | ==Overview== | ||
===Design details=== | |||
The deployable cover is a small, portable [[equipment]] piece used by the [[Covenant]] in a role similar to the [[Covenant portable shield]]. The emitter module itself is a teardrop-shaped equipment piece that, when deployed, unfolds into an [[Energy shielding|energy shield]] generator capable of projecting a large shield into the area around it. Any solid projectiles fired will be deflected by the shield; however, [[plasma]]-based weapons fire are absorbed by the shield from either side. The shield's health is represented by its color: it is normally blue, turns red/orange as it is damaged, and finally deactivates. If left alone, the shield will regenerate to full health. To deactivate the shield permanently, the base must be destroyed.{{Ref/Reuse|H3}} | |||
The shield is deployed in the same manner as all other equipment in the game, and it will stay activated until it takes enough damage or if left untouched for too long | ==In-game information== | ||
===''Halo 3'' and ''Halo 3: ODST''=== | |||
The deployable cover is featured as an [[equipment]] piece in ''[[Halo 3]]'' and ''[[Halo 3: ODST]]''. In ''Halo 3'', it is useable by both the player or by [[Jiralhanae|Brute]] enemies while in ''ODST'', it is only useable by enemy AI. The shield is deployed in the same manner as all other equipment in the game, and it will stay activated until it takes enough damage, or if left untouched for too long. | |||
Like the [[ | In [[campaign]], the shield will stay active indefinitely if left alone while in [[multiplayer]], the deployable cover will self-destruct after 30 seconds. Like the [[portable gravity lift]], the deployable cover will be destroyed after a fall from a great height. | ||
In campaign mode, the deployable cover is completely immune to the solid projectiles fired by [[Flood]] [[Flood pure form|Ranged Forms]], making it very useful on the eighth level of ''Halo 3'', [[Cortana (level)|Cortana]], especially on higher difficulties. Enemy AI cannot detect the player through a deployable cover, even on Legendary, making it possible for a player to take cover right in front of the enemy. This can be especially helpful on part of [[Crow's Nest]], where eight [[Jiralhanae|Brutes]] plus a [[Jiralhanae Chieftain|Chieftain]] are present, as there are multiple deployable covers available. | |||
The | ==Gallery== | ||
<gallery> | |||
File:Deployablecoverhud.svg|The Deployable Cover HUD icon. | |||
File:Deployable Cover Inactive.jpg|An inactive deployable cover. | |||
File:Deployable Cover Demonstration.jpg|Demonstration of firing from behind a deployable cover. | |||
File:DCbase.jpg|The base of a Deployable Cover after the shields have been depleted. | |||
</gallery> | |||
== | ==List of appearances== | ||
* | *''[[Halo 3]]'' {{1st}} | ||
*''[[Halo 3: ODST]]'' | |||
* | |||
==Sources== | ==Sources== | ||
{{Ref/Sources}} | |||
{{ | {{Navbox/Pickups/Gameplay}} | ||
[[Category: | [[Category:Shield technology]] | ||
[[Category:Covenant technology]] | |||
[[Category:Equipment]] | [[Category:Equipment]] | ||
Latest revision as of 20:20, October 15, 2023
| Deployable cover | |
|---|---|

| |
| Production overview | |
|
Type: |
|
| Specifications | |
|
Weight: |
14.0 kilograms (30.8 lb)[1] |
|
Duration: |
Single use (infinite duration in campaign; 30 seconds in Multiplayer) |
| Service history | |
|
In service: |
|
The deployable cover is a form of Covenant equipment.[1][2] Among United Nations Space Command personnel, the equipment has acquired a number of colloquial nicknames including "DC", "One-Way Wall", "One-Way Mirror", "One-Way Sign", and "Walking Shield".[1]
OverviewEdit
Design detailsEdit
The deployable cover is a small, portable equipment piece used by the Covenant in a role similar to the Covenant portable shield. The emitter module itself is a teardrop-shaped equipment piece that, when deployed, unfolds into an energy shield generator capable of projecting a large shield into the area around it. Any solid projectiles fired will be deflected by the shield; however, plasma-based weapons fire are absorbed by the shield from either side. The shield's health is represented by its color: it is normally blue, turns red/orange as it is damaged, and finally deactivates. If left alone, the shield will regenerate to full health. To deactivate the shield permanently, the base must be destroyed.[2]
In-game informationEdit
Halo 3 and Halo 3: ODSTEdit
The deployable cover is featured as an equipment piece in Halo 3 and Halo 3: ODST. In Halo 3, it is useable by both the player or by Brute enemies while in ODST, it is only useable by enemy AI. The shield is deployed in the same manner as all other equipment in the game, and it will stay activated until it takes enough damage, or if left untouched for too long.
In campaign, the shield will stay active indefinitely if left alone while in multiplayer, the deployable cover will self-destruct after 30 seconds. Like the portable gravity lift, the deployable cover will be destroyed after a fall from a great height.
In campaign mode, the deployable cover is completely immune to the solid projectiles fired by Flood Ranged Forms, making it very useful on the eighth level of Halo 3, Cortana, especially on higher difficulties. Enemy AI cannot detect the player through a deployable cover, even on Legendary, making it possible for a player to take cover right in front of the enemy. This can be especially helpful on part of Crow's Nest, where eight Brutes plus a Chieftain are present, as there are multiple deployable covers available.
GalleryEdit

The Deployable Cover HUD icon.
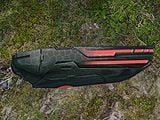
An inactive deployable cover.
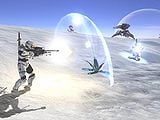
Demonstration of firing from behind a deployable cover.
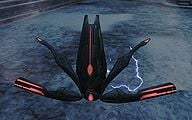
The base of a Deployable Cover after the shields have been depleted.


List of appearancesEdit
- Halo 3 (First appearance)
- Halo 3: ODST
SourcesEdit
| |||||||||||