Crater (Level)
From Halopedia, the Halo wiki
Template:Multiplayer Map Infobox
- "Fight in Dare's sunken crash-site."
- — Bungie.net
Crater is a Firefight map in Halo 3: ODST, based on Dare's crash site,[1] set in the city of New Mombasa. It is a relatively small map, with elevated outer edges surrounding a center area placed considerably lower than the rest, creating a crater shape. In this map, Covenant spawn from Phantoms which drop enemies at the side of the map adjacent to the player spawn point, as well as so called "Monster closets", which enemies spawn through placed on the left and right sides of the map. (from the spawning player's perspective).
The player's spawning area consists of two connected parallel tunnels which lead out to a small elevated area. Enemy access to this location is provided by two staircases on the left and right sides of the player area, which also contains a turret in the center. The machine gun turret has a broad field of fire, and is capable of shooting at almost any point on the map, but the location is greatly exposed.
There are two versions of this map, one taking place during the day, and the other taking place at night. The night version contains Engineers, while the day contains Jackal Snipers, who are an irritatingly long distance from your starting point, making pistol-counter sniping difficult.
Strategies
- There are a few good ways to stay alive for a long time on this map: One is to stay in the spawning base at all times, and pile some pistols in the second floor (if you want to snipe from there). However, when the Chieftains come simply have one player "guide" him up the stairs while having another assassinate him. The second way is to clear the walkways to your left and right as soon as possible, and having 2 players stay there to hold the two places, and have another engage in sniping from the second floor, or using the turret.
- Be careful using the turret during rounds with Catch enabled, as Grunts and Brutes can easily stick the turret and kill the gunner from the pit below.
- There are three potential landing sites for Phantoms, the Pit, ahead of the spawning zone, and to the left of the spawning zone. Grunts can easily be picked off in earlier rounds when dropping from the ledges above for massive streaks early in the game.
- There are two ammo spawns for the Sniper Rifle.
Gallery
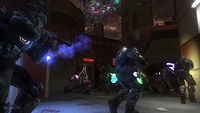
Team work is vital for survival.
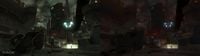
Dare's crashed SOEIV in Low Light and regular settings.

An over-head layout of the map.

Weapon and Ammo Locations for the Daytime Map.

Weapon and Ammo Locations for the Nighttime Map.


Sources


