Halo: Last One Standing: Difference between revisions
From Halopedia, the Halo wiki
(→Trivia) |
m (link cleanup, replaced: [[Type-2 Energy Weapon/Hammer| → [[Gravity hammer (fiction)| (2)) |
||
| (95 intermediate revisions by 48 users not shown) | |||
| Line 1: | Line 1: | ||
{{ | {{Title|''Halo: Last One Standing''}} | ||
{{ | {{Status|RealWorld}} | ||
{{ | {{Film infobox | ||
[[ | |image = [[File:T.Rymarr.jpg|250px]] | ||
[[ | |name = Halo: Last One Standing | ||
'''Halo: | |director = [[Neill Blomkamp]] | ||
|producer = | |||
|writer = | |||
|starring = | |||
|music = | |||
|studio = [[Bungie|Bungie Studios]]<br>[[Wikipedia:Weta Digital|Weta Digital]]<br>[[Origami Digital LLC]] | |||
|distributor = | |||
|release date = September 24, 2007 | |||
|runtime = 3 min, 30 sec | |||
|language = English | |||
}} | |||
'''''Halo: Last One Standing''''' is a short video created in collaboration with [[Bungie|Bungie Studios]], [[Neill Blomkamp]], [[WETA Workshop]] and [[Origami Digital LLC]]. It is the last in the [[Halo: Landfall|trilogy]] of shorts, continuing where ''[[Halo: Combat]]'' left off. It was released on September 24, 2007; only twelve hours before the release of ''[[Halo 3]]''. The video was unveiled on the Discovery Channel's website to promote an unrelated television show titled ''[[Wikipedia:Last Man Standing (UK TV series)|Last One Standing]]''. | |||
==Synopsis== | |||
''Halo: Last One Standing'' opens on where ''Combat Part 1'' left off, with the two [[Orbital Drop Shock Trooper|Marine ODSTs]], Bravo-21 ([[T. Rymann]]) and Bravo-22 ([[S. Hartley]]), in their [[M12 Force Application Vehicle|Warthog]] making their way to a squad of [[UNSC Marine Corps|Marines]] holding off an advancing column of [[Jiralhanae]]. The Spike in Hartley's gut is causing him intense pain and is likely to be fatal without immediate treatment. They drive through an abandoned industrial area toward a damaged satellite dish. When they arrive, they are forced to hold the line, waiting for [[John-117]] to enter range while Bravo-28, a female [[Hospital Corpsman|Corpsman]] named [[R. Coney]], tries to treat Bravo-22's wounds. A [[Type-2 Antipersonnel Fragmentation Grenade|Spike Grenade]] attaches to a wall near where the Marines are under cover - the Marine retaliates by breaking cover, grabbing the device and hurling it in the air, where it explodes and destroys a strafing [[Type-26 Ground Support Aircraft|Banshee]]. | |||
A Phantom begins its approach to the ground with a handful of Marines firing upon it. Bravo-21 joins them and flanks a column of [[Jiralhanae Minor|Brute Minors]] and tries to hold them off with an [[Sniper Rifle System 99D-S2 Anti-Matériel|SRS99D-S2 AM Sniper Rifle]], actually killing two and pinning a third, until he is ambushed by a [[Jiralhanae Chieftain|Brute Chieftain]] wielding a [[Gravity hammer (fiction)|Gravity Hammer]] from his left. He is forced out of his position by it, almost gets tagged by a Spike Grenade and then is chased down by the Chieftain. It bats him against a wall then delivers a killing blow, finishing him off. A Marine mans the M41 LAAG on the Warthog, downing two Brutes before being killed by a Spiker round to the chest. Coney declares him dead moments later, then goes to treat another Marine impaled through the arm with a Spiker round. With the Marine pinned to a wall, the Corpsman has no choice but to use a buzz saw to cut the round in half to free the Marine, causing him great pain. | |||
Finally, a fireball is seen entering the atmosphere. Bravo-22 opens the box that he obtained in the previous video, ''[[Halo: Combat]]'', revealing it to be some sort of laser sighting device. He sights the fireball, and "SIERRA 117" appears on the display in the sight.'' | |||
Their mission accomplished, the wounded squad of Marines and Bravo-22 retreat into a blast door, one Marine, being hit by a [[Pez'tk-pattern fuel rod gun|Fuel Rod Gun]], is blown onto the hood of the [[M12 Force Application Vehicle|Warthog]], but recovers and continues fleeing. A Phantom passes overhead, preparing to deploy more Brutes. After the squad gets in the blast door, with Bravo-22 lying against the wall and Coney helping the wounded Marine, another rushes past them to kill the advancing Chieftain with an [[M41 Surface-to-Surface Rocket Medium Anti-Vehicle/Assault Weapon|M41 SSR MAV/AW Rocket Launcher]], blowing it to pieces. The blast doors close on them, steeping them in darkness. | |||
==Transcript== | ==Transcript== | ||
{{#widget:YouTube|id=bYX3O1T4FNY|width=300|right}} | |||
''In the Warthog, Bravo 22 is screaming in pain, a [[Paegaas Workshop Spiker|Spiker]] round in his abdomen, while Bravo-21 drives and talks on the radio.'' | |||
*'''Bravo-21''': "Command, we're not gonna make it in time!" | |||
'' | *'''[[Oscar 6]] Pilot (COM)''': "Nearest Medic in Sector 6. Deviate from original course. Move to Sector 6. Master Chief's re-entry is minutes away." | ||
*'''Bravo-21''': | *'''Bravo-21''': "Okay, got it." | ||
*''' | *'''Oscar 6 Pilot (COM)''': "Proceed with caution. They're under heavy fire." | ||
''The Warthog arrives at the scene where three Marines are fighting Brutes in an open corridor. [[Scottlee]] and Marine #1 are firing from behind a wall on the right, while Marine #2 fires from around a wall on the left. A Brute throws a [[Type-2 Antipersonnel Fragmentation Grenade|Spike Grenade]], which sticks itself to the wall that Scottlee and Marine #1 are using for cover.'' | |||
*''' | *'''Marine #2''': "Throw it!" | ||
'' | ''Marine #2 provides cover fire for Marine #1 who pulls the Spike Grenade off the wall and throws it into the air, taking out a [[Type-26 Ground Support Aircraft|Banshee]].'' | ||
*''' | *'''Oscar 6 Pilot (COM)''': "Sierra 117, search and rescue team is awaiting coordinates." | ||
'' | ''Warthog comes to a halt, narrowly missing a fuel rod bolt. Bravo-21 jumps out of the Warthog.'' | ||
*''' | *'''Bravo-21''': "Medic! Hey, Medic!" ''(to Bravo-22)'' "Private… ?" | ||
'' | *'''Bravo-22''': "I can do it." | ||
''Bravo-21 and Corpsman Coney drag Bravo-22 out of the passenger seat and carry him over to a wall.'' | |||
'' | *'''Oscar 6 Pilot (COM)''': "You need to get that laser on the Chief." | ||
''Bravo-22 pulls off his helmet.'' | |||
*'''Bravo-22 | *'''Bravo-22''': "Just get this thing out of me, now! Ugh!" | ||
'' | ''The marines fire at a Brute, while a Phantom flies overhead.'' | ||
''Cut back to Bravo-22. Coney is inspecting the spike embedded in his abdomen.'' | |||
*''' | *'''Bravo-21''': "Can you do your job?" | ||
*'''Bravo-22''': | *'''Bravo-22''': "Yeah…" | ||
''Bravo-21 runs over to the Marines, narrowly avoiding a shot from a Banshee's fuel rod cannon.'' | |||
*'''Bravo- | *'''Bravo-21''': "Hey, what's the situation?" | ||
'' | *'''Marine #1''': "Almost out of ammo, sir! We have to pull back!" | ||
*'''Bravo-21''': | *'''Bravo-21''': "Negative, we need to hold them off until Master Chief breaks through. I'll go round and pin 'em down. Make every shot count!" | ||
''Bravo-21 grabs a sniper rifle propped up against a wall and runs off, while the marines provide cover fire. A Covenant Phantom deploys more Brutes. Bravo-21 runs around the left flank and gets into position just as the Brute reinforcements arrive. He shoots two Brutes at a rather close range with his sniper rifle. He fires at a third (presumably killing it too).'' | |||
''Suddenly a Brute Chieftain attacks from behind. Bravo-21 tries to run away but the Chieftain throws a Spike Grenade at him. Bravo-21 survives the blast but is overtaken by the Chieftain. He tries to shoot the Chieftain with his Magnum sidearm, but the Chieftain kills him with two blows from its [[Gravity hammer (fiction)|Gravity Hammer]].'' | |||
'' | ''The other Marines are still fighting. A Banshee comes in for a strafing run, forcing them all to take cover. Just then they look up and see a [[Forerunner Dreadnought|massive flaming object]] falling rapidly from the sky.'' | ||
*'''Corpsman Coney''': | *'''Corpsman Coney''': "Hold still." | ||
''Coney yanks the Spiker round out of Bravo-22; he yelps in pain.'' | ''Coney yanks the Spiker round out of Bravo-22; he yelps in pain. She begins to apply [[biofoam]] into his wound.'' | ||
''Cut back to the marines. Scottlee runs over to Marine #2.'' | |||
'' | *'''Scottlee''': "Go! Go! Go!" | ||
''Scottlee and Marine #1 provide cover for Marine #2 who races back and mans the LAAG on the back of the 'Hog and begins firing, killing two more Brutes. Scottlee starts to fall back to a new position.'' | |||
''Marine # | *'''Marine #1''': "Hit their position!" | ||
''Marine #2 is shot in the chest by Spiker fire and falls off the Warthog. Coney runs over to check on him, while Scottlee exchanges fire with a Brute. Spiker rounds fly past, embedding themselves in the wall behind him.'' | |||
'' | ''Coney quickly checks Marine #2.'' | ||
*''' | *'''Corpsman Coney''': "He's gone!" | ||
''Scottlee | ''The Brute adjusts it aim and fires its Spiker again, impaling Scottlee's left arm to the wall.'' | ||
*''' | *'''Scottlee''': "Augh, Medic!" | ||
'' | ''Coney rushes over to Scottlee's position. Scottlee uses his free arm to continue firing his battle rifle, killing the Brute. Coney looks over her shoulder.'' | ||
*''' | *'''Corpsman Coney''': "Incoming!" | ||
'' | ''They turn their heads away. Plasma fire hits the wall, narrowly missing them both. Coney opens up her bag and takes out a cutting tool. Scottlee screams in pain as the Medic begins cutting the Spike round with a buzz saw.'' | ||
''Bravo-22 opens the case and pulls out a laser designator. He points it at the object falling from the sky. A second smaller unidentified object has now broken off from the larger object.'' | |||
*''' | *'''Bravo-22''': "Target… acquired." | ||
''The monitor on the designator begins beeping as it tracks the smaller object which has been now been identified: SIERRA 117.'' | |||
'' | ''Cut to the Pelican hovering over the battlefield.'' | ||
*''' | *'''Oscar 6 Pilot (COM)''': "That's it; we got [[John-117|him]]. Recovery team has his coordinates, [[Arrival|touching down soon]]. Fall Back. Fall Back." | ||
'' | *'''Marine #1''': "Fall back! Fall back!" | ||
''Coney finishes cutting off the Spiker round in | ''Marine #1 turns and runs towards the bunker. A fuel rod cannon blast lands near him and he is thrown onto the Warthog's hood. Bravo-22 stumbles into the bunker, while Coney continues buzz sawing the Spiker round in Scottlee. The Phantom flies overhead. Marine #1 gets back up and runs toward the bunker. Coney finishes cutting off the Spiker round in Scottlee. They retreat inside the bunker, limping past Bravo-22 who has collapsed near the door, too exhausted to move. Marine #1 pauses at the door, lifts and aims an M41 SSR MAV/AW and blows the charging Brute Chieftain to pieces. Doors slam shut.'' | ||
'' | ''Fade to black.'' | ||
==Characters== | ==Characters== | ||
*'''[[2nd Shock Troops Battalion|2BN/3U]]''' | |||
*'''[[2BN/3U]]''' | |||
**[[T. Rymann]] | **[[T. Rymann]] | ||
**[[S. Hartley]] | **[[S. Hartley]] | ||
| Line 121: | Line 134: | ||
**[[Scottlee]] | **[[Scottlee]] | ||
**[[R. Coney]] | **[[R. Coney]] | ||
**Two unnamed | **Two unnamed Marines | ||
*'''Pelican [[Oscar 6]]''' | *'''Pelican [[Oscar 6]]''' | ||
| Line 127: | Line 140: | ||
== Trivia == | == Trivia == | ||
[[ | [[File:Update cougarhuting.jpg|thumb|The weapons featured in the live ''Halo'' shorts in the hands of Bungie employees.]] | ||
*The BR55HB battle rifles used by the Marines and ODSTs feature side attachments near the barrel that do not appear in ''Halo 3''. Additionally, the weapons' scopes differ from the model used in the game. The Marines are seen firing their battle rifles in fully automatic mode; while this is canonically possible, it cannot be performed in-game. | |||
*The | *After Bravo-21 is killed, when the Banshee's fuel rod cannon projectile hits, the famous [[Wikipedia:Wilhelm Scream|Wilhelm Scream]] can be heard. This sound effect was later used in the introductory cinematic of ''[[Halo Wars]]'', in the level ''[[Tip of the Spear]]'' in ''[[Halo: Reach]]'', and in the motion comic adaptation of ''[[The Mona Lisa]]''. | ||
*The spike grenades have a timer far longer than is seen in-game, with a Marine able to emerge from cover, pull the grenade out of a wall, and still have time to throw it at a passing Banshee. These grenades also explode rather than merely sending spikes in a specific direction, though part of this could be due to the exploding Banshee. | |||
*The | *''Last One Standing'' and ''Combat'' (collectively referred to as the "Landfall Trailer") received an honorable mention on Gametrailers list of the [http://www.gametrailers.com/shows/top-100-trailers/videos-clips Top 100 Trailers of All Time] in 2011.<ref>[http://www.gametrailers.com/videos/k0pai6/top-100-trailers-of-all-time-trailers--60---41 Gametrailers Top 100 Trailers of All Time: 60-41]</ref> | ||
==Gallery== | |||
<gallery> | |||
File:LastOneStanding-2.jpg|A [[Jiralhanae Chieftain|Brute Chieftain]] prepares to kill [[T. Rymann]]. | |||
File:LastOneStanding-1.jpg|Brutes advance on Marines' position | |||
File:R.Coney.jpg|[[R. Coney|Corpsman Coney]] tends to a wounded Marine who was shot off a [[M12 Force Application Vehicle|Warthog]] [[M41 Light Anti-Aircraft Gun|Turret]] with Spiker rounds. | |||
</gallery> | |||
==Sources== | |||
{{Ref/Sources}} | |||
== | |||
==External links== | |||
*http://dsc.discovery.com/tv/last-one-standing/halo-sweeps/halo-sweeps.html | *http://dsc.discovery.com/tv/last-one-standing/halo-sweeps/halo-sweeps.html | ||
{{Trailer}} | |||
[[Category:Halo 3]] | [[Category:Halo 3]] | ||
[[Category:Cinematics]] | [[Category:Cinematics]] | ||
[[Category:Film]] | |||
[[Category:Canon]] | |||
Latest revision as of 14:17, October 12, 2022
| Halo: Last One Standing | |
|---|---|

| |
|
Directed by: |
|
|
Studio: |
|
|
Release date(s): |
September 24, 2007 |
|
Running time: |
3 min, 30 sec |
|
Available in: |
English |
Halo: Last One Standing is a short video created in collaboration with Bungie Studios, Neill Blomkamp, WETA Workshop and Origami Digital LLC. It is the last in the trilogy of shorts, continuing where Halo: Combat left off. It was released on September 24, 2007; only twelve hours before the release of Halo 3. The video was unveiled on the Discovery Channel's website to promote an unrelated television show titled Last One Standing.
Synopsis[edit]
Halo: Last One Standing opens on where Combat Part 1 left off, with the two Marine ODSTs, Bravo-21 (T. Rymann) and Bravo-22 (S. Hartley), in their Warthog making their way to a squad of Marines holding off an advancing column of Jiralhanae. The Spike in Hartley's gut is causing him intense pain and is likely to be fatal without immediate treatment. They drive through an abandoned industrial area toward a damaged satellite dish. When they arrive, they are forced to hold the line, waiting for John-117 to enter range while Bravo-28, a female Corpsman named R. Coney, tries to treat Bravo-22's wounds. A Spike Grenade attaches to a wall near where the Marines are under cover - the Marine retaliates by breaking cover, grabbing the device and hurling it in the air, where it explodes and destroys a strafing Banshee.
A Phantom begins its approach to the ground with a handful of Marines firing upon it. Bravo-21 joins them and flanks a column of Brute Minors and tries to hold them off with an SRS99D-S2 AM Sniper Rifle, actually killing two and pinning a third, until he is ambushed by a Brute Chieftain wielding a Gravity Hammer from his left. He is forced out of his position by it, almost gets tagged by a Spike Grenade and then is chased down by the Chieftain. It bats him against a wall then delivers a killing blow, finishing him off. A Marine mans the M41 LAAG on the Warthog, downing two Brutes before being killed by a Spiker round to the chest. Coney declares him dead moments later, then goes to treat another Marine impaled through the arm with a Spiker round. With the Marine pinned to a wall, the Corpsman has no choice but to use a buzz saw to cut the round in half to free the Marine, causing him great pain.
Finally, a fireball is seen entering the atmosphere. Bravo-22 opens the box that he obtained in the previous video, Halo: Combat, revealing it to be some sort of laser sighting device. He sights the fireball, and "SIERRA 117" appears on the display in the sight.
Their mission accomplished, the wounded squad of Marines and Bravo-22 retreat into a blast door, one Marine, being hit by a Fuel Rod Gun, is blown onto the hood of the Warthog, but recovers and continues fleeing. A Phantom passes overhead, preparing to deploy more Brutes. After the squad gets in the blast door, with Bravo-22 lying against the wall and Coney helping the wounded Marine, another rushes past them to kill the advancing Chieftain with an M41 SSR MAV/AW Rocket Launcher, blowing it to pieces. The blast doors close on them, steeping them in darkness.
Transcript[edit]
- Bravo-21: "Command, we're not gonna make it in time!"
- Oscar 6 Pilot (COM): "Nearest Medic in Sector 6. Deviate from original course. Move to Sector 6. Master Chief's re-entry is minutes away."
- Bravo-21: "Okay, got it."
- Oscar 6 Pilot (COM): "Proceed with caution. They're under heavy fire."
The Warthog arrives at the scene where three Marines are fighting Brutes in an open corridor. Scottlee and Marine #1 are firing from behind a wall on the right, while Marine #2 fires from around a wall on the left. A Brute throws a Spike Grenade, which sticks itself to the wall that Scottlee and Marine #1 are using for cover.
- Marine #2: "Throw it!"
Marine #2 provides cover fire for Marine #1 who pulls the Spike Grenade off the wall and throws it into the air, taking out a Banshee.
- Oscar 6 Pilot (COM): "Sierra 117, search and rescue team is awaiting coordinates."
Warthog comes to a halt, narrowly missing a fuel rod bolt. Bravo-21 jumps out of the Warthog.
- Bravo-21: "Medic! Hey, Medic!" (to Bravo-22) "Private… ?"
- Bravo-22: "I can do it."
Bravo-21 and Corpsman Coney drag Bravo-22 out of the passenger seat and carry him over to a wall.
- Oscar 6 Pilot (COM): "You need to get that laser on the Chief."
Bravo-22 pulls off his helmet.
- Bravo-22: "Just get this thing out of me, now! Ugh!"
The marines fire at a Brute, while a Phantom flies overhead.
Cut back to Bravo-22. Coney is inspecting the spike embedded in his abdomen.
- Bravo-21: "Can you do your job?"
- Bravo-22: "Yeah…"
Bravo-21 runs over to the Marines, narrowly avoiding a shot from a Banshee's fuel rod cannon.
- Bravo-21: "Hey, what's the situation?"
- Marine #1: "Almost out of ammo, sir! We have to pull back!"
- Bravo-21: "Negative, we need to hold them off until Master Chief breaks through. I'll go round and pin 'em down. Make every shot count!"
Bravo-21 grabs a sniper rifle propped up against a wall and runs off, while the marines provide cover fire. A Covenant Phantom deploys more Brutes. Bravo-21 runs around the left flank and gets into position just as the Brute reinforcements arrive. He shoots two Brutes at a rather close range with his sniper rifle. He fires at a third (presumably killing it too).
Suddenly a Brute Chieftain attacks from behind. Bravo-21 tries to run away but the Chieftain throws a Spike Grenade at him. Bravo-21 survives the blast but is overtaken by the Chieftain. He tries to shoot the Chieftain with his Magnum sidearm, but the Chieftain kills him with two blows from its Gravity Hammer.
The other Marines are still fighting. A Banshee comes in for a strafing run, forcing them all to take cover. Just then they look up and see a massive flaming object falling rapidly from the sky.
- Corpsman Coney: "Hold still."
Coney yanks the Spiker round out of Bravo-22; he yelps in pain. She begins to apply biofoam into his wound.
Cut back to the marines. Scottlee runs over to Marine #2.
- Scottlee: "Go! Go! Go!"
Scottlee and Marine #1 provide cover for Marine #2 who races back and mans the LAAG on the back of the 'Hog and begins firing, killing two more Brutes. Scottlee starts to fall back to a new position.
- Marine #1: "Hit their position!"
Marine #2 is shot in the chest by Spiker fire and falls off the Warthog. Coney runs over to check on him, while Scottlee exchanges fire with a Brute. Spiker rounds fly past, embedding themselves in the wall behind him.
Coney quickly checks Marine #2.
- Corpsman Coney: "He's gone!"
The Brute adjusts it aim and fires its Spiker again, impaling Scottlee's left arm to the wall.
- Scottlee: "Augh, Medic!"
Coney rushes over to Scottlee's position. Scottlee uses his free arm to continue firing his battle rifle, killing the Brute. Coney looks over her shoulder.
- Corpsman Coney: "Incoming!"
They turn their heads away. Plasma fire hits the wall, narrowly missing them both. Coney opens up her bag and takes out a cutting tool. Scottlee screams in pain as the Medic begins cutting the Spike round with a buzz saw.
Bravo-22 opens the case and pulls out a laser designator. He points it at the object falling from the sky. A second smaller unidentified object has now broken off from the larger object.
- Bravo-22: "Target… acquired."
The monitor on the designator begins beeping as it tracks the smaller object which has been now been identified: SIERRA 117.
Cut to the Pelican hovering over the battlefield.
- Oscar 6 Pilot (COM): "That's it; we got him. Recovery team has his coordinates, touching down soon. Fall Back. Fall Back."
- Marine #1: "Fall back! Fall back!"
Marine #1 turns and runs towards the bunker. A fuel rod cannon blast lands near him and he is thrown onto the Warthog's hood. Bravo-22 stumbles into the bunker, while Coney continues buzz sawing the Spiker round in Scottlee. The Phantom flies overhead. Marine #1 gets back up and runs toward the bunker. Coney finishes cutting off the Spiker round in Scottlee. They retreat inside the bunker, limping past Bravo-22 who has collapsed near the door, too exhausted to move. Marine #1 pauses at the door, lifts and aims an M41 SSR MAV/AW and blows the charging Brute Chieftain to pieces. Doors slam shut.
Fade to black.
Characters[edit]
- Pelican Oscar 6
- Unnamed Male Pilot
Trivia[edit]

- The BR55HB battle rifles used by the Marines and ODSTs feature side attachments near the barrel that do not appear in Halo 3. Additionally, the weapons' scopes differ from the model used in the game. The Marines are seen firing their battle rifles in fully automatic mode; while this is canonically possible, it cannot be performed in-game.
- After Bravo-21 is killed, when the Banshee's fuel rod cannon projectile hits, the famous Wilhelm Scream can be heard. This sound effect was later used in the introductory cinematic of Halo Wars, in the level Tip of the Spear in Halo: Reach, and in the motion comic adaptation of The Mona Lisa.
- The spike grenades have a timer far longer than is seen in-game, with a Marine able to emerge from cover, pull the grenade out of a wall, and still have time to throw it at a passing Banshee. These grenades also explode rather than merely sending spikes in a specific direction, though part of this could be due to the exploding Banshee.
- Last One Standing and Combat (collectively referred to as the "Landfall Trailer") received an honorable mention on Gametrailers list of the Top 100 Trailers of All Time in 2011.[1]
Gallery[edit]
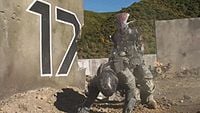
A Brute Chieftain prepares to kill T. Rymann.
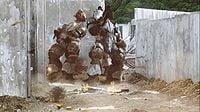
Brutes advance on Marines' position

Corpsman Coney tends to a wounded Marine who was shot off a Warthog Turret with Spiker rounds.


Sources[edit]
External links[edit]


