Requiem Campaign: Difference between revisions
From Halopedia, the Halo wiki
| Line 144: | Line 144: | ||
Following Halsey's abduction, ''Infinity'' dispatched all fireteams from both ''Infinity'' itself and three {{Class|Vindication|light battleship}}s to search for her. [[Fireteam Crimson]] was dispatched to "[[Cyclone]]" where Halsey had been routing communications through the area before she was snatched. With the help of beam turrets and [[Aggressor Sentinel]]s under the Librarian's control, Crimson was able to access the Covenant data terminal with the Librarian aiding Roland and Dr. [[Lani Truman]] with the decryption as she prepared to transmit herself to the [[Absolute Record]]. Both the decryption and transmission became stalled at 99%, resulting in Crimson opening the breaker on the power source in the area. The Librarian's imprint was broadcast to the Absolute Record in the form of a massive data stream while Halsey's signal was determined to have bounced to "[[Control]]."<ref>'''Spartan Ops''', [[Key/The Search for Halsey|S1E9 ''The Search for Halsey'']]</ref> At "Control," where [[Boa Squad]] had been wiped out by the Covenant, Crimson fought off the occupying forces and activated the comm terminals in the area. The Covenant received backup in the form of Prometheans, but Crimson was able to hold them off long enough for Roland to determine that the signal next bounced to "[[Apex]]." Once Crimson got to a safe location, [[Robert Dalton]] commenced an aerial bombardment of "Control," wiping out the remaining Promethean forces.<ref>'''Spartan Ops''', [[Key/Clean Up|S1E9 ''Clean Up'']]</ref> At "Apex," Crimson discovered the area protected by multiple Covenant shields and heavily fortified by infantry troops supported by [[Type-44 Phantom|Phantoms]]. Using [[M808C Scorpion|Scorpion tanks]], Crimson fought through the occupying Covenant and Promethean forces, allowing Roland to determine the signal next bounced to "[[Lockup]]."<ref>'''Spartan Ops''', [[Key/Science Mountain|S1E9 ''Science Mountain'']]</ref> | Following Halsey's abduction, ''Infinity'' dispatched all fireteams from both ''Infinity'' itself and three {{Class|Vindication|light battleship}}s to search for her. [[Fireteam Crimson]] was dispatched to "[[Cyclone]]" where Halsey had been routing communications through the area before she was snatched. With the help of beam turrets and [[Aggressor Sentinel]]s under the Librarian's control, Crimson was able to access the Covenant data terminal with the Librarian aiding Roland and Dr. [[Lani Truman]] with the decryption as she prepared to transmit herself to the [[Absolute Record]]. Both the decryption and transmission became stalled at 99%, resulting in Crimson opening the breaker on the power source in the area. The Librarian's imprint was broadcast to the Absolute Record in the form of a massive data stream while Halsey's signal was determined to have bounced to "[[Control]]."<ref>'''Spartan Ops''', [[Key/The Search for Halsey|S1E9 ''The Search for Halsey'']]</ref> At "Control," where [[Boa Squad]] had been wiped out by the Covenant, Crimson fought off the occupying forces and activated the comm terminals in the area. The Covenant received backup in the form of Prometheans, but Crimson was able to hold them off long enough for Roland to determine that the signal next bounced to "[[Apex]]." Once Crimson got to a safe location, [[Robert Dalton]] commenced an aerial bombardment of "Control," wiping out the remaining Promethean forces.<ref>'''Spartan Ops''', [[Key/Clean Up|S1E9 ''Clean Up'']]</ref> At "Apex," Crimson discovered the area protected by multiple Covenant shields and heavily fortified by infantry troops supported by [[Type-44 Phantom|Phantoms]]. Using [[M808C Scorpion|Scorpion tanks]], Crimson fought through the occupying Covenant and Promethean forces, allowing Roland to determine the signal next bounced to "[[Lockup]]."<ref>'''Spartan Ops''', [[Key/Science Mountain|S1E9 ''Science Mountain'']]</ref> | ||
When Crimson arrived at "Lockup," they faced off against fierce Covenant resistance including Ghosts, Wraiths and Hunters. Following the signal being emanated by [[IFF]] tags, Crimson fell into a Covenant trap, but managed to fight their way out of it. Crimson succeeded in clearing the area, but the Covenant and Prometheans sent further reinforcements to "Lockup."<ref>'''Spartan Ops''', [[Key/Revenge|S1E9 ''Revenge'']]</ref> Crimson | When Crimson arrived at "Lockup," they faced off against fierce Covenant resistance including Ghosts, Wraiths and Hunters. Following the signal being emanated by [[IFF]] tags, Crimson fell into a Covenant trap, but managed to fight their way out of it. Crimson succeeded in clearing the area, but the Covenant and Prometheans sent further reinforcements to "Lockup."<ref>'''Spartan Ops''', [[Key/Revenge|S1E9 ''Revenge'']]</ref> Crimson managed to eliminate the initial waves of Prometheans and assist [[Poker Squad]] in fighting off more attackers. With Poker Squad safe, Crimson was sent to find [[Hawk Squad]] whose IFF tags were detected nearby. The signal eventually leads Crimson to a [[gravity lift]] the UNSC was never able to activate before leading to the roof of the main structure. On the roof, Hawk Squad's IFF tags were found, revealing that they were being used by Covenant forces as [[Reclaimer]]s in an attempt to activate a Forerunner device. After they couldn't activate it, the [[Sangheili]] killed them in frustration. With the device being where Halsey's signal ended up before bouncing off into the [[Covenant battle network|Covenant battlenet]], Crimson activated the device while fighting off more Covenant and Promethean forces. The Forerunner device proved to be a large map of Requiem which, combined with the map recovered from [[Gek 'Lhar]], was believed by Roland to possibly be the key to freeing ''Infinity'' from Requiem. With the trail for Halsey having reached a dead end, Crimson was extracted from the area.<ref>'''Spartan Ops''', [[Key/The Hammer|S1E9 ''The Hammer'']]</ref> | ||
===Requiem's end=== | ===Requiem's end=== | ||
Revision as of 02:36, November 5, 2019
|
Previous: |
|||||||||||||||||||
|
Next: |
|||||||||||||||||||
| Requiem Campaign | |||||||||||||||||||
|---|---|---|---|---|---|---|---|---|---|---|---|---|---|---|---|---|---|---|---|

| |||||||||||||||||||
|
Conflict: |
|||||||||||||||||||
|
Date: |
February 7 - March 1/2, 2558 | ||||||||||||||||||
|
Location: |
|||||||||||||||||||
|
Outcome: |
Indecisive
| ||||||||||||||||||
| |||||||||||||||||||
- "The Covies... they believe this is the home of one of their gods! Way I see it, if those freaks wanna meet God, it's our duty to help them along!"
- — Sarah Palmer discussing the Covenant remnant presence on Requiem to the SPARTAN-IVs
The Requiem Campaign,[2] also known as the Second Battle of Requiem[3] or the Requiem Conflict,[4] was the second, larger-scale engagement fought on the Forerunner shield world Requiem in February 2558. It was waged between the Prometheans and their Covenant remnant religious followers and the returning United Nations Space Command.
Prelude
- Main article: Battle of Requiem
Six months before the onset of the battle in July 2557, the Forerunner Promethean supreme commander known as the Didact had been inadvertently awakened from his Cryptum on Requiem and immediately initiated a campaign against humanity, which he saw as unworthy of taking on the Mantle. Revering the Forerunner as a living god, the revived Covenant faction, under the leadership of Jul 'Mdama, allied themselves with the Didact and his mechanical Promethean armies. The Didact was eventually defeated by Spartan John-117 above Earth, leaving the Prometheans without a leader, yet still hostile to humanity. The Prometheans and the Covenant continued to occupy Requiem, which humanity recognized as a site of great value due to the abundance of Forerunner artifacts contained therein, particularly a digital personality impression of the Librarian encountered by the Master Chief during the initial foray on the shield world. As a result, the UNSC Infinity, the most advanced warship in the Navy, was dispatched to establish research facilities on the Forerunner construct and eliminate any opposition from the occupying Promethean and Covenant forces.[5]
The battle
Infinity's return
In February 2558, UNSC Infinity returned to Requiem, destroying an RCS-class armored cruiser immediately upon arrival. Strident-class heavy frigates were deployed to protect the ship and establish a position in orbit. SPARTAN-IV fireteams were sent into Requiem to support the Marine, Army, and Air Force assets deployed within the shield world.[5] UNSC forces set up several research bases: Copernicus Base, Galileo Base, and Magma Base. Other locations, such as areas designated "Quarry", "Fortress", and "Apex", were often contested for control.
During an interception on a Covenant archaeological dig, Fireteam Crimson discovered one of the three Requiem slipspace artifacts on Requiem in "the Cauldron".[5] The artifact was brought onboard Infinity, where it was examined by Henry Glassman.[6] Glassman, who accidentally activated it, was translocated to Requiem and became a prisoner of the Covenant. There, he was brought to Jul 'Mdama and was forced to find a method to activate the device containing the Librarian AI in the Librarian's Rest. Captain Lasky requested Doctor Catherine Halsey to be brought onboard Infinity to study the artifact. Halsey found out that the artifact was communicating with the ship's system's, notably the engine, and transmitting signal to a location in Requiem. On Requiem, Sangheili terrorist Parg Vol, an associate of 'Mdama, was hunted and eventually assassinated by Fireteam Crimson. During another engagement, a CRS-class light cruiser was destroyed by Infinity Sub-Vessel 3 while it was meaning Crimson who were investigating a Forerunner structure at "Two Giants."[7]
Jul 'Mdama's plan
During their flight to Copernicus Base, Fireteam Castle was shot down by Covenant forces led by Jul 'Mdama. This attack drew Infinity's attention to hunt down 'Mdama. UNSC scientists had discovered that the Covenant were using Requiem's portal systems, and Fireteam Crimson was deployed to assist in the investigation. Incidentally, 'Mdama was detected traversing through the portals, so Fireteam Majestic and Crimson were sent to give chase. After discovering a way to activate Requiem's portal systems, Crimson followed 'Mdama to "the Cauldron", where he purposely left an artifact known as the "Didact's Gift" for Crimson, prompting the team to bring the artifact to Galileo Base.[8]

The Covenant then staged an attack on the base to show that they were attempting to recover the artifact. While Fireteam Crimson defended the base, Fireteam Majestic extracted the "Didact's Gift" and brought it back to Infinity, where it was analyzed by Halsey. By giving Halsey the "soul of a Promethean Knight", 'Mdama had gained Halsey's interest in cooperating to find the Librarian. Their partnership, however, was discovered by Captain Lasky and Commander Palmer, who then took Halsey into custody. Spartan Gabriel Thorne, during his examination of the artifact, was taken to Requiem like Glassman. On Requiem, the Covenant and Promethean forces attacked UNSC research bases "the Refuge" and Magma Base, but both of these attacks were successfully repelled by Fireteam Crimson with the assistance of Fireteam Shadow in "the Refuge," resulting in the destruction of another cruiser. Additionally, the UNSC gained vital intelligence on Requiem's portal system and was able to control it before Crimson destroyed a device at "the Refuge" that allowed the portals to open in order to limit the movement of the Covenant and Prometheans. During their search for Spartan Gabriel Thorne in the Quarry, members of Crimson were captured by Covenant forces.[9]
Spartan Thorne was captured by the Covenant and was brought to where Glassman was. Glassman, on the other hand, managed to activate the Librarian's device, and used the opportunity to escape. Glassman's escape distracted the Sangheili who took Thorne prisoner, giving Thorne the chance to retaliate. Together, the duo ran away, heading for Galileo Base, being chased by a vengeful Gek 'Lhar. At the same time, Fireteam Crimson also escaped the Covenant and hijacked a Phantom in the process. Using the captured Phantom, Crimson was able to infiltrate Covenant bases at "Control" and the "Warrens" where they hacked into the Covenant systems and uncovered vital intel on a nearby Covenant supply depo and an archeological dig. Crimson attacked and destroyed the supply depot at "Cyclone," discovering in the process HAVOK nuclear missiles missing their warheads while Fireteam Switchback was sent to disable a Harvester at the archeological dig site. After Switchback disappeared, Crimson was sent to investigate and ensure that the Harvester was permanently disabled. Crimson only found Switchback's blank IFF tags and destroyed two consoles aboard the Harvester to ensure its permanent disabling.[10]
Second attack on the Infinity

Meanwhile, as Dr. Halsey sat in the brig of the UNSC Infinity, Roland appeared and asked why she attempted to communicate with an unknown intelligence about classified material. After a brief interchange, Halsey used the passphrase override "undid iridium" to gain control of the AI and then use him to move unsuspected to the captain's ready room. Once there she perused all the material she could find for information on the Librarian and Jul 'Mdama, also discovering that John-117 was still alive and had survived the destruction of Installation 00. She then used the terminal to communicate with Jul 'Mdama. She offered her assistance in exchange for what they both wanted: the Librarian's secrets. At that moment, though, Roland regained control of his confused matrices, pulled the plug, and immediately alerted Lasky. Just as the captain was about to have Halsey interred in a cryo-tube, alarms sounded across the ship: the Prometheans had gained access to the Infinity and taken all hands by surprise. Most Spartan and Marine fireteams were deployed on Requiem and the Prometheans quickly overran most of the ship. All UNSC assets were recalled to the ship, but at that moment the rest of the Covenant fleet arrived, composed primarily of CRS-class light cruisers, and attacked the Infinity.[11]

At this point, Fireteam Crimson reached the battle, still in the captured Phantom. Infinity's automated point-defense turrets could not differentiate between the thousands of incoming enemy spacecraft and Crimson was hit. Lieutenant Murphy barely guided the out-of-control dropship into one of Infinity's hangars, the bay's vacuum shields decelerating the dropship enough to allow all of its passengers to survive. Fireteam Crimson promptly went to work, clearing the hangar. However, interference from the artifact prevented Roland from closing the bay doors so Crimson was forced to power cycle the Server Room and reboot the ship-wide data link before the hanger bay could be fully secured. At that moment though, teams on board made two discoveries: the Covenant had internally disabled the all port defenses, leaving Infinity open to attacks from the Covenant fleet, and that the Covenant had stolen UNSC HAVOK tactical nuclear weapons and had armed the warheads in the Server Room and the Engine Room. Despite the Covenant protecting the warheads with active camouflage, Fireteam Crimson, managed to disarm all seven and secure both rooms. With the nukes disarmed and back in UNSC control, Crimson reactivated the ship's port defenses, which promptly destroyed all adjacent ships, including at least one light cruiser. The remainder of the Covenant fleet fled as the UNSC regrouped and repelled the remaining boarders.[11] But the Infinity was not safe yet. As Lasky escorted Halsey to the bridge, it was brought to his attention that Infinity was unable to move from its current spot because it was trapped by a sort of Slipspace anchor. As he turned his back, a Promethean Knight appeared, knocked Commander Palmer to the deck, grabbed Dr. Halsey, and disappeared again.[12]

As the massive battle waged hundreds of miles over their heads, Spartan Thorne and Dr. Glassman trekked through the dusty canyons near Sniper Alley to reach Galileo Base. Glassman sat down to take a rest and Thorne stopped to glance around. Realizing that something was amiss, he told Glassman to get to safety just as Gek 'Lhar emerged from invisibility, swinging his Energy Sword and slicing Thorne's Storm Rifle in half. Gek tossed Glassman aside like a ragdoll and attempted to truncate Thorne, who disarmed him in the process. Thorne managed to knock the Elite assassin to the ground. The Spartan then tried to break Gek's skull with a boulder, but the Elite caught it, flipped Thorne to the ground and brought the stone down on his chest and head, stunning him. Glassman was attempting to reach the fallen Energy Sword, but was stopped when Gek stepped on his outstretched arm, breaking it. Just as the Elite was preparing to execute the downed Spartan, he was shot in the head three times by DeMarco, who had shown up with the rest of Majestic. The Spartans looted his body, taking Gek's energy sword and active camouflage module before Madsen located a map of Requiem.[12]
Disrupting Covenant Operations
Following the end of the attack on the UNSC Infinity, the human forces were redeployed to continue disrupting Covenant operations on the planet. Having been interrupted in their mission to deactivate the portals at "Apex" by the attack on Infinity,[13] Fireteam Crimson were sent back to Apex to complete their original mission and secure the area. Crimson succeeded in closing the portals and Infinity sent Fireteam Lancer to hold Apex.[14] Getting a distress call from Fireteam Majestic, Crimson and Fireteam Kodiak were sent to "Cyclone" to take down three Covenant plasma artilleries stationed there that Majestic was under fire from. During the mission, Spartan Jared Miller picked up an SOS coming over the Covenant frequencies in Morse code. In addition, the Covenant displayed an inexplicable ability to predict the UNSC's movements.[15]
With Fireteam Lancer having discovered a Covenant nest in the "Warrens" near "Apex," Crimson was sent to aid Lancer in taking out the Covenant position. Fighting through the Covenant base, the SOS was detected again and Crimson followed it to the imprisoned Fireteam Switchback who had mysteriously vanished while disrupting a Covenant dig site. Crimson and Lancer rescued Switchback while elsewhere Poker Squad captured a wounded Sangheili who offered up the location of a Covenant listening post in exchange for his own life. After extracting Crimson and Switchback, Sarah Palmer ordered Crimson redeployed to destroy the listening post.[16] Crimson returned to "Lockup" where the Sangheili revealed the Covenant listening post was. Fighting their way through the Covenant forces stationed there, Crimson discovered a captured Army Pelican that had been shot down in "the Cauldron" and thought destroyed. The Covenant were able to tap into the Pelican's communications systems and use them to spy on UNSC comm traffic, explaining their inexplicable ability to predict the UNSC's movements. Crimson deactivated the energy tethers hooked into the Pelican's communications systems and Robert Dalton conducted an orbital strike on the Pelican, destroying it and permanently depriving the Covenant of their ability to spy on the Infinity's communications with her forces.[17]
Believing that the map Madsen recovered from Gek 'Lhar could hold the key to freeing Infinity from Requiem, Dr. Henry Glassman had Crimson redeployed to "Control" to test his ability to read the map. Glassman guided the fireteam in activating Forerunner heavy weapon caches, beam turrets and anti-aircraft guns. With the help of the activated defenses, Crimson destroyed several Phantoms and wiped out the Covenant forces in the area, proving Glassman's interpretation of the map to be correct.[18] Shortly thereafter, Glassman, still on Requiem with Fireteam Majestic, was extracted back to Infinity by a Pelican.[1]
The Janus Key and Halsey
With the abduction of Dr. Catherine Halsey by enemy forces, Rear Admiral Serin Osman, head of the Office of Naval Intelligence, ordered Lasky to assassinate the doctor before the Covenant glean any sensitive intel from her. Sarah Palmer was deployed from Infinity despite Lasky's admonishments to the contrary. As soon as she was out of earshot Lasky contacted Fireteam Majestic and asked them to rescue Dr. Halsey, without telling them that Palmer was en route. The Spartans returned to the Covenant's base and engaged the sentries outside while Thorne used his recently-acquired cloaking unit to slip inside. At the same time, Dr. Halsey unlocked the shield set up by Glassman and entered the Librarian's shrine. Inside she was greeted by the Librarian's imprint, which presented to her the two pieces of the Janus Key, an artifact that would reveal the location of every piece of Forerunner technology in the galaxy. Once she reappeared outside the shrine, Jul 'Mdama snatched one of the halves away from her, not noticing the second piece in Halsey's hand. At that moment Thorne broke a nearby sentry's back, killing the other with his assault rifle. Halsey tossed the other half of the Janus Key to Thorne. Just as a sword-wielding warrior was about to kill him from behind, it was felled by Palmer. A pair of Promethean Knights appeared to protect 'Mdama and Halsey, but not before Palmer shot the doctor in the left shoulder. The rest of Majestic appeared and fought through the army of Prometheans alongside Palmer. Before they could reach the cornered 'Mdama, a Knight appeared and teleported away with him and the injured doctor.[1]
Following Halsey's abduction, Infinity dispatched all fireteams from both Infinity itself and three Vindication-class light battleships to search for her. Fireteam Crimson was dispatched to "Cyclone" where Halsey had been routing communications through the area before she was snatched. With the help of beam turrets and Aggressor Sentinels under the Librarian's control, Crimson was able to access the Covenant data terminal with the Librarian aiding Roland and Dr. Lani Truman with the decryption as she prepared to transmit herself to the Absolute Record. Both the decryption and transmission became stalled at 99%, resulting in Crimson opening the breaker on the power source in the area. The Librarian's imprint was broadcast to the Absolute Record in the form of a massive data stream while Halsey's signal was determined to have bounced to "Control."[19] At "Control," where Boa Squad had been wiped out by the Covenant, Crimson fought off the occupying forces and activated the comm terminals in the area. The Covenant received backup in the form of Prometheans, but Crimson was able to hold them off long enough for Roland to determine that the signal next bounced to "Apex." Once Crimson got to a safe location, Robert Dalton commenced an aerial bombardment of "Control," wiping out the remaining Promethean forces.[20] At "Apex," Crimson discovered the area protected by multiple Covenant shields and heavily fortified by infantry troops supported by Phantoms. Using Scorpion tanks, Crimson fought through the occupying Covenant and Promethean forces, allowing Roland to determine the signal next bounced to "Lockup."[21]
When Crimson arrived at "Lockup," they faced off against fierce Covenant resistance including Ghosts, Wraiths and Hunters. Following the signal being emanated by IFF tags, Crimson fell into a Covenant trap, but managed to fight their way out of it. Crimson succeeded in clearing the area, but the Covenant and Prometheans sent further reinforcements to "Lockup."[22] Crimson managed to eliminate the initial waves of Prometheans and assist Poker Squad in fighting off more attackers. With Poker Squad safe, Crimson was sent to find Hawk Squad whose IFF tags were detected nearby. The signal eventually leads Crimson to a gravity lift the UNSC was never able to activate before leading to the roof of the main structure. On the roof, Hawk Squad's IFF tags were found, revealing that they were being used by Covenant forces as Reclaimers in an attempt to activate a Forerunner device. After they couldn't activate it, the Sangheili killed them in frustration. With the device being where Halsey's signal ended up before bouncing off into the Covenant battlenet, Crimson activated the device while fighting off more Covenant and Promethean forces. The Forerunner device proved to be a large map of Requiem which, combined with the map recovered from Gek 'Lhar, was believed by Roland to possibly be the key to freeing Infinity from Requiem. With the trail for Halsey having reached a dead end, Crimson was extracted from the area.[23]
Requiem's end
Believing to have obtained what they were looking for, Jul 'Mdama activated Requiem's self-destruction system which set the shield world to collide with its sun. All Covenant ships were ordered to evacuate from Requiem; the crew of Infinity took note of this mass exodus and soon realized that Requiem was steadily moving toward the system's star. Infinity could not move, being still firmly anchored to the shield world due to the slipspace artifact on board. Dr. Glassman deduced that the anchor could be disabled if two similar artifacts on the surface were deactivated. Fireteams Majestic and Crimson were deployed to the shield world and succeeded in freeing Infinity from Requiem. Once both fireteams were aboard, Lieutenant James flew the ship away from Requiem on Captain Lasky's order, only moments before Requiem collided with its sun. Infinity jumped into slipspace while Requiem was consumed by the sun, causing the star's immediate collapse. The ship and its crew survived the hasty emergency jump without major damage or casualties.[24]
Aftermath
- "Not only would Requiem and the important history it possessed be lost forever, but many Spartans would sacrifice their lives during the occupation."
- — Curator on the Requiem Campaign[25]
With one half of the Janus Key in possession of each belligerent, the artifact remained divided and could thus not be used for its intended purpose. Aboard Infinity, Lasky and Palmer joined Dr. Glassman as he studied one half of the Key. Meanwhile, Dr. Halsey—now missing her left arm—seemingly agreed to collaborate with Jul 'Mdama, claiming that she wanted revenge.[24]
Gallery
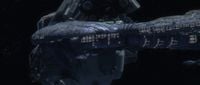
Infinity rams a Covenant RCS-class armored cruiser immediately upon arrival at Requiem in Spartan Ops.
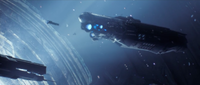
Infinity and two of her Strident-class heavy frigates over Requiem.
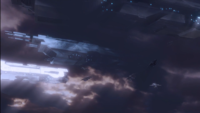
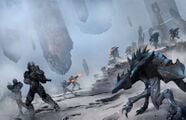
A trio of Vindication-class light battleships deploy their ground forces onto Requiem.
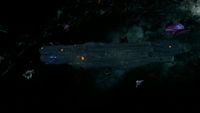
The Infinity under attack.
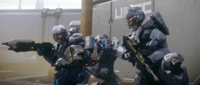
Members of Fireteam Majestic in combat on Requiem.
Fireteam Majestic recovering the "Didact's Gift".

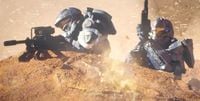
A Marine and a SPARTAN-IV fighting Covenant forces at "Fortress".
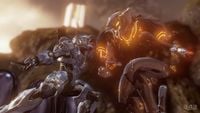
A SPARTAN-IV faces down a Promethean Knight in close combat.

Dr. Catherine Halsey meets the Librarian in the "Shrine".

Requiem and its sun are destroyed in the conclusion of the battle.
Fireteam Majestic fighting Prometheans during the Requiem Campaign in Halo Mythos.


List of appearances
- Halo 4
- Spartan Ops (First appearance)
- Halo: Escalation
- Halo 5: Guardians (Mentioned only)
- Limited Edition (Mentioned only)
- Halo Mythos
Sources
- ^ a b c Spartan Ops, S1E9 Key
- ^ Halo: Escalation, Issue #13
- ^ Halo Waypoint: Henry Glassman
- ^ Halo Waypoint: Tedra Grant
- ^ a b c Spartan Ops, S1E1 Departure
- ^ Spartan Ops, S1E2 Artifact
- ^ Spartan Ops, S1E3 Catherine
- ^ Spartan Ops, S1E4 Didact's Hand
- ^ Spartan Ops, S1E5 Memento Mori
- ^ Spartan Ops, S1E6 Scattered
- ^ a b Spartan Ops, S1E7 Invasion
- ^ a b Spartan Ops, S1E8 Expendable
- ^ Spartan Ops, S107 Backup
- ^ Spartan Ops, S108 Unfinished Business
- ^ Spartan Ops, S108 Majestic Rescue
- ^ Spartan Ops, S108 Lancer
- ^ Spartan Ops, S108 Crystal Ball
- ^ Spartan Ops, S108 Glassman
- ^ Spartan Ops, S1E9 The Search for Halsey
- ^ Spartan Ops, S1E9 Clean Up
- ^ Spartan Ops, S1E9 Science Mountain
- ^ Spartan Ops, S1E9 Revenge
- ^ Spartan Ops, S1E9 The Hammer
- ^ a b Spartan Ops, S1E10 Exodus
- ^ Halo Mythos, page 180


