Scarab Gun: Difference between revisions
From Halopedia, the Halo wiki
(→Trivia) |
m (added acrophobia method.) |
||
| (247 intermediate revisions by more than 100 users not shown) | |||
| Line 1: | Line 1: | ||
{{ | {{Status|Gameplay}} | ||
{{Center|''This article is about the Scarab gun found in [[Halo 2]]. For types of Scarab, see [[Scarab]]. For other real-world uses of the word, see [[Scarab (disambiguation)]].''}} | |||
{{ | |||
| | |||
[[File:Scarab Gun.jpg|200px|thumb|The Scarab Gun, floating above a traffic cone atop a bridge.]] | |||
{{quote|Think, MASSIVE FIREPOWER! For one level only.|[[Frank O'Connor]]<ref>[http://nikon.bungie.org/bwu/index.html?item=5 '''Bungie Weekly Update''' 12-17-04]</ref>}} | |||
The '''Scarab Gun''' is a hidden {{Pattern|Okarda'phaa|plasma rifle}} with the firepower of a {{Pattern|Protos|Scarab}}'s [[focus cannon]]. It is hidden in the ''[[Halo 2]]'' level [[Metropolis]]. Like the [[Da Vinci Code objects]], the Scarab Gun is simply a placeholder object that generates the Scarab's firing effect. | |||
[[ | |||
== | ==Overview== | ||
The Scarab Gun has similar appearance as a normal Plasma Rifle. It has unlimited [[ammo]], continuous rapid fire, and never overheats. Due to its tremendous firepower and immense splash-damage, firing the weapon at close range will normally kill the player. | |||
==Walkthrough== | |||
It is recommended for the player to attempt to obtain the Scarab Gun on [[Easy]] difficulty. The most popular method is the banshee method, since it can be done on single player, and the player can fly back down to the level normally after getting the Scarab Gun. However, other methods are also described below. However, the easiest method by far is using the acrophobia skull on [[Halo: The Master Chief Collection]]. | |||
===Banshee Method=== | |||
Since the player cannot fly the banshee into the tunnel, due to an elastic barrier, the banshee has to be lured through the tunnel. | |||
#Proceed normally as you would till the end of the bridge. Kill all allies and enemy ground vehicles, and commandeer a ghost. | |||
#To lure a Banshee into the tunnel, simply drive in reverse and fire around at a Banshee. Try to avoid firing directly at the Banshee. When the banshee follows you, you can start driving forward. Keep it from getting too close or too far, as either will make the banshee turn around and try to fly out of the tunnel. | |||
#Some allies will spawn in a Warthog. The marines are invincible until they reach the jackals/road block in the tunnel. Eliminate them to avoid them from damaging/destroying the Banshee you lured. Feel free to also kill all enemy infantries to avoid interruptions. At the same time, repeat step #2 to keep luring the Banshee into the tunnel. | |||
#Avoid taking your eyes off the banshee while in the tunnel. It may despawn, especially in co-op. | |||
#Once you reach the closed section of the roadway and have to detour off into the pipes, you should dismount your Ghost if you have not done so. Lure the Banshee into this detour as you would with a Ghost by firing around it. | |||
#In the detour hallway, lure the Banshee to the left path that leads to the next section of the campaign level. Try to melee it slowly into tunnel. | |||
#It will get stuck due to the narrowness of the tunnel. At this point, you should fire off the Banshee's wings. | |||
#The loadzone is just inside the tunnel. Board the banshee as it's flying through it to prevent it from despawning. The barrier will deload, preventing the banshee from being destroyed. | |||
#Proceed out of the tunnel and fly off to the suspension bridges. You will see the Scarab Gun will be hovering on a cone. | |||
:'''Note''': the [[Halo 2 skulls#Sputnik|Sputnik skull]] and [[Halo 2 skulls#Black Eye|Black Eye skull]] are recommended for this, but not necessarily required. The Sputnik skull essentially makes objects lighter while the Black Eye skull allows players to boost their energy shield by meleeing an enemy. | |||
''' | :'''Note''': if the Banshee is stuck between scenery objects in the tunnel, simply walk behind it and move backwards slowly to get it unstuck. | ||
:'''Note''': Having another player will ease the process. | |||
===Banshee Method with AUP=== | |||
The banshee method can be extremely simplified by using [[Arbitrary unit possession|AUP]]. This is because elites are unaffected by the barrier, meaning you can fly through the tunnel if you AUP an elite. The method is described below. | |||
#Start Metropolis on co-op, any difficulty except Legendary, and no iron. Do not shoot or throw grenades unless told to! Enable [[Halo 2 Skulls#Envy|Envy]]. | |||
''' | #Get the marines in the warthog and park them in the back corner. Make sure they don't run out onto the bridge. | ||
#Punch one player to death. Have him pick up '''two''' out of the four grenades that get dropped. | |||
#Drive the Scorpion Tank into the corner and maneuver it against the wall until it "rides" up on the wall/railing facing the water. | |||
#Move the tank to the left and lower it so it sits on the edge of some windows above the ground. | |||
#Have the player who died crawl under the tank. The other player should jump off to his death. | |||
#If done correctly, the player should not respawn. Restart the mission. | |||
#Have one player throw '''two''' grenades. | |||
#That same player goes forward a bit until they near the first bus/set of ghosts. Make sure they don't shoot at you. | |||
#The other player should jump to his death, while the first player uses camo and moves forward. They should jump and melee when they're about to hit the ground, repeatedly, to delay the other player's respawn. | |||
#When you see two ghosts boosting towards you from across the bridge, you can let the player respawn. | |||
#They should spawn as an elite. | |||
The elite can't hijack banshees on his own, so the spartan player will have to hijack a banshee and give it to him. However, the elite can fly the banshee all the way through the tunnel. When he goes through the loadzone in the banshee, the elite player will "despawn" and the player will respawn normally, but the banshee will remain. | |||
:'''Note''': If the elite player exits the banshee at all while it's in the tunnel, the banshee will explode. This is because the game, at that point, recognizes that a player is piloting the banshee, and applies the "proper" physics. | |||
''' | |||
===Box Launch Method=== | |||
This method doesn't require two players, or putting a banshee through a tube, but it may take many tries to pull off properly. Two players is also recommended, as it will be easier to delay and get checkpoints so the launch can be attempted repeatedly without having to reset the box. | |||
#Start Metropolis on Easy. Enable Sputnik and Black Eye. | |||
#Go through the mission as normal, but make sure you have full (green) overshields and at least one spare rocket when you reach the final section. | |||
#Rush to the last bridge ahead of the scarab. You should see three giant "cubes." A small box lays next to one of them. | |||
#Push that box back to the start of that bridge. You must position it very specifically, or the launch may not work. | |||
== | To position the box correctly, first orientate it so that the indented middle is in-line with the long way of the bridge. You'll want to move it so that it's most of the way on the "vent" texture between the main walkway and the bridge's "plain" texture. There should be a "tile" like texture on the walkway itself, with little breaks that form small semi-squares (well, closer to octagons, but still square-ish). Position the box so that its indents are in-line and centered with the center of the semi-squares. Finally, ensure that the box is slightly overlapping with the walkway texture, and not entirely on the "vent" texture. | ||
{{ | |||
#At this point, or somewhere around it, you should get a checkpoint from the scarab. The checkpoint should appear when the scarab is nearing its final position. | |||
#Shoot at the first "strip" on the bridge's texture past where you're standing. Aim halfway to the left to also explode the cube closest to you. | |||
#If done correctly, you should get launched with incredible height. This is because of the cube, combined with the sputnik skull, giving you the power, while the box determines the angle you launch at. | |||
#Land on the high-rise bridge above and claim your prize. | |||
===Barrier Launch Method=== | |||
This is an alternate version of the box launch method that uses the barriers on the bridge rather than a box. | |||
#Start Metropolis on Easy. Enable Sputnik and Feather. | |||
#Go through the mission as normal until you reach the final section. Grab a rocket. | |||
#Rush to the last bridge ahead of the scarab. Jump on the first defensive barrier and position yourself as close to the edge facing the wall as possible. | |||
#Aim down, jump and fire the rocket. The blast should give you tremendous height. Keep aiming down and pushing forward, and you should land on the high-rise bridge where the gun awaits after a few tries. | |||
===Acrophobia Method (MCC Only)=== | |||
#Simply activate the acrophobia skull when starting the level, and fly up to the scarab gun at the high-rise bridge. | |||
==Other Scarab Guns== | |||
There are actually three Scarab Guns in ''Halo 2''—one on [[Outskirts]] and two on [[Metropolis]]. The other two Scarab Guns are scripted guns that shoot the scarab beam in place of the scarab itself. As with most scripted guns, they float in the air and disappear after their scripted firing. However, players can still pick these up. Bungie never expected players to reach these Scarab Guns and never disabled their pickup. | |||
===Outskirts Scarab Gun=== | |||
The Outskirts Scarab Gun normally spawns when driving through the tunnel. It fires a beam through a hole in the ceiling, and hits the warthog flying by. There are currently a few methods of obtaining this Scarab Gun. | |||
====Out of Bounds Launch==== | |||
#On Outskirts with the Black eye and Sputnik skulls on, get a [[M41 Surface-to-Surface Rocket Medium Anti-Vehicle/Assault Weapon|Rocket Launcher]] and grenades. | |||
#Get in a {{Pattern|Karo'etba|Ghost}} and go to the highway tunnel. (Fun fact: if you go against the wall and out toward the water you can slip outside the map.) | |||
#Go to the edge of the building and turn left. Now go boost forward until you get a checkpoint. | |||
#When the checkpoint is activated, get out and aim at the ground. Throw a grenade, shoot the ground with a rocket, and, at the same time, jump. | |||
#With an [[Overshield]], you should fly up in the air. | |||
#Hold the pickup button and you should (if in the right place) pick it up and land on the wall. | |||
You can simplify the process in co-op. Having a co-op partner means that you can pickup the Scarab Gun without having to land on the wall, and it should not despawn when you fall to your death. You can also use AUP. | |||
====AUP Methods==== | |||
Possessing either a Pelican or Phantom will allow the other player to fly into the Scarab Gun when launching up the wall. Additionally, possessing a Phantom can give the player enough speed to fly through the beam while inside the tunnel. Due to its simpler and more consistent setup, the phantom possession method is described below. | |||
#At the start of Outskirts on co-op, use debris to block the marines from exiting the room you start in. | |||
#Do not take ANY shots or throw ANY grenades unless instructed. This is very important. | |||
#Jump over the debris and scare the first grunt (do not shoot!). Do not progress down the ramp. | |||
#Have one player grab Johnson's sniper rifle and get into the pelican. They should crouch in the back corner. | |||
#Kill the other player with exactly 2 shots from the sniper. If crouched in the corner correctly, the other player should not respawn. | |||
#Restart the mission. | |||
#Repeat steps 1-4, but don't have the player go into the pelican. | |||
#Kill the second player with 2 shots. Melee repeatedly while advancing down the ramp and behind the trash can. This will delay the player's respawn. | |||
#Ensure no enemies shoot at you. Stop meleeing when you hear the phantom. | |||
#If done correctly, the player should respawn as the phantom. | |||
Note that when you proceed past the first loadzone, the phantom will get stuck under the map. Going through the second loadzone may teleport the phantom correctly, or it will get stuck in the wall again, ''or'' it will despawn and the player will appear in a new body. If the phantom gets stuck in the ceiling, go back through the loadzone while adjusting the phantom's position to try to teleport it inside the map. Note that going too quickly back and forth through loadzones will usually result in the phantom despawning. Once you've done this, you can use the launching method described above, or just boost and fly through the scarab beam. | |||
===Metropolis Scarab Gun (Alternate)=== | |||
The second Metropolis Scarab Gun appears just before the scarab rounds the corner and blows up the tank. It fires the initial beam that the player sees before the scarab. Much like the Outskirts Gun, this is a scripted Scarab Gun that despawns after firing, but picking it up will prevent this. | |||
#On Co-op, at [[Metropolis]], fight until you clear the city center. | |||
#Before you talk to [[Corporal Perez]], use an alternate method to get on top of the building, such as a grenade launch, or by flying the banshee. | |||
#Get outside the map on the left side of the top of the building. You should be following where the scarab goes. | |||
#Once you can see the last area of the map with the bridges, go back. This will prevent the second player from teleporting. | |||
#Have one player stand where the Scarab arrives. Have the other go into the building and up to the top flight of stairs. | |||
#A few steps beyond will load the Scarab Gun. This is where you can adjust your setup as needed. | |||
#When it loads, have the first player perform an Overshield-, Rocket-, Grenade-, or Sputnik-jump (or really any "boosted" jump) into the scarab's laser—or into the blue cloud, if there is one—and hold X, and they will pick up yet another Scarab Gun. | |||
Note that the player doesn't have to live, but the scarab may knock the gun far away if the player dies. | |||
== Trivia == | == Trivia == | ||
* The Scarab Gun has a slightly different appearance than a normal | *The Scarab Gun has a slightly different appearance than a normal {{Pattern|Okarda'phaa|plasma rifle}}. On co-op, when you get the gun, have your partner look at you while you are dual-wielding it with a Plasma Rifle. There is a glow at the tip of the Plasma Rifle, that is not present on the Scarab Gun (although you can do it on single player). | ||
* | *Obtaining the Scarab Gun in [[Halo 2 (Windows Vista)|''Halo 2'' for Windows Vista]] will unlock the [[King of the Scarab]] achievement. Obtaining it in ''[[Halo: The Master Chief Collection]]'' will unlock the [[Scarab Lord]] achievement. | ||
*Interestingly, the safety cone underneath the gun has multiple "Danger" signs on it, showing that the gun might have been put there intentionally to keep it away from others. Also, this is supported by the fact that Bungie put in an actual model (the plasma rifle's model) for the weapon, unlike other vehicles' .weapon tag (weapons are not specified in the vehicle tag). | |||
* Interestingly, the safety cone has multiple "Danger" signs on it, showing that the gun might have been put there intentionally | *If the player gets into the side seat of a [[M12 Force Application Vehicle|Warthog]] and fires the Scarab gun, the screen (except for the HUD) will go completely white until the player stops firing. That is because, in third person, the weapon's gleam is as large as the Scarab's main gun. | ||
*If you give a marine this Easter egg, he will hold it as if it were a normal plasma rifle, but he will never fire it. Bungie might have expected this and took steps to prevent this in order to balance the game AIs. | |||
*The Scarab Gun was originally used by [[Joseph Staten]] to generate the cinematic effect of the Scarab beam firing. According to him, it ended up in the game because he forgot to take it out.<ref>[http://www.youtube.com/watch?v=afXrOIpwz4M '''YouTube''': ''Halo Fest: Bungie Hatching the Cosmic Halo Egg'']</ref> However, designer [[Tyson Green]] has confirmed that the Scarab Gun was intentionally left in the game as an Easter egg.<ref>[http://halo.bungie.net/News/content.aspx?type=topnews&cid=25650 '''Bungie: One Final Effort'''] (Tyson Green: ''"Hiding the Scarab Gun on newmombasa and thinking "heh, it'll be forever before they find this!" and then having players get up there within a week by pushing Banshee through the BSP transition from the bridge. Damn. Never underestimate the player."'')</ref> | |||
*If you grab the gun and make it to the part when the Scarab shoots the [[957-A3|Scorpion tank]], you can destroy the Scorpion yourself and the Scarab will refrain from firing. | |||
*If the player gets into the side seat of a [[ | *The Scarab Skull can be enabled in Halo 2 Anniversary. This causes all weapons used by the player to fire scarab beams, much like the Scarab Gun itself. | ||
**The skull used to affect vehicles as well, even working on the Warthog's horn | |||
*If you give a marine this | |||
* | |||
== | ==Gallery== | ||
<gallery> | |||
File:Scarab Gunfire.jpg|A single shot from the Scarab Gun | |||
File:Scarab Gun whitescreen.jpg|The result of firing the Scarab Gun when in the passenger seat of the Warthog. | |||
</gallery> | |||
==Sources== | |||
{{Ref/Sources}} | |||
{{Easter Egg}} | {{Easter Egg}} | ||
[[Category:Halo 2 Easter eggs]] | |||
[[Category:Halo 2 Easter | |||
Latest revision as of 11:13, May 8, 2023

- "Think, MASSIVE FIREPOWER! For one level only."
- — Frank O'Connor[1]
The Scarab Gun is a hidden Okarda'phaa-pattern plasma rifle with the firepower of a Protos-pattern Scarab's focus cannon. It is hidden in the Halo 2 level Metropolis. Like the Da Vinci Code objects, the Scarab Gun is simply a placeholder object that generates the Scarab's firing effect.
Overview[edit]
The Scarab Gun has similar appearance as a normal Plasma Rifle. It has unlimited ammo, continuous rapid fire, and never overheats. Due to its tremendous firepower and immense splash-damage, firing the weapon at close range will normally kill the player.
Walkthrough[edit]
It is recommended for the player to attempt to obtain the Scarab Gun on Easy difficulty. The most popular method is the banshee method, since it can be done on single player, and the player can fly back down to the level normally after getting the Scarab Gun. However, other methods are also described below. However, the easiest method by far is using the acrophobia skull on Halo: The Master Chief Collection.
Banshee Method[edit]
Since the player cannot fly the banshee into the tunnel, due to an elastic barrier, the banshee has to be lured through the tunnel.
- Proceed normally as you would till the end of the bridge. Kill all allies and enemy ground vehicles, and commandeer a ghost.
- To lure a Banshee into the tunnel, simply drive in reverse and fire around at a Banshee. Try to avoid firing directly at the Banshee. When the banshee follows you, you can start driving forward. Keep it from getting too close or too far, as either will make the banshee turn around and try to fly out of the tunnel.
- Some allies will spawn in a Warthog. The marines are invincible until they reach the jackals/road block in the tunnel. Eliminate them to avoid them from damaging/destroying the Banshee you lured. Feel free to also kill all enemy infantries to avoid interruptions. At the same time, repeat step #2 to keep luring the Banshee into the tunnel.
- Avoid taking your eyes off the banshee while in the tunnel. It may despawn, especially in co-op.
- Once you reach the closed section of the roadway and have to detour off into the pipes, you should dismount your Ghost if you have not done so. Lure the Banshee into this detour as you would with a Ghost by firing around it.
- In the detour hallway, lure the Banshee to the left path that leads to the next section of the campaign level. Try to melee it slowly into tunnel.
- It will get stuck due to the narrowness of the tunnel. At this point, you should fire off the Banshee's wings.
- The loadzone is just inside the tunnel. Board the banshee as it's flying through it to prevent it from despawning. The barrier will deload, preventing the banshee from being destroyed.
- Proceed out of the tunnel and fly off to the suspension bridges. You will see the Scarab Gun will be hovering on a cone.
- Note: the Sputnik skull and Black Eye skull are recommended for this, but not necessarily required. The Sputnik skull essentially makes objects lighter while the Black Eye skull allows players to boost their energy shield by meleeing an enemy.
- Note: if the Banshee is stuck between scenery objects in the tunnel, simply walk behind it and move backwards slowly to get it unstuck.
- Note: Having another player will ease the process.
Banshee Method with AUP[edit]
The banshee method can be extremely simplified by using AUP. This is because elites are unaffected by the barrier, meaning you can fly through the tunnel if you AUP an elite. The method is described below.
- Start Metropolis on co-op, any difficulty except Legendary, and no iron. Do not shoot or throw grenades unless told to! Enable Envy.
- Get the marines in the warthog and park them in the back corner. Make sure they don't run out onto the bridge.
- Punch one player to death. Have him pick up two out of the four grenades that get dropped.
- Drive the Scorpion Tank into the corner and maneuver it against the wall until it "rides" up on the wall/railing facing the water.
- Move the tank to the left and lower it so it sits on the edge of some windows above the ground.
- Have the player who died crawl under the tank. The other player should jump off to his death.
- If done correctly, the player should not respawn. Restart the mission.
- Have one player throw two grenades.
- That same player goes forward a bit until they near the first bus/set of ghosts. Make sure they don't shoot at you.
- The other player should jump to his death, while the first player uses camo and moves forward. They should jump and melee when they're about to hit the ground, repeatedly, to delay the other player's respawn.
- When you see two ghosts boosting towards you from across the bridge, you can let the player respawn.
- They should spawn as an elite.
The elite can't hijack banshees on his own, so the spartan player will have to hijack a banshee and give it to him. However, the elite can fly the banshee all the way through the tunnel. When he goes through the loadzone in the banshee, the elite player will "despawn" and the player will respawn normally, but the banshee will remain.
- Note: If the elite player exits the banshee at all while it's in the tunnel, the banshee will explode. This is because the game, at that point, recognizes that a player is piloting the banshee, and applies the "proper" physics.
Box Launch Method[edit]
This method doesn't require two players, or putting a banshee through a tube, but it may take many tries to pull off properly. Two players is also recommended, as it will be easier to delay and get checkpoints so the launch can be attempted repeatedly without having to reset the box.
- Start Metropolis on Easy. Enable Sputnik and Black Eye.
- Go through the mission as normal, but make sure you have full (green) overshields and at least one spare rocket when you reach the final section.
- Rush to the last bridge ahead of the scarab. You should see three giant "cubes." A small box lays next to one of them.
- Push that box back to the start of that bridge. You must position it very specifically, or the launch may not work.
To position the box correctly, first orientate it so that the indented middle is in-line with the long way of the bridge. You'll want to move it so that it's most of the way on the "vent" texture between the main walkway and the bridge's "plain" texture. There should be a "tile" like texture on the walkway itself, with little breaks that form small semi-squares (well, closer to octagons, but still square-ish). Position the box so that its indents are in-line and centered with the center of the semi-squares. Finally, ensure that the box is slightly overlapping with the walkway texture, and not entirely on the "vent" texture.
- At this point, or somewhere around it, you should get a checkpoint from the scarab. The checkpoint should appear when the scarab is nearing its final position.
- Shoot at the first "strip" on the bridge's texture past where you're standing. Aim halfway to the left to also explode the cube closest to you.
- If done correctly, you should get launched with incredible height. This is because of the cube, combined with the sputnik skull, giving you the power, while the box determines the angle you launch at.
- Land on the high-rise bridge above and claim your prize.
Barrier Launch Method[edit]
This is an alternate version of the box launch method that uses the barriers on the bridge rather than a box.
- Start Metropolis on Easy. Enable Sputnik and Feather.
- Go through the mission as normal until you reach the final section. Grab a rocket.
- Rush to the last bridge ahead of the scarab. Jump on the first defensive barrier and position yourself as close to the edge facing the wall as possible.
- Aim down, jump and fire the rocket. The blast should give you tremendous height. Keep aiming down and pushing forward, and you should land on the high-rise bridge where the gun awaits after a few tries.
Acrophobia Method (MCC Only)[edit]
- Simply activate the acrophobia skull when starting the level, and fly up to the scarab gun at the high-rise bridge.
Other Scarab Guns[edit]
There are actually three Scarab Guns in Halo 2—one on Outskirts and two on Metropolis. The other two Scarab Guns are scripted guns that shoot the scarab beam in place of the scarab itself. As with most scripted guns, they float in the air and disappear after their scripted firing. However, players can still pick these up. Bungie never expected players to reach these Scarab Guns and never disabled their pickup.
Outskirts Scarab Gun[edit]
The Outskirts Scarab Gun normally spawns when driving through the tunnel. It fires a beam through a hole in the ceiling, and hits the warthog flying by. There are currently a few methods of obtaining this Scarab Gun.
Out of Bounds Launch[edit]
- On Outskirts with the Black eye and Sputnik skulls on, get a Rocket Launcher and grenades.
- Get in a Karo'etba-pattern Ghost and go to the highway tunnel. (Fun fact: if you go against the wall and out toward the water you can slip outside the map.)
- Go to the edge of the building and turn left. Now go boost forward until you get a checkpoint.
- When the checkpoint is activated, get out and aim at the ground. Throw a grenade, shoot the ground with a rocket, and, at the same time, jump.
- With an Overshield, you should fly up in the air.
- Hold the pickup button and you should (if in the right place) pick it up and land on the wall.
You can simplify the process in co-op. Having a co-op partner means that you can pickup the Scarab Gun without having to land on the wall, and it should not despawn when you fall to your death. You can also use AUP.
AUP Methods[edit]
Possessing either a Pelican or Phantom will allow the other player to fly into the Scarab Gun when launching up the wall. Additionally, possessing a Phantom can give the player enough speed to fly through the beam while inside the tunnel. Due to its simpler and more consistent setup, the phantom possession method is described below.
- At the start of Outskirts on co-op, use debris to block the marines from exiting the room you start in.
- Do not take ANY shots or throw ANY grenades unless instructed. This is very important.
- Jump over the debris and scare the first grunt (do not shoot!). Do not progress down the ramp.
- Have one player grab Johnson's sniper rifle and get into the pelican. They should crouch in the back corner.
- Kill the other player with exactly 2 shots from the sniper. If crouched in the corner correctly, the other player should not respawn.
- Restart the mission.
- Repeat steps 1-4, but don't have the player go into the pelican.
- Kill the second player with 2 shots. Melee repeatedly while advancing down the ramp and behind the trash can. This will delay the player's respawn.
- Ensure no enemies shoot at you. Stop meleeing when you hear the phantom.
- If done correctly, the player should respawn as the phantom.
Note that when you proceed past the first loadzone, the phantom will get stuck under the map. Going through the second loadzone may teleport the phantom correctly, or it will get stuck in the wall again, or it will despawn and the player will appear in a new body. If the phantom gets stuck in the ceiling, go back through the loadzone while adjusting the phantom's position to try to teleport it inside the map. Note that going too quickly back and forth through loadzones will usually result in the phantom despawning. Once you've done this, you can use the launching method described above, or just boost and fly through the scarab beam.
Metropolis Scarab Gun (Alternate)[edit]
The second Metropolis Scarab Gun appears just before the scarab rounds the corner and blows up the tank. It fires the initial beam that the player sees before the scarab. Much like the Outskirts Gun, this is a scripted Scarab Gun that despawns after firing, but picking it up will prevent this.
- On Co-op, at Metropolis, fight until you clear the city center.
- Before you talk to Corporal Perez, use an alternate method to get on top of the building, such as a grenade launch, or by flying the banshee.
- Get outside the map on the left side of the top of the building. You should be following where the scarab goes.
- Once you can see the last area of the map with the bridges, go back. This will prevent the second player from teleporting.
- Have one player stand where the Scarab arrives. Have the other go into the building and up to the top flight of stairs.
- A few steps beyond will load the Scarab Gun. This is where you can adjust your setup as needed.
- When it loads, have the first player perform an Overshield-, Rocket-, Grenade-, or Sputnik-jump (or really any "boosted" jump) into the scarab's laser—or into the blue cloud, if there is one—and hold X, and they will pick up yet another Scarab Gun.
Note that the player doesn't have to live, but the scarab may knock the gun far away if the player dies.
Trivia[edit]
- The Scarab Gun has a slightly different appearance than a normal Okarda'phaa-pattern plasma rifle. On co-op, when you get the gun, have your partner look at you while you are dual-wielding it with a Plasma Rifle. There is a glow at the tip of the Plasma Rifle, that is not present on the Scarab Gun (although you can do it on single player).
- Obtaining the Scarab Gun in Halo 2 for Windows Vista will unlock the King of the Scarab achievement. Obtaining it in Halo: The Master Chief Collection will unlock the Scarab Lord achievement.
- Interestingly, the safety cone underneath the gun has multiple "Danger" signs on it, showing that the gun might have been put there intentionally to keep it away from others. Also, this is supported by the fact that Bungie put in an actual model (the plasma rifle's model) for the weapon, unlike other vehicles' .weapon tag (weapons are not specified in the vehicle tag).
- If the player gets into the side seat of a Warthog and fires the Scarab gun, the screen (except for the HUD) will go completely white until the player stops firing. That is because, in third person, the weapon's gleam is as large as the Scarab's main gun.
- If you give a marine this Easter egg, he will hold it as if it were a normal plasma rifle, but he will never fire it. Bungie might have expected this and took steps to prevent this in order to balance the game AIs.
- The Scarab Gun was originally used by Joseph Staten to generate the cinematic effect of the Scarab beam firing. According to him, it ended up in the game because he forgot to take it out.[2] However, designer Tyson Green has confirmed that the Scarab Gun was intentionally left in the game as an Easter egg.[3]
- If you grab the gun and make it to the part when the Scarab shoots the Scorpion tank, you can destroy the Scorpion yourself and the Scarab will refrain from firing.
- The Scarab Skull can be enabled in Halo 2 Anniversary. This causes all weapons used by the player to fire scarab beams, much like the Scarab Gun itself.
- The skull used to affect vehicles as well, even working on the Warthog's horn
Gallery[edit]
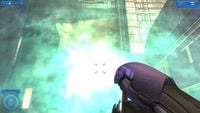
A single shot from the Scarab Gun
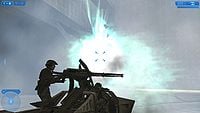
The result of firing the Scarab Gun when in the passenger seat of the Warthog.


Sources[edit]
- ^ Bungie Weekly Update 12-17-04
- ^ YouTube: Halo Fest: Bungie Hatching the Cosmic Halo Egg
- ^ Bungie: One Final Effort (Tyson Green: "Hiding the Scarab Gun on newmombasa and thinking "heh, it'll be forever before they find this!" and then having players get up there within a week by pushing Banshee through the BSP transition from the bridge. Damn. Never underestimate the player.")


