Rat Race: Difference between revisions
From Halopedia, the Halo wiki
General Heed (talk | contribs) (→Trivia) |
mNo edit summary |
||
| (47 intermediate revisions by 33 users not shown) | |||
| Line 1: | Line 1: | ||
{{ | {{Status|Gameplay}} | ||
{{Multiplayer map infobox | |||
{{Multiplayer | |||
|name=Rat Race | |name=Rat Race | ||
|image=[[ | |image=[[File:RatRace.png|300px]] | ||
|game=''[[Halo: Combat Evolved]]'' | |game=''[[Halo: Combat Evolved]]'' | ||
|location= | |map= | ||
|location=[[Human]] mining tunnel, [[Installation 04]]{{Ref/Site|Id=Bnet|URL=http://www.bungie.net/Games/Halo/page.aspx?section=Guides&subsection=MultiplayerPages&page=6|Site=Bungie.net|Page=Guides: Multiplayer Pages|D=12|M=02|Y=2005|Quote=An asymmetrical map which involves some human mining into one of Halo's hallway system.}} | |||
|terrain= Underground [[Forerunner]] structure | |terrain= Underground [[Forerunner]] structure | ||
| | |symmetry=Asymmetrical | ||
|playernumber=2-6 | |||
| | |||
|gametypes=*[[Slayer]] | |gametypes=*[[Slayer]] | ||
*[[Oddball]] | *[[Oddball]] | ||
*[[Race]] | *[[Race]] | ||
| | |pagegamelabel=CE | ||
}} | }} | ||
{{Article quote|Up the Ramps, Down the Tubes.}} | |||
'''Rat Race''' is a [[multiplayer]] map in [[Halo: Combat Evolved]]. | '''Rat Race''' is a [[multiplayer]] map in [[Halo: Combat Evolved]]. | ||
==Summary== | ==Summary== | ||
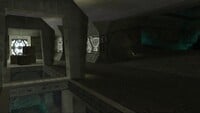
It is a | [[File:Rat Race map.jpg|Rat Race as seen from above.|thumb|left]] | ||
It is a circular map, with a multitude of [[Teleporters]], tunnels and passages. | |||
The most notable feature of the map is the central section, which consists of elevated tunnels. There are two entrances to this complex, one by a teleporter and one by an inclined ramp. The strategic value lies in the two exit points which allow a player to drop unexpectedly from the ceiling through a wide hole into the enemy section of the base. Since this is strictly a one-way vector of attack and jumping down this hole usually entails grabbing an [[Active camouflage]] or [[Overshield]] power-up, defenders are forced to keep an eye on the ceiling. | |||
Although the Bungie.net description claims that it is a [[UNSC]] attempt to mine into the surface of a section of [[Installation 04]],{{Ref/Reuse|Bnet}} the fact that the crew of the ''[[Pillar of Autumn]]'' would have had only 2 or 3 days to set it up makes this unlikely. Likewise, it is not known where they would have found the equipment necessary, or the time to do this. Why they would attempt to mine the surface of the ring is also unknown. | |||
==Strategies== | |||
*The [[Overshield]] and [[Active camouflage]] on the map can be shot down from their ledges. | |||
===Capture the Flag=== | ===Capture the Flag=== | ||
*First, if located on the "base" (there are no buildings in Rat Race, only the flags) that has the [[ | *First, if located on the "base" (there are no buildings in Rat Race, only the flags) that has the [[M7057 flamethrower|flamethrower]], get it. It is the best weapon in the entire map. | ||
*If you're at the enemy base, do ''not'' act miserly and only chuck one grenade | *If you're at the enemy base, do ''not'' act miserly and only chuck one grenade. The other team will spawn there, and your grenades will weaken them to the extent that you can finish them off with any weapon. | ||
*If you have [[ | *If you have [[M9 fragmentation grenade|frags]], use those up before employing the [[Anskum-pattern plasma grenade|plasma counterparts]]. They are much more destructive unless you manage to "stick" an opponent. | ||
*Before charging to the enemy flag, keep an eye at the ceiling. There should be either an | *Before charging to the enemy flag, keep an eye at the ceiling. There should be either an Overshield or an Active Camouflage, both of which are priceless assets. | ||
*Go through the tunnel towards the enemy base, and you should be provided with an ideal spot to jump down to retrieve the flag | *Go through the tunnel towards the enemy base, and you should be provided with an ideal spot to jump down to retrieve the flag. Your opponents will not see you unless you jump down, or you show up on their motion tracker. | ||
*The two [[Covenant portable shield]]s can be used for camping. Use this to your team's advantage by hiding there as your team's flag carrier escapes, and blasting pursuers. | |||
*This can be turned against you however, by using the "Noob Combo": an overcharged [[Type-25 plasma pistol|plasma pistol]] shot to disable their shields, then an [[MA5B assault rifle|assault rifle]] burst to kill the camper. This method only works in "No Shields" games; however, substituting the [[Okarda'phaa-pattern plasma rifle|plasma rifle]] for the plasma pistol is a good way around this problem if shields are active. | |||
===King of the Hill (Team)=== | ===King of the Hill (Team)=== | ||
*You can spam [[ | *You can spam [[grenade]]s to either hold off your enemies or confuse them. | ||
*If it is in an open area, the hill will become extended. Therefore, you should be wary of hiding locations that | *If it is in an open area, the hill will become extended. Therefore, you should be wary of hiding locations that a crouching and silent opponent might be able to use and evade detection (giving the other team time). | ||
*At close range, an expert | *At close range, an expert player wielding a [[M90 shotgun|shotgun]] is arguably the most dangerous one. If given the chance, always take it. If possible, get a plasma rifle to take down their shields. | ||
*To counter a | *To counter a player with a shotgun, you can either spam grenades, [[M6D magnum|pistol]] snipe him (you might require a reasonably distant range and skill) or use the fire-melee tactic from the assault rifle. | ||
==Production notes== | |||
This map was one of the first [[Development of Halo: Combat Evolved|created]] for the multiplayer component of ''Combat Evolved''. The map's unusual layout was created by multiplayer lead [[Hardy LeBel]], who claimed Rat Race as the product of the tutorial series he was watching to learn the modelling software 3DS Max, in particular the tool's extrusion function. The majority of the map's layout came from just this tutorial series, with only a few minor tweaks thereafter.{{Ref/YouTube|OheqVrMGPv0|The Act Man|Interview With The Man Who Created Halo's Multiplayer|Time=453|Detail=7:33}} | |||
{{Main|Cut Halo 2 levels#Rodentia}} | |||
Rat Race was recreated during ''Halo 2''{{'}}s post-production as a new map called "Rodentia". This variant never officially shipped in the Xbox or Vista versions of Halo 2, but was restored and released through the [[Digsite]] project in 2023{{Ref/Site|URL=https://www.halowaypoint.com/news/digsite-deliveries|Site=Halo Waypoint|Page=Digsite Deliveries|D=30|M=01|Y=2024}}{{Ref/Site|URL=https://steamcommunity.com/sharedfiles/filedetails/?id=3000901245|Site=Steam Workshop|Page=Digtacular Map Pack|D=30|M=01|Y=2024}}. | |||
==Trivia== | ==Trivia== | ||
*Other than [[Longest]], it is the only map in Halo: CE that lacks the sniper rifle (Though the sniper would not be useful on this map). | |||
*Other than [[Longest]], it is the only map in | |||
== | ==Gallery== | ||
< | {{Linkbox|gallery=yes}} | ||
<gallery> | |||
File:HMCC HCE Rat Race Map.png|Rat Race's topography and load screen in The Master Chief Collection. | |||
File:H2 Digsite Rodentia.jpg|Rodentia, the cut reprise of Rat Race's layout for Halo 2. | |||
</gallery> | |||
{{ | ==Sources== | ||
{{Ref/Sources}} | |||
{{Levels|H1|mode=yes}} | |||
Latest revision as of 00:36, February 25, 2024
| Rat Race | |
|---|---|

| |
| Map overview | |
|
Game: |
|
| Lore information | |
|
Location: |
Human mining tunnel, Installation 04[1] |
| Gameplay overview | |
|
Terrain: |
Underground Forerunner structure |
|
Map layout: |
Asymmetrical |
|
Recommended number of players: |
2-6 |
|
Recommended gametype(s): |
|
| “ | Up the Ramps, Down the Tubes. | ” |
Rat Race is a multiplayer map in Halo: Combat Evolved.
Summary[edit]

It is a circular map, with a multitude of Teleporters, tunnels and passages.
The most notable feature of the map is the central section, which consists of elevated tunnels. There are two entrances to this complex, one by a teleporter and one by an inclined ramp. The strategic value lies in the two exit points which allow a player to drop unexpectedly from the ceiling through a wide hole into the enemy section of the base. Since this is strictly a one-way vector of attack and jumping down this hole usually entails grabbing an Active camouflage or Overshield power-up, defenders are forced to keep an eye on the ceiling.
Although the Bungie.net description claims that it is a UNSC attempt to mine into the surface of a section of Installation 04,[1] the fact that the crew of the Pillar of Autumn would have had only 2 or 3 days to set it up makes this unlikely. Likewise, it is not known where they would have found the equipment necessary, or the time to do this. Why they would attempt to mine the surface of the ring is also unknown.
Strategies[edit]
- The Overshield and Active camouflage on the map can be shot down from their ledges.
Capture the Flag[edit]
- First, if located on the "base" (there are no buildings in Rat Race, only the flags) that has the flamethrower, get it. It is the best weapon in the entire map.
- If you're at the enemy base, do not act miserly and only chuck one grenade. The other team will spawn there, and your grenades will weaken them to the extent that you can finish them off with any weapon.
- If you have frags, use those up before employing the plasma counterparts. They are much more destructive unless you manage to "stick" an opponent.
- Before charging to the enemy flag, keep an eye at the ceiling. There should be either an Overshield or an Active Camouflage, both of which are priceless assets.
- Go through the tunnel towards the enemy base, and you should be provided with an ideal spot to jump down to retrieve the flag. Your opponents will not see you unless you jump down, or you show up on their motion tracker.
- The two Covenant portable shields can be used for camping. Use this to your team's advantage by hiding there as your team's flag carrier escapes, and blasting pursuers.
- This can be turned against you however, by using the "Noob Combo": an overcharged plasma pistol shot to disable their shields, then an assault rifle burst to kill the camper. This method only works in "No Shields" games; however, substituting the plasma rifle for the plasma pistol is a good way around this problem if shields are active.
King of the Hill (Team)[edit]
- You can spam grenades to either hold off your enemies or confuse them.
- If it is in an open area, the hill will become extended. Therefore, you should be wary of hiding locations that a crouching and silent opponent might be able to use and evade detection (giving the other team time).
- At close range, an expert player wielding a shotgun is arguably the most dangerous one. If given the chance, always take it. If possible, get a plasma rifle to take down their shields.
- To counter a player with a shotgun, you can either spam grenades, pistol snipe him (you might require a reasonably distant range and skill) or use the fire-melee tactic from the assault rifle.
Production notes[edit]
This map was one of the first created for the multiplayer component of Combat Evolved. The map's unusual layout was created by multiplayer lead Hardy LeBel, who claimed Rat Race as the product of the tutorial series he was watching to learn the modelling software 3DS Max, in particular the tool's extrusion function. The majority of the map's layout came from just this tutorial series, with only a few minor tweaks thereafter.[2]
- Main article: Cut Halo 2 levels#Rodentia
Rat Race was recreated during Halo 2's post-production as a new map called "Rodentia". This variant never officially shipped in the Xbox or Vista versions of Halo 2, but was restored and released through the Digsite project in 2023[3][4].
Trivia[edit]
- Other than Longest, it is the only map in Halo: CE that lacks the sniper rifle (Though the sniper would not be useful on this map).
Gallery[edit]

|
Browse more images in this article's gallery page. |
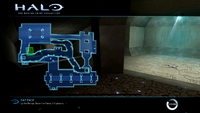
Rat Race's topography and load screen in The Master Chief Collection.
Rodentia, the cut reprise of Rat Race's layout for Halo 2.


Sources[edit]
- ^ a b Bungie.net, Guides: Multiplayer Pages: "An asymmetrical map which involves some human mining into one of Halo's hallway system." (Retrieved on Feb 12, 2005) [archive]
- ^ YouTube - The Act Man, Interview With The Man Who Created Halo's Multiplayer: 7:33
- ^ Halo Waypoint, Digsite Deliveries (Retrieved on Jan 30, 2024) [archive]
- ^ Steam Workshop, Digtacular Map Pack (Retrieved on Jan 30, 2024) [archive]
| |||||||||||||||||||||||


