Legendary: Difference between revisions
From Halopedia, the Halo wiki
m (→Specific differences: Replacing level link) |
|||
| (40 intermediate revisions by 12 users not shown) | |||
| Line 1: | Line 1: | ||
{{ | {{Status|Gameplay}} | ||
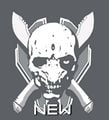
[[File:MCC - Legendary symbol.png|150px|thumb | [[File:MCC - Legendary symbol.png|150px|thumb|The Legendary shield, as per ''[[Halo: The Master Chief Collection|Halo: The Master Chief Collection's]]'' release.]] | ||
{{Quote|You face opponents who have never known defeat, who laugh in alien tongues at your efforts to survive. This is suicide.|Description from ''[[Halo: Combat Evolved]]'', ''[[Halo 2]]'', and ''[[Halo: Combat Evolved Anniversary]]''}} | {{Quote|You face opponents who have never known defeat, who laugh in alien tongues at your efforts to survive. This is suicide.|Description from ''[[Halo: Combat Evolved]]'', ''[[Halo 2]]'', and ''[[Halo: Combat Evolved Anniversary]]''}} | ||
{{Quote|Tremble as teeming hordes of invincible alien monsters punish the slightest error with instant death... again and again.|Description from ''[[Halo 3]]'', ''[[Halo 3: ODST]]'', ''[[Halo: Reach]]'', and ''[[Halo 4]]'' | {{Quote|Tremble as teeming hordes of invincible alien monsters punish the slightest error with instant death... again and again.|Description from ''[[Halo 3]]'', ''[[Halo 3: ODST]]'', ''[[Halo: Reach]]'', and ''[[Halo 4]]''{{Ref/Note|The ''[[Halo 4]]'' description is the same wording, however it ends with an [[wikipedia:exclamation point|exclamation point]] rather than a [[wikipedia:full stop|period]].}}}} | ||
{{Quote|Your enemies outnumber you greatly and are hunting you down. Can you survive their onslaught?|Description from ''[[Halo: The Master Chief Collection]]''}} | {{Quote|Your enemies outnumber you greatly and are hunting you down. Can you survive their onslaught?|Description from ''[[Halo: The Master Chief Collection]]''}} | ||
{{Quote|Death around every corner. Reload often.|Description from ''[[Halo 5: Guardians]]''}} | {{Quote|Death around every corner. Reload often.|Description from ''[[Halo 5: Guardians]]''}} | ||
{{Quote|Face insurmountable odds and an overwhelming enemy force. This is what legends are made of.|Description from ''[[Halo Wars 2]]''}} | {{Quote|Face insurmountable odds and an overwhelming enemy force. This is what legends are made of.|Description from ''[[Halo Wars 2]]''}} | ||
{{Quote|Run, little Demon. Recommended for fans of Jackal Snipers.|Description from ''[[Halo Infinite]]''}} | |||
'''Legendary''' is the highest and most difficult setting of [[Campaign]] gameplay in every ''Halo'' games to date, aside from the informal "[[Mythic (difficulty)|Mythic]]" difficulty which is Legendary with all [[Skull]]s active in ''Halo'' games that feature them. The Legendary difficulty is also featured in [[Firefight]], [[Skirmish]], and [[Spartan Ops]] games. | '''Legendary''' is the highest and most difficult setting of [[Campaign]] gameplay in every ''Halo'' games to date, aside from the informal "[[Mythic (difficulty)|Mythic]]" difficulty which is Legendary with all [[Skull]]s active in ''Halo'' games that feature them. The Legendary difficulty is also featured in [[Firefight]], [[Skirmish]], and [[Spartan Ops]] games. | ||
==Summary== | ==Summary== | ||
[[File:Halo 3 - Legendary Symbol.png|thumb|The original Legendary shield.]] | [[File:Halo 3 - Legendary Symbol.png|thumb|The original Legendary shield.]] | ||
In the original ''Halo'' trilogy, legendary difficulty is symbolized by an [[Sangheili|Elite]] skull with a bullet | In the original ''Halo'' trilogy, legendary difficulty is symbolized by an [[Sangheili|Elite]] skull with a bullet pierced on the cranium, two crossed [[Combat knife|combat knives]] and a shield bearing the ''[[Marathon]]'' symbol, though the symbol is not visible behind the skull. In ''[[Halo 3: ODST]]'', the symbol is adjusted to a [[human]] skull with two crossed [[M7S Caseless Submachine Gun|Suppressed SMGs]] in front of the same shield with the ''Marathon'' symbol, now slightly visible behind the skull. In ''[[Halo: Reach]]'' and ''[[Halo: Combat Evolved Anniversary]]'', the original legendary symbol returns, but these games, along with future titles, lack the ''Marathon'' symbol on the shield. In ''[[Halo 4]]'', the shield and the combat knives have been redesigned while the skull of a [[Promethean Knight]] replaces the previous skulls. | ||
Legendary is regarded as a significant challenge, even for veteran players. Overwhelming enemy firepower, superior enemy numbers, and increased enemy intelligence make up most of the challenge, but several specific changes, varying throughout games, also add to the difficulty. Most allies are practically useless aside from creating distractions. The player must play cautiously and conservatively to succeed, but even with appropriate tactics and practice, the player will die very often and may require some luck to succeed. The increased difficulty does not come without rewards; many details, such as pieces of dialogue, cutscenes, and music, can only be heard or seen on Legendary; in particular, most Halo games feature an additional scene in the ending cutscenes, which is only shown on Legendary, often referred to as "Legendary Endings". ''Halo: Combat Evolved'', ''Halo 3'', ''Halo 3: ODST'', ''Halo: Reach'', ''Halo 4'', and ''Halo 5: Guardians'' feature such endings. Several [[achievement]]s, [[ | Legendary is regarded as a significant challenge, even for veteran players. Overwhelming enemy firepower, superior enemy numbers, and increased enemy intelligence make up most of the challenge, but several specific changes, varying throughout games, also add to the difficulty. Most allies are practically useless aside from creating distractions. The player must play cautiously and conservatively to succeed, but even with appropriate tactics and practice, the player will die very often and may require some luck to succeed. The increased difficulty does not come without rewards; many details, such as pieces of dialogue, cutscenes, and music, can only be heard or seen on Legendary; in particular, most Halo games feature an additional scene in the ending cutscenes, which is only shown on Legendary, often referred to as "Legendary Endings". ''Halo: Combat Evolved'', ''Halo 3'', ''Halo 3: ODST'', ''Halo: Reach'', ''Halo 4'', and ''Halo 5: Guardians'' feature such endings. Several [[achievement]]s, [[challenge]]s, [[commendations]], and [[Halo Waypoint#Awards|career awards]] reward players for accomplishing various tasks on Legendary difficulty in addition to the achievements for simply completing every mission on Legendary. | ||
==''Halo: Combat Evolved'' and ''Halo: Anniversary''== | ==''Halo: Combat Evolved'' and ''Halo: Anniversary''== | ||
In the first ''Halo'' game, the differences between Legendary and other settings is relatively numeric. The player does not face unique or different enemies yet they face many more enemies who are tougher to defeat and endure. Many of the same strategies that work on other settings work on Legendary in this game except that the player has to be extremely careful of his/her own weaknesses. This is where the [[Noob combo]] comes in handy, with use of the [[Type-25 | In the first ''Halo'' game, the differences between Legendary and other settings is relatively numeric. The player does not face unique or different enemies yet they face many more enemies who are tougher to defeat and endure. Many of the same strategies that work on other settings work on Legendary in this game except that the player has to be extremely careful of his/her own weaknesses. This is where the [[Noob combo]] comes in handy, with use of the [[Type-25 plasma pistol|Plasma Pistol]] and [[M6D magnum|M6D Magnum]]. | ||
=== General differences === | === General differences === | ||
| Line 23: | Line 24: | ||
*Player shields and enemy shields recharge faster - twice as fast as when on Normal difficulty. | *Player shields and enemy shields recharge faster - twice as fast as when on Normal difficulty. | ||
*Enemy health is doubled. | *Enemy health is doubled. | ||
*'''[[Sangheili | *'''[[Sangheili]]:''' Twice as many Sangheili appear as on the Normal difficulty. [[Sangheili Major]] are encountered at a ratio of about one of every three Elites encountered, improving enemy forces. An area that had two [[Sangheili Minor]] on Normal should have four to five Elites on Legendary with one or two of them being Majors. Their shields can take 28 rounds from an [[MA5B assault rifle|Assault Rifle]] before lowering. | ||
*'''[[Unggoy | *'''[[Unggoy]]:''' Twice as many Unggoy appear than on the Normal setting. Around half of the Grunts encountered are [[Unggoy Major]]. | ||
*Enemy Grunts and Elites throw grenades frequently, much faster and almost always accurately. The grenade detonation timers are cut in half. | *Enemy Grunts and Elites throw grenades frequently, much faster and almost always accurately. The grenade detonation timers are cut in half. | ||
*'''Firing Rate :''' All enemies fire their weapons much faster and more accurately. In particular, [[Kig-Yar | *'''Firing Rate :''' All enemies fire their weapons much faster and more accurately. In particular, [[Kig-Yar]] will fire long streams of 10-15 shots with high accuracy. Kig-Yar will also charge their plasma pistols much more often proving deadly in combat. | ||
*'''Agility :''' All enemies move much faster and will rarely allow a player to stick them with [[ | *'''Agility :''' All enemies move much faster and will rarely allow a player to stick them with [[Anskum-pattern plasma grenade|grenades]]. Sangheili will often do their dodging maneuver immediately if hit, making it very difficult to make consistent hits on them to drain their shields. | ||
*'''[[Stealth Sangheili | *'''[[Stealth Sangheili]]:''' They are always encountered in packs of four to six with few exceptions. | ||
*'''[[Flood]]:''' The Flood are now armed 90 percent of the time. Their deadly melee attacks will drain shields by half. Many more of them wield [[M90 | *'''[[Flood]]:''' The Flood are now armed 90 percent of the time. Their deadly melee attacks will drain shields by half. Many more of them wield [[M90 shotgun|Shotguns]] and [[M41 SPNKR|Rocket Launchers]] than before. Only a couple of Infection Forms can completely drain your shields, and an explosion from a Carrier Form can kill you instantly if your shields are completely or partially drained. | ||
*'''Allies:''' [[UNSC Marine Corps|Marines]] are virtually useless. They will constantly get stuck with grenades and most are easily killed by the enemy's increased rate of fire. Their returning fire only inflicts minimal damage on enemies. Their AI is increased significantly, still to little effect. | *'''Allies:''' [[UNSC Marine Corps|Marines]] are virtually useless. They will constantly get stuck with grenades and most are easily killed by the enemy's increased rate of fire. Their returning fire only inflicts minimal damage on enemies. Their AI is increased significantly, still to little effect. | ||
* [[Sangheili Zealot | * [[Sangheili Zealot]]s appear more frequently throughout the game. Incredibly, it takes 21 shots from an M6D Pistol to remove their shields alone. | ||
===Specific differences=== | ===Specific differences=== | ||
| Line 37: | Line 38: | ||
**The player does not go through the controls section at the beginning of the level, the game assuming that anyone choosing the highest difficulty level has gone through it before. Instead, they will wake up and leave the cryo section immediately. This also occurs on Heroic difficulty. | **The player does not go through the controls section at the beginning of the level, the game assuming that anyone choosing the highest difficulty level has gone through it before. Instead, they will wake up and leave the cryo section immediately. This also occurs on Heroic difficulty. | ||
**[[Avery Johnson|Johnson]]'s speech changes in the beginning of the level. | **[[Avery Johnson|Johnson]]'s speech changes in the beginning of the level. | ||
**The player has immediate access to the [[motion tracker]] and [[M9 | **The player has immediate access to the [[motion tracker]] and [[M9 frag grenade|Frag grenades]]. | ||
*'''[[The Truth and Reconciliation]]:''' | *'''[[The Truth and Reconciliation]]:''' | ||
**Upon entering the loading bay, 4-6 | **Upon entering the loading bay, 4-6 Sangheili Zealots will ambush the player and the Marines in addition to the standard waves of Unggoy and Kig-Yar which pass through the hallways. There will also be a couple of [[Mgalekgolo]]. | ||
*'''[[343 Guilty Spark (level)|343 Guilty Spark]]:''' | *'''[[343 Guilty Spark (level)|343 Guilty Spark]]:''' | ||
**The shotgun is no longer available early on in the game. The only way to pick it up is to kill a [[Flood combat form]] that was holding one or from one of the dead Marines from the third room with an energy bridge. | **The shotgun is no longer available early on in the game. The only way to pick it up is to kill a [[Flood combat form]] that was holding one or from one of the dead Marines from the third room with an energy bridge. | ||
*'''[[The Maw]]:''' | *'''[[The Maw]]:''' | ||
**The player only has five minutes to get to the [[GA-TL1 Longsword|Longsword]] fighter after destroying the ''Pillar of Autumn'' | **The player only has five minutes to get to the [[GA-TL1 Longsword|Longsword]] fighter after destroying the ''Pillar of Autumn''{{'}}s engine core as opposed to the usual six minutes. | ||
**The player will get to see the non-canon [[Hugging Elite|secret ending]]. | **The player will get to see the non-canon [[Hugging Elite|secret ending]]. | ||
| Line 57: | Line 58: | ||
==''Halo 2''== | ==''Halo 2''== | ||
In one of the [[Bungie]] Updates, [[Frank O'Connor]] describes ''Halo 2'' | In one of the [[Bungie]] Updates, [[Frank O'Connor]] describes ''Halo 2''{{'}}s Legendary as: | ||
{{Article quote|A whole new sick twist on game difficulty. Legendary includes bizarre stuff like perma-death for [[Cooperative play|Co-Op]] players, meaning that you can't hopscotch like you can on other difficulty levels. Once a player dies on Legendary, both players are hurled back to the last checkpoint. It's brutal. Also, that place where you encountered two grunts and a flowerpot on Normal? Well now they're hunters, high-ranking, [[Type-1 energy sword|Sword]] carrying Elites and they're all PMS-ing. Seriously, sticking your head around a corner on level two can get it shot clean off.}} | {{Article quote|A whole new sick twist on game difficulty. Legendary includes bizarre stuff like perma-death for [[Cooperative play|Co-Op]] players, meaning that you can't hopscotch like you can on other difficulty levels. Once a player dies on Legendary, both players are hurled back to the last checkpoint. It's brutal. Also, that place where you encountered two grunts and a flowerpot on Normal? Well now they're hunters, high-ranking, [[Type-1 energy sword|Sword]] carrying Elites and they're all PMS-ing. Seriously, sticking your head around a corner on level two can get it shot clean off.}} | ||
===General differences=== | ===General differences=== | ||
*Both players have "linked lives". That is, when one of the players dies, both are sent back to the last checkpoint regardless of whether or not only one of them died (Possibly to prevent players from easily reaching the status of beating Legendary on their profile or to enhance it with the general knowledge of the above statement). This effect is similar to enabling the [[Halo 2 | *Both players have "linked lives". That is, when one of the players dies, both are sent back to the last checkpoint regardless of whether or not only one of them died (Possibly to prevent players from easily reaching the status of beating Legendary on their profile or to enhance it with the general knowledge of the above statement). This effect is similar to enabling the [[Halo 2 skulls#Iron|Iron Skull]]. | ||
*Enemy fire or munitions have a faster velocity. | *Enemy fire or munitions have a faster velocity. | ||
*Enemies will tend to use more powerful weapons earlier in the game or more often, such as [[Sangheili Ultra|Ultras]] and [[Sangheili Zealot|Zealots]] with [[Type-1 energy sword|Energy Swords]], [[Unggoy | *Enemies will tend to use more powerful weapons earlier in the game or more often, such as [[Sangheili Ultra|Ultras]] and [[Sangheili Zealot|Zealots]] with [[Type-1 energy sword|Energy Swords]], [[Unggoy]] with [[Pez'tk-pattern fuel rod gun|Fuel Rod Guns]] and [[Type-33 needler|Needlers]], and finally [[Jiralhanae]] with [[Type-25 Brute Shot|Brute Shots]]. | ||
*Flood Combat Forms will frequently wield Shotguns and Rocket Launchers. A shot from a Shotgun at mid-range can kill you instantly. There are more Infection Forms present, and they will instantly revive any Combat Form if their corpses are intact. | *Flood Combat Forms will frequently wield Shotguns and Rocket Launchers. A shot from a Shotgun at mid-range can kill you instantly. There are more Infection Forms present, and they will instantly revive any Combat Form if their corpses are intact. | ||
*Enemies will tend to stick together, and not follow the player too far from their spawn point, making it very difficult to ambush them. | *Enemies will tend to stick together, and not follow the player too far from their spawn point, making it very difficult to ambush them. | ||
| Line 74: | Line 75: | ||
*The [[Thel 'Vadam|Arbiter]]'s [[active camouflage]] lasts only five seconds and takes ten seconds to recharge. | *The [[Thel 'Vadam|Arbiter]]'s [[active camouflage]] lasts only five seconds and takes ten seconds to recharge. | ||
*Enemy shields and health are almost double their Normal resistance. | *Enemy shields and health are almost double their Normal resistance. | ||
*Virtually all | *Virtually all Sangheili encountered are Majors. Unggoy Majors are also far more common. | ||
*Elite Ultras are now a very common sight. The player will encounter up to four in some parts of the game. They have the most powerful energy shields in the game and can survive | *Elite Ultras are now a very common sight. The player will encounter up to four in some parts of the game. They have the most powerful energy shields in the game and can survive four head shots from a [[Sniper Rifle System 99C-Series 2 Anti-Matériel|Sniper Rifle]] or a [[Sulok-pattern beam rifle|Beam Rifle]]. | ||
*When playing as the [[John-117|Master Chief]], the player has to face large numbers of | *When playing as the [[John-117|Master Chief]], the player has to face large numbers of Sangheili Zealots. They always wield Swords and can slaughter large groups of Marines with ease. | ||
*Enemies are extremely adaptive and intelligent in tactical action. They rarely fall victim to being outsmarted. | *Enemies are extremely adaptive and intelligent in tactical action. They rarely fall victim to being outsmarted. | ||
* | *Unggoy retreat less often when a leader is killed. | ||
*Marine allies are much stronger. They have more health and their AI is increased significantly. They are still highly vulnerable though. | *Marine allies are much stronger. They have more health and their AI is increased significantly. They are still highly vulnerable though. | ||
**Marines can withstand one shot from a sniper jackal without dying. | |||
*Melee attacks received from Elites and Flood combat forms are practically always one hit fatalities, however moving to the side will reduce the damage concurred from such attacks. | *Melee attacks received from Elites and Flood combat forms are practically always one hit fatalities, however moving to the side will reduce the damage concurred from such attacks. | ||
*Enemies normally have upgraded weapons. For example, | **Melee attacks from Heretic Elites are glitched, so the player will not take any damage from them. This can be used as a saving grace in otherwise bad situations. '''''This does not apply when a Heretic Elite is holding an Energy Sword'''''. | ||
*Enemies normally have upgraded weapons. For example, Jiralhanae that usually had [[Kewu R'shi'k-pattern plasma rifle]]s would now carry [[Vostu-pattern carbine]] or have the deadly Brute Shot equipped. | |||
*Enemies will often notice the player sooner and prove to be more alert. | *Enemies will often notice the player sooner and prove to be more alert. | ||
*[[Kig-Yar Sniper | *[[Kig-Yar Sniper]]s will appear more often than on any other difficulty. They can kill the player with only one shot regardless of where it hits. Players should think twice before sticking themselves out into the open. | ||
*Stealth Elites appear more often and travel in groups of two to four, usually with one or two dual-wielding Plasma Rifles and the others using Energy Swords. | *Stealth Elites appear more often and travel in groups of two to four, usually with one or two dual-wielding Plasma Rifles and the others using Energy Swords. | ||
*Almost all Elite Combat Forms have shields. | *Almost all Elite Combat Forms have shields. | ||
| Line 98: | Line 101: | ||
==''Halo 3'' and ''Halo 3: ODST''== | ==''Halo 3'' and ''Halo 3: ODST''== | ||
[[File:Halo 3 ODST - Legendary Symbol.png|150px|thumb | [[File:Halo 3 ODST - Legendary Symbol.png|150px|thumb|The ''Halo 3: ODST'' Legendary shield.]] | ||
===General differences=== | ===General differences=== | ||
*Shields are 50% their Normal power and a few hits even from a Plasma Pistol will drain them completely. | *Shields are 50% their Normal power and a few hits even from a Plasma Pistol will drain them completely. | ||
*Enemies are much more resistant to damage. (E.g. The player needs three body shots or two headshots for a fully shielded [[Jiralhanae Captain| | *Enemies are much more resistant to damage. (E.g. The player needs three body shots or two headshots for a fully shielded [[Jiralhanae Captain|Jiralhanae Captain]] to take it down instead of one headshot or two body shots with a sniper or beam rifle). | ||
*Headshots are the only means to get a quick kill on enemies like Jackals and Grunts, aside from assassinations. | *Headshots are the only means to get a quick kill on enemies like Jackals and Grunts, aside from assassinations. | ||
*Nearly all enemy forces are promoted by one rank. This can be changed with the effects of the [[Halo 3 | *Nearly all enemy forces are promoted by one rank. This can be changed with the effects of the [[Halo 3 skulls#Thunderstorm|Thunderstorm Skull]], which promotes enemies even higher. In addition to this promotion, Brutes will not carry [[deployable cover]]s. | ||
*Enemy numbers double or sometimes triple in the case of Flood encounters. | *Enemy numbers double or sometimes triple in the case of Flood encounters. | ||
*Enemy AI improves dramatically, enemy vehicles will be significantly harder to hijack and enemies will be nearly impossible to stick with grenades. | *Enemy AI improves dramatically, enemy vehicles will be significantly harder to hijack and enemies will be nearly impossible to stick with grenades. | ||
* | *Kig-Yar Snipers, one of the rarer enemies in ''Halo 3'', will appear with greater frequency, though not nearly as much as in ''Halo 2''. | ||
*Enemies fire much faster and more accurately, and toss grenades more often and with greater accuracy. | *Enemies fire much faster and more accurately, and toss grenades more often and with greater accuracy. | ||
*Turrets, such as [[ | *Turrets, such as [[Rizsheda-pattern Shade|Shades]], are frequently encountered, even in places in which they did not appear in lower difficulties. Gunners will also fire more aggressively. | ||
* | *Jirlahane will wield Brute Shots more often. They will fire them faster and more accurately. They will also frequently go berserk. | ||
*The "linked lives" system from ''Halo 2'' is removed but can be achieved with the [[Halo 3 | *The "linked lives" system from ''Halo 2'' is removed but can be achieved with the [[Halo 3 skulls#Iron|Iron Skull]] activated. | ||
*Almost all Sentinels have shields, including allied ones. | *Almost all Sentinels have shields, including allied ones. | ||
*In single-player mode, the Arbiter is next to useless and will frequently be knocked out for prolonged periods. He will also take cover a lot more and so reduce his outgoing fire. However, he becomes a powerful ally if wielding an Energy Sword when fighting the Flood, especially in the level [[Floodgate]]. | *In single-player mode, the Arbiter is next to useless and will frequently be knocked out for prolonged periods. He will also take cover a lot more and so reduce his outgoing fire. However, he becomes a powerful ally if wielding an Energy Sword when fighting the Flood, especially in the level [[Floodgate]]. | ||
| Line 117: | Line 120: | ||
*''Halo 3'': | *''Halo 3'': | ||
**In the level ''[[Arrival]]'', there are five different random dialog lines for Johnson which are exclusive to Legendary difficulty. | **In the level ''[[Arrival]]'', there are five different random dialog lines for Johnson which are exclusive to Legendary difficulty. | ||
**The [[Terminal (Halo 3)|Terminals]] have a different narrative on Legendary, changing from the story of the [[Didact]] and the [[Librarian]], to the story of [[Mendicant Bias]]. | |||
**The ending cutscene of the level ''[[Halo (Halo 3 level)|Halo]]'', following the game's [[Halo 3 credits|credits]], has a Legendary-only scene [[Requiem|foreshadowing]] ''Halo 4''. | **The ending cutscene of the level ''[[Halo (Halo 3 level)|Halo]]'', following the game's [[Halo 3 credits|credits]], has a Legendary-only scene [[Requiem|foreshadowing]] ''Halo 4''. | ||
*''Halo 3: ODST'': | *''Halo 3: ODST'': | ||
| Line 132: | Line 136: | ||
**The [[Vidmaster Challenge: Classic]] achievement is awarded for completing any level solo on Legendary, on LIVE, with no shots fired or grenades thrown. | **The [[Vidmaster Challenge: Classic]] achievement is awarded for completing any level solo on Legendary, on LIVE, with no shots fired or grenades thrown. | ||
**The [[Vidmaster Challenge: Deja Vu]] achievement is awarded for completing the level ''[[Coastal Highway]]'' on 4-player Legendary LIVE co-op, with Iron Skull, and no Warthog or Scorpion. | **The [[Vidmaster Challenge: Deja Vu]] achievement is awarded for completing the level ''[[Coastal Highway]]'' on 4-player Legendary LIVE co-op, with Iron Skull, and no Warthog or Scorpion. | ||
**[[Veronica Dare]] is awarded as a playable [[Firefight]] character for completing the campaign on Legendary. | **[[Veronica Dare]] is awarded as a playable [[Firefight (Halo 3: ODST)|Firefight]] character for completing the campaign on Legendary. | ||
==''Halo Wars''== | ==''Halo Wars''== | ||
| Line 140: | Line 144: | ||
*Enemies are always upgraded with at least one or two upgrades and attack the player's base earlier and with more units. | *Enemies are always upgraded with at least one or two upgrades and attack the player's base earlier and with more units. | ||
*When facing Flood units, player infantry units get infected at a faster rate. | *When facing Flood units, player infantry units get infected at a faster rate. | ||
*Extra enemy units which normally don't appear on lower difficulties are present: Shades, stationary Jackals and sometimes even | *Extra enemy units which normally don't appear on lower difficulties are present: Shades, stationary Jackals and sometimes even {{Pattern|Emp'seam|Antlion}}s. In Flood missions, there are more [[Flood launcher]]s, [[Flood spores|spores]] and [[Flood blister|blisters]] than usual. | ||
===Specific differences=== | ===Specific differences=== | ||
| Line 150: | Line 154: | ||
== ''Halo: Reach'' == | == ''Halo: Reach'' == | ||
[[File: | [[File:HR Legendary Icon.png|thumb|The ''Halo: Reach'' Legendary shield.]] | ||
=== General differences === | === General differences === | ||
* In ''Halo Reach'', enemy AI and numbers will be scaled according to the number of players (i.e. the more players there are, the more enemies there are and the more intelligent each enemy AI is). | * In ''Halo Reach'', enemy AI and numbers will be scaled according to the number of players (i.e. the more players there are, the more enemies there are and the more intelligent each enemy AI is). | ||
* Plasma projectiles travel faster than on other difficulties. | * Plasma projectiles travel faster than on other difficulties. | ||
* Shade turrets fire and turn several times faster than physically possible by the player. | * Shade turrets fire and turn several times faster than physically possible by the player. | ||
* [[Sangheili General | * [[Sangheili General]] appear more often, usually wielding Covenant heavy weapons. | ||
* [[Sangheili Minor | * [[Sangheili Minor]]s seldom appear; less than five are encountered in the entire campaign, with the exception of Banshee pilots. | ||
* Similar to Elite Minors, very few [[Kig-Yar Minor | * Similar to Elite Minors, very few [[Kig-Yar Minor]]s appear through the whole campaign. | ||
=== Specific differences === | === Specific differences === | ||
| Line 170: | Line 174: | ||
== ''Halo 4'' == | == ''Halo 4'' == | ||
[[File:Halo 4 - Legendary symbol.png|150px|thumb | [[File:Halo 4 - Legendary symbol.png|150px|thumb|The ''Halo 4'' Legendary shield.]] | ||
=== General differences === | === General differences === | ||
{{Expand-section}} | {{Expand-section}} | ||
* The player will get an extended cutscene in ''[[Epilogue (Halo 4 level)|Epilogue]]'' if the entire campaign is cleared on Legendary. | * The player will get an extended cutscene in ''[[Epilogue (Halo 4 level)|Epilogue]]'' if the entire campaign is cleared on Legendary. | ||
* Enemies deal more damage and are more resistant to damage, with Elites taking at least [[seven]] direct headshots from a [[M395 DMR|DMR]] to lose their shields. | * Enemies deal more damage and are more resistant to damage, with Elites taking at least [[seven]] direct headshots from a [[M395 DMR|DMR]] to lose their shields. | ||
* [[Crawler Snipe]]s are more dangerous as their built-in [[Z-750 binary rifle | * More [[Promethean Knight]]s are featured, especially higher-ranking ones. | ||
* | * [[Crawler Snipe]]s are more dangerous as their built-in [[Z-750 binary rifle]]s almost always kill the player in one hit, regardless of where it hits. | ||
* Promethean Knights' and [[Promethean Watcher]]s' shields recharge much faster. | |||
* Knights also throw [[Z-040 pulse grenade|Pulse Grenades]] even more often. | * Knights also throw [[Z-040 pulse grenade|Pulse Grenades]] even more often. | ||
=== Specific differences === | === Specific differences === | ||
* | * '''[[Forerunner (level)|Forerunner]]''': | ||
* | ** Playing on Legendary allows access to two [[Incineration Cannons on Forerunner|Easter]] [[Hidden weapons caches on Forerunner|eggs]] allowing the player to spawn nine [[Z-390 incineration cannon|Incineration Cannon]]s and two Forerunner heavy weapons caches for use in the mission, respectively. | ||
* | * '''[[Shutdown]]''': | ||
** A new Legendary-exclusive easter egg allows the player to [[Gravity Hammers on Shutdown|spawn]] four [[Gravity hammer (fiction)|Gravity Hammer]]s for use in the mission. | |||
* '''[[Midnight]]''': | |||
** A Legendary-only easter egg allows the player to [[Secret Gravity Hammer on Midnight|spawn a second Gravity Hammer]] for use in the mission. | |||
=== Awards === | === Awards === | ||
| Line 192: | Line 200: | ||
== ''Halo 5: Guardians'' == | == ''Halo 5: Guardians'' == | ||
[[File:Halo 5 Guardians - Legendary symbol.png|150px|thumb | [[File:Halo 5 Guardians - Legendary symbol.png|150px|thumb|The ''Halo 5: Guardians'' Legendary shield.]] | ||
While playing on [[cooperative play|co-op]], it is highly recommended to pick characters with precision weapons (e.g. DMR) as their starting primary weapon as part of their starting loadout, like [[Frederic-104]] or [[Holly Tanaka]], as precision weapons are more useful than fully automatic weapons in most cases. | |||
=== General differences === | === General differences === | ||
{{Expand-section}} | {{Expand-section}} | ||
* Enemies deal more damage and are more resistant to damage. | * Enemies deal more damage and are more resistant to damage. Two shots from an enemy wielding a [[Z-250 lightrifle]] will down a player. | ||
* [[Promethean Crawler]]s' tracking shots from their built-in weapons exhibit virtually pinpoint accuracy. | * [[Promethean Crawler]]s' tracking shots from their built-in weapons exhibit virtually pinpoint accuracy. | ||
* [[ | * [[Armiger Soldier]]s use slipspace translocation even more often to confuse or avoid players and throw [[Z-400 splinter grenade|Splinter Grenades]] more often. | ||
* [[Knight Commander]]s wielding Incineration Cannons fire charged shots even more often. | * [[Knight Commander]]s wielding Incineration Cannons fire charged shots even more often. | ||
=== Specific differences === | === Specific differences === | ||
* The player will get a secret ending after the credits if the [[Guardians|final mission]] is completed on Legendary. | * The player will get a secret ending after the credits if the [[Guardians|final mission]] is completed on Legendary. | ||
* | * '''[[Osiris (level)|Osiris]]''': | ||
* The [[Flaming | ** The [[Flaming knives on Osiris]] easter egg becomes available. If successfully triggered, it will result in an oversized Promethean Knight and [[Warden Eternal]] spawning in the final room, as well as the player getting the ''[[Prophets' Bane]]''. | ||
* [[Genesis (level)|Genesis]] | * '''[[Blue Team (level)|Blue Team]]''': | ||
** Near the [[Gateway]], there is a dead [[Promethean Crawler]]. If the player [[Corpse humping|teabags]] this Crawler 117 times in the same spot, [[031 Exuberant Witness]] will be able to shoot gauss beams, extending her combat capabilities, which then makes her useful in the double | ** Jackal Snipers will spawn in the reactor room. In addition, Elites will be seen manning the [[Shea'p-pattern plasma cannon|Plasma Turrets]] instead of Grunts. | ||
** In the hangar bay, several [[Sangheili Warrior|Elite Warriors]] armed with [[Gespu-pattern fuel rod gun|Fuel Rod Cannons]] will spawn. | |||
* '''[[Glassed]]''': | |||
** The [[Halo 5: Guardians skulls#Iron|Iron]] skull becomes available to unlock in this mission by shooting down the pursuing [[Phaeton]] towards the end of the level. | |||
* '''[[Genesis (level)|Genesis]]''': | |||
** Near the [[Gateway]], there is a dead [[Promethean Crawler]]. If the player [[Corpse humping|teabags]] this Crawler 117 times in the same spot, [[031 Exuberant Witness]] will be able to shoot gauss beams, extending her combat capabilities, which then makes her useful in the double Warden Eternal boss fight at the end of the mission. | |||
=== Awards === | === Awards === | ||
| Line 211: | Line 226: | ||
* The [[Lone Wolf (achievement)|Lone Wolf]] achievement is awarded for completing the campaign on Legendary solo. | * The [[Lone Wolf (achievement)|Lone Wolf]] achievement is awarded for completing the campaign on Legendary solo. | ||
* The [[Tank Still Beats Everything]] achievement is awarded for surviving Genesis all the way to the first Warden Eternal fight with the [[M820 Scorpion|Scorpion]] still intact on Legendary. | * The [[Tank Still Beats Everything]] achievement is awarded for surviving Genesis all the way to the first Warden Eternal fight with the [[M820 Scorpion|Scorpion]] still intact on Legendary. | ||
* The [[Harbinger (achievement)|Harbinger]] achievement is awarded for completing [[The Breaking]] on Legendary | * The [[Harbinger (achievement)|Harbinger]] achievement is awarded for completing [[The Breaking]] on Legendary without all members of [[Blue Team]] dying. | ||
== ''Halo Wars 2'' == | == ''Halo Wars 2'' == | ||
[[File:Halo Wars 2 - Legendary symbol.png|150px|thumb | [[File:Halo Wars 2 - Legendary symbol.png|150px|thumb|The ''Halo Wars 2'' Legendary shield.]] | ||
=== General differences === | === General differences === | ||
{{Expand-section}} | {{Expand-section}} | ||
| Line 220: | Line 235: | ||
* Enemies often use Leader Powers to harass the player in the Campaign. | * Enemies often use Leader Powers to harass the player in the Campaign. | ||
* Enemies do more damage than Normal. | * Enemies do more damage than Normal. | ||
===Awards=== | ===Awards=== | ||
*In ''Halo Wars 2'': | *In ''Halo Wars 2'': | ||
| Line 233: | Line 249: | ||
**The [[The Ancient Enemy]] achievement is awarded for completing ''Awakening the Nightmare'' on Legendary. | **The [[The Ancient Enemy]] achievement is awarded for completing ''Awakening the Nightmare'' on Legendary. | ||
{{Clear}} | {{Clear}} | ||
==''Halo Infinite''== | |||
{{Expand-section}} | |||
{{Clear}} | |||
===Awards=== | |||
*The [[A True Test of Legends]] achievement is awarded for completing the campaign on Legendary. | |||
== Trivia == | == Trivia == | ||
| Line 240: | Line 262: | ||
* The second ''Halo 3'' map pack is named the [[Legendary Map Pack]]. (Aptly named, for the previous map pack was the [[Heroic Map Pack]] and the next one was [[Mythic Map Pack]]). | * The second ''Halo 3'' map pack is named the [[Legendary Map Pack]]. (Aptly named, for the previous map pack was the [[Heroic Map Pack]] and the next one was [[Mythic Map Pack]]). | ||
* In ''Halo: Combat Evolved'', if [[The Silent Cartographer]] is played on any difficulty higher than [[Easy]], the guitar version of [[Rock Anthem for Saving the World]] will play after the transmission with ''[[Echo 419]]'' after accessing the [[Silent Cartographer|Cartographer]]. | * In ''Halo: Combat Evolved'', if [[The Silent Cartographer]] is played on any difficulty higher than [[Easy]], the guitar version of [[Rock Anthem for Saving the World]] will play after the transmission with ''[[Echo 419]]'' after accessing the [[Silent Cartographer|Cartographer]]. | ||
* In ''Halo 2'', Legendary is the only difficulty in which the player can find the hidden skulls, except for the [[Halo 2 | * In ''Halo 2'', Legendary is the only difficulty in which the player can find the hidden skulls, except for the [[Halo 2 skulls#Blind|Blind Skull]] and the [[Halo 2 skulls#Assassins|Assassins Skull]]. However the Assassins Skull does not give the player the effect when not on Legendary. | ||
* The Legendary symbol is visible several times in ''Halo Wars'', on Sergeant Forge's and Red Team's armors. | * The Legendary symbol is visible several times in ''Halo Wars'', on Sergeant Forge's and Red Team's armors. | ||
| Line 248: | Line 270: | ||
File:H2V Achievement Hired Gun.png|Hired Gun achievement in ''Halo 2'' Vista. | File:H2V Achievement Hired Gun.png|Hired Gun achievement in ''Halo 2'' Vista. | ||
File:H3 Achievement Campaign Complete Legendary.png|Complete Complete: Legendary achievement in ''Halo 3''. | File:H3 Achievement Campaign Complete Legendary.png|Complete Complete: Legendary achievement in ''Halo 3''. | ||
File: | File:H3_LegendaryMapPack_Banner.jpg|Promo of the Legendary Map Pack for ''Halo 3''. | ||
File:H3ODST Achievement Campaign Complete Legendary.png|Campaign Complete: Legendary achievement in ''Halo 3: ODST''. | File:H3ODST Achievement Campaign Complete Legendary.png|Campaign Complete: Legendary achievement in ''Halo 3: ODST''. | ||
File:H3ODST Achievement Vidmaster Challenge Classic.png|Vidmaster Challenge: Classic achievement in ''Halo 3: ODST''. | File:H3ODST Achievement Vidmaster Challenge Classic.png|Vidmaster Challenge: Classic achievement in ''Halo 3: ODST''. | ||
| Line 267: | Line 289: | ||
==Notes== | ==Notes== | ||
{{Ref/Notes}} | |||
{{Halo Difficulty Levels}} | {{Halo Difficulty Levels}} | ||
[[Category:Difficulties]] | [[Category:Difficulties]] | ||
Revision as of 20:11, October 27, 2023

- "You face opponents who have never known defeat, who laugh in alien tongues at your efforts to survive. This is suicide."
- — Description from Halo: Combat Evolved, Halo 2, and Halo: Combat Evolved Anniversary
- "Tremble as teeming hordes of invincible alien monsters punish the slightest error with instant death... again and again."
- — Description from Halo 3, Halo 3: ODST, Halo: Reach, and Halo 4[Note 1]
- "Your enemies outnumber you greatly and are hunting you down. Can you survive their onslaught?"
- — Description from Halo: The Master Chief Collection
- "Death around every corner. Reload often."
- — Description from Halo 5: Guardians
- "Face insurmountable odds and an overwhelming enemy force. This is what legends are made of."
- — Description from Halo Wars 2
- "Run, little Demon. Recommended for fans of Jackal Snipers."
- — Description from Halo Infinite
Legendary is the highest and most difficult setting of Campaign gameplay in every Halo games to date, aside from the informal "Mythic" difficulty which is Legendary with all Skulls active in Halo games that feature them. The Legendary difficulty is also featured in Firefight, Skirmish, and Spartan Ops games.
Summary

In the original Halo trilogy, legendary difficulty is symbolized by an Elite skull with a bullet pierced on the cranium, two crossed combat knives and a shield bearing the Marathon symbol, though the symbol is not visible behind the skull. In Halo 3: ODST, the symbol is adjusted to a human skull with two crossed Suppressed SMGs in front of the same shield with the Marathon symbol, now slightly visible behind the skull. In Halo: Reach and Halo: Combat Evolved Anniversary, the original legendary symbol returns, but these games, along with future titles, lack the Marathon symbol on the shield. In Halo 4, the shield and the combat knives have been redesigned while the skull of a Promethean Knight replaces the previous skulls.
Legendary is regarded as a significant challenge, even for veteran players. Overwhelming enemy firepower, superior enemy numbers, and increased enemy intelligence make up most of the challenge, but several specific changes, varying throughout games, also add to the difficulty. Most allies are practically useless aside from creating distractions. The player must play cautiously and conservatively to succeed, but even with appropriate tactics and practice, the player will die very often and may require some luck to succeed. The increased difficulty does not come without rewards; many details, such as pieces of dialogue, cutscenes, and music, can only be heard or seen on Legendary; in particular, most Halo games feature an additional scene in the ending cutscenes, which is only shown on Legendary, often referred to as "Legendary Endings". Halo: Combat Evolved, Halo 3, Halo 3: ODST, Halo: Reach, Halo 4, and Halo 5: Guardians feature such endings. Several achievements, challenges, commendations, and career awards reward players for accomplishing various tasks on Legendary difficulty in addition to the achievements for simply completing every mission on Legendary.
Halo: Combat Evolved and Halo: Anniversary
In the first Halo game, the differences between Legendary and other settings is relatively numeric. The player does not face unique or different enemies yet they face many more enemies who are tougher to defeat and endure. Many of the same strategies that work on other settings work on Legendary in this game except that the player has to be extremely careful of his/her own weaknesses. This is where the Noob combo comes in handy, with use of the Plasma Pistol and M6D Magnum.
General differences
- Player shields are half their Normal resistance. A few hits from plasma will often drain them completely.
- Enemy shield resistance is strengthened.
- Extremely weak health. One melee from an enemy in front of the player will often prove fatal.
- Player shields and enemy shields recharge faster - twice as fast as when on Normal difficulty.
- Enemy health is doubled.
- Sangheili: Twice as many Sangheili appear as on the Normal difficulty. Sangheili Major are encountered at a ratio of about one of every three Elites encountered, improving enemy forces. An area that had two Sangheili Minor on Normal should have four to five Elites on Legendary with one or two of them being Majors. Their shields can take 28 rounds from an Assault Rifle before lowering.
- Unggoy: Twice as many Unggoy appear than on the Normal setting. Around half of the Grunts encountered are Unggoy Major.
- Enemy Grunts and Elites throw grenades frequently, much faster and almost always accurately. The grenade detonation timers are cut in half.
- Firing Rate : All enemies fire their weapons much faster and more accurately. In particular, Kig-Yar will fire long streams of 10-15 shots with high accuracy. Kig-Yar will also charge their plasma pistols much more often proving deadly in combat.
- Agility : All enemies move much faster and will rarely allow a player to stick them with grenades. Sangheili will often do their dodging maneuver immediately if hit, making it very difficult to make consistent hits on them to drain their shields.
- Stealth Sangheili: They are always encountered in packs of four to six with few exceptions.
- Flood: The Flood are now armed 90 percent of the time. Their deadly melee attacks will drain shields by half. Many more of them wield Shotguns and Rocket Launchers than before. Only a couple of Infection Forms can completely drain your shields, and an explosion from a Carrier Form can kill you instantly if your shields are completely or partially drained.
- Allies: Marines are virtually useless. They will constantly get stuck with grenades and most are easily killed by the enemy's increased rate of fire. Their returning fire only inflicts minimal damage on enemies. Their AI is increased significantly, still to little effect.
- Sangheili Zealots appear more frequently throughout the game. Incredibly, it takes 21 shots from an M6D Pistol to remove their shields alone.
Specific differences
- The Pillar of Autumn:
- The player does not go through the controls section at the beginning of the level, the game assuming that anyone choosing the highest difficulty level has gone through it before. Instead, they will wake up and leave the cryo section immediately. This also occurs on Heroic difficulty.
- Johnson's speech changes in the beginning of the level.
- The player has immediate access to the motion tracker and Frag grenades.
- The Truth and Reconciliation:
- Upon entering the loading bay, 4-6 Sangheili Zealots will ambush the player and the Marines in addition to the standard waves of Unggoy and Kig-Yar which pass through the hallways. There will also be a couple of Mgalekgolo.
- 343 Guilty Spark:
- The shotgun is no longer available early on in the game. The only way to pick it up is to kill a Flood combat form that was holding one or from one of the dead Marines from the third room with an energy bridge.
- The Maw:
- The player only has five minutes to get to the Longsword fighter after destroying the Pillar of Autumn's engine core as opposed to the usual six minutes.
- The player will get to see the non-canon secret ending.
Awards
In Halo: Combat Evolved Anniversary:
- The Living Legend achievement is awarded for completing the campaign on Legendary.
- The Bro Hammer achievement is awarded for completing any level cooperatively on Legendary.
- The Overshields are for Sissies achievement is awarded for completing the level The Pillar of Autumn on Legendary without picking up an overshield.
- The Walk it Off achievement is awarded for completing the level The Pillar of Autumn on Legendary without picking up any health packs.
- The Speed Reader achievement is awarded for completing the level The Library on Legendary in 30 minutes or less.
- The Leave It Where It Lay achievement is awarded for completing the level Two Betrayals on Legendary without picking up any other weapons.
- The Never Tell Me the Odds achievement is awarded for completing The Maw on Legendary with at least one minute remaining on the countdown.
Halo 2
In one of the Bungie Updates, Frank O'Connor describes Halo 2's Legendary as:
| “ | A whole new sick twist on game difficulty. Legendary includes bizarre stuff like perma-death for Co-Op players, meaning that you can't hopscotch like you can on other difficulty levels. Once a player dies on Legendary, both players are hurled back to the last checkpoint. It's brutal. Also, that place where you encountered two grunts and a flowerpot on Normal? Well now they're hunters, high-ranking, Sword carrying Elites and they're all PMS-ing. Seriously, sticking your head around a corner on level two can get it shot clean off. | ” |
General differences
- Both players have "linked lives". That is, when one of the players dies, both are sent back to the last checkpoint regardless of whether or not only one of them died (Possibly to prevent players from easily reaching the status of beating Legendary on their profile or to enhance it with the general knowledge of the above statement). This effect is similar to enabling the Iron Skull.
- Enemy fire or munitions have a faster velocity.
- Enemies will tend to use more powerful weapons earlier in the game or more often, such as Ultras and Zealots with Energy Swords, Unggoy with Fuel Rod Guns and Needlers, and finally Jiralhanae with Brute Shots.
- Flood Combat Forms will frequently wield Shotguns and Rocket Launchers. A shot from a Shotgun at mid-range can kill you instantly. There are more Infection Forms present, and they will instantly revive any Combat Form if their corpses are intact.
- Enemies will tend to stick together, and not follow the player too far from their spawn point, making it very difficult to ambush them.
- Enemies will throw grenades more often, and if the player is behind cover they may continuously throw grenades until the player moves or is killed.
- One burst from the Plasma Rifle is enough to kill the player (Four to penetrate shields and three to kill).
- Enemies fire at a much faster rate and fire extremely accurately.
- Enemy numbers are drastically increased.
- Shields are 50% their Normal resistance and a few hits will drain them completely.
- The Arbiter's active camouflage lasts only five seconds and takes ten seconds to recharge.
- Enemy shields and health are almost double their Normal resistance.
- Virtually all Sangheili encountered are Majors. Unggoy Majors are also far more common.
- Elite Ultras are now a very common sight. The player will encounter up to four in some parts of the game. They have the most powerful energy shields in the game and can survive four head shots from a Sniper Rifle or a Beam Rifle.
- When playing as the Master Chief, the player has to face large numbers of Sangheili Zealots. They always wield Swords and can slaughter large groups of Marines with ease.
- Enemies are extremely adaptive and intelligent in tactical action. They rarely fall victim to being outsmarted.
- Unggoy retreat less often when a leader is killed.
- Marine allies are much stronger. They have more health and their AI is increased significantly. They are still highly vulnerable though.
- Marines can withstand one shot from a sniper jackal without dying.
- Melee attacks received from Elites and Flood combat forms are practically always one hit fatalities, however moving to the side will reduce the damage concurred from such attacks.
- Melee attacks from Heretic Elites are glitched, so the player will not take any damage from them. This can be used as a saving grace in otherwise bad situations. This does not apply when a Heretic Elite is holding an Energy Sword.
- Enemies normally have upgraded weapons. For example, Jiralhanae that usually had Kewu R'shi'k-pattern plasma rifles would now carry Vostu-pattern carbine or have the deadly Brute Shot equipped.
- Enemies will often notice the player sooner and prove to be more alert.
- Kig-Yar Snipers will appear more often than on any other difficulty. They can kill the player with only one shot regardless of where it hits. Players should think twice before sticking themselves out into the open.
- Stealth Elites appear more often and travel in groups of two to four, usually with one or two dual-wielding Plasma Rifles and the others using Energy Swords.
- Almost all Elite Combat Forms have shields.
- One shot from a Brute Shot will have the same power as a shot of the rocket launcher on Easy difficulty.
Awards
- The Legend achievement is awarded for completing the campaign on Legendary.
- The Hired Gun achievement is awarded for killing an opponent who has the Legend achievement in multiplayer.
In Halo: The Master Chief Collection:
- The Legendary Anniversary achievement is awarded for completing the campaign on Legendary.
- The Monopolized achievement is awarded for completing the campaign on Legendary in under 3 hours.
- The He's Running a Marathon... achievement is awarded for watching the Gravemind cutscene on Legendary in classic graphics.
Halo 3 and Halo 3: ODST

General differences
- Shields are 50% their Normal power and a few hits even from a Plasma Pistol will drain them completely.
- Enemies are much more resistant to damage. (E.g. The player needs three body shots or two headshots for a fully shielded Jiralhanae Captain to take it down instead of one headshot or two body shots with a sniper or beam rifle).
- Headshots are the only means to get a quick kill on enemies like Jackals and Grunts, aside from assassinations.
- Nearly all enemy forces are promoted by one rank. This can be changed with the effects of the Thunderstorm Skull, which promotes enemies even higher. In addition to this promotion, Brutes will not carry deployable covers.
- Enemy numbers double or sometimes triple in the case of Flood encounters.
- Enemy AI improves dramatically, enemy vehicles will be significantly harder to hijack and enemies will be nearly impossible to stick with grenades.
- Kig-Yar Snipers, one of the rarer enemies in Halo 3, will appear with greater frequency, though not nearly as much as in Halo 2.
- Enemies fire much faster and more accurately, and toss grenades more often and with greater accuracy.
- Turrets, such as Shades, are frequently encountered, even in places in which they did not appear in lower difficulties. Gunners will also fire more aggressively.
- Jirlahane will wield Brute Shots more often. They will fire them faster and more accurately. They will also frequently go berserk.
- The "linked lives" system from Halo 2 is removed but can be achieved with the Iron Skull activated.
- Almost all Sentinels have shields, including allied ones.
- In single-player mode, the Arbiter is next to useless and will frequently be knocked out for prolonged periods. He will also take cover a lot more and so reduce his outgoing fire. However, he becomes a powerful ally if wielding an Energy Sword when fighting the Flood, especially in the level Floodgate.
Specific differences
- Halo 3:
- In the level Arrival, there are five different random dialog lines for Johnson which are exclusive to Legendary difficulty.
- The Terminals have a different narrative on Legendary, changing from the story of the Didact and the Librarian, to the story of Mendicant Bias.
- The ending cutscene of the level Halo, following the game's credits, has a Legendary-only scene foreshadowing Halo 4.
- Halo 3: ODST:
- In the level Prepare To Drop, a photo of the Rookie's girlfriend can be seen in his drop pod.
- In the ending cutscene of the level NMPD HQ, blood sprays out of Romeo's chest.
- The ending cutscene of the game, at the end of the level Coastal Highway and after the credits, has a Legendary-only scene.
Awards
- In Halo 3:
- The Campaign Complete: Legendary achievement is awarded for completing the campaign on Legendary.
- The Vidmaster Challenge: Annual achievement is awarded for completing the level Halo on 4-player Legendary LIVE Co-Op, with Iron Skull and everyone in Ghosts.
- The EOD armor is awarded in multiplayer for completing the campaign on Legendary.
- In Halo 3: ODST:
- The Campaign Complete: Legendary achievement is awarded for completing the campaign on Legendary.
- The Vidmaster Challenge: Classic achievement is awarded for completing any level solo on Legendary, on LIVE, with no shots fired or grenades thrown.
- The Vidmaster Challenge: Deja Vu achievement is awarded for completing the level Coastal Highway on 4-player Legendary LIVE co-op, with Iron Skull, and no Warthog or Scorpion.
- Veronica Dare is awarded as a playable Firefight character for completing the campaign on Legendary.
Halo Wars
General differences
- Enemies' health varies from being 25% to 50% stronger than on Normal, depending on the mission.
- Enemy units deal much more damage, up to 50% more than on Normal.
- Enemies are always upgraded with at least one or two upgrades and attack the player's base earlier and with more units.
- When facing Flood units, player infantry units get infected at a faster rate.
- Extra enemy units which normally don't appear on lower difficulties are present: Shades, stationary Jackals and sometimes even Emp'seam-pattern Antlions. In Flood missions, there are more Flood launchers, spores and blisters than usual.
Specific differences
- Beating the game on Legendary unlocks additional dialogue at the end of the last cutscene, played after the level Escape and the credits.
Awards
- The Detour The Great Journey achievement is awarded for completing the campaign on Legendary.
- The One and Done achievement is awarded for scoring the winning point in a game of Keepaway against Legendary A.I.s.
Halo: Reach
General differences
- In Halo Reach, enemy AI and numbers will be scaled according to the number of players (i.e. the more players there are, the more enemies there are and the more intelligent each enemy AI is).
- Plasma projectiles travel faster than on other difficulties.
- Shade turrets fire and turn several times faster than physically possible by the player.
- Sangheili General appear more often, usually wielding Covenant heavy weapons.
- Sangheili Minors seldom appear; less than five are encountered in the entire campaign, with the exception of Banshee pilots.
- Similar to Elite Minors, very few Kig-Yar Minors appear through the whole campaign.
Specific differences
- Data pads 10 to 19 are only found on Legendary difficulty.
- When playing the level The Pillar of Autumn on Legendary, Captain Keyes refers to Catherine Halsey by her first name, while he uses her last name on lower difficulties.
Awards
- The Gods Must Be Strong achievement is awarded for completing the campaign on Legendary.
- The A Monument to All Your Sins achievement is awarded for completing the campaign on Legendary solo.
- The Game, Set, Match achievement is awarded for completing a Firefight set on Legendary without dying.
- Carter's helmet is awarded for the player's Avatar for completing a level on Legendary without dying.
Halo 4

General differences
 This section needs expansion. You can help Halopedia by expanding it.
- The player will get an extended cutscene in Epilogue if the entire campaign is cleared on Legendary.
- Enemies deal more damage and are more resistant to damage, with Elites taking at least seven direct headshots from a DMR to lose their shields.
- More Promethean Knights are featured, especially higher-ranking ones.
- Crawler Snipes are more dangerous as their built-in Z-750 binary rifles almost always kill the player in one hit, regardless of where it hits.
- Promethean Knights' and Promethean Watchers' shields recharge much faster.
- Knights also throw Pulse Grenades even more often.
Specific differences
- Forerunner:
- Playing on Legendary allows access to two Easter eggs allowing the player to spawn nine Incineration Cannons and two Forerunner heavy weapons caches for use in the mission, respectively.
- Shutdown:
- A new Legendary-exclusive easter egg allows the player to spawn four Gravity Hammers for use in the mission.
- Midnight:
- A Legendary-only easter egg allows the player to spawn a second Gravity Hammer for use in the mission.
Awards
- The Legend of 117 achievement is awarded for completing the campaign on Legendary.
- The Lone Wolf Legend achievement is awarded for completing the campaign on Legendary solo.
- The A Legendary Episode achievement is awarded for completing all chapters in Spartan Ops Episode 1 on Legendary.
- The Crimson Alone achievement is awarded for completing a Spartan Ops chapter on Legendary solo.
- The Mark VI armor and the Legendary visor color are awarded in Infinity multiplayer for completing the campaign on Legendary.
Halo 5: Guardians

While playing on co-op, it is highly recommended to pick characters with precision weapons (e.g. DMR) as their starting primary weapon as part of their starting loadout, like Frederic-104 or Holly Tanaka, as precision weapons are more useful than fully automatic weapons in most cases.
General differences
- This section needs expansion. You can help Halopedia by expanding it.
- Enemies deal more damage and are more resistant to damage. Two shots from an enemy wielding a Z-250 lightrifle will down a player.
- Promethean Crawlers' tracking shots from their built-in weapons exhibit virtually pinpoint accuracy.
- Armiger Soldiers use slipspace translocation even more often to confuse or avoid players and throw Splinter Grenades more often.
- Knight Commanders wielding Incineration Cannons fire charged shots even more often.
Specific differences
- The player will get a secret ending after the credits if the final mission is completed on Legendary.
- Osiris:
- The Flaming knives on Osiris easter egg becomes available. If successfully triggered, it will result in an oversized Promethean Knight and Warden Eternal spawning in the final room, as well as the player getting the Prophets' Bane.
- Blue Team:
- Jackal Snipers will spawn in the reactor room. In addition, Elites will be seen manning the Plasma Turrets instead of Grunts.
- In the hangar bay, several Elite Warriors armed with Fuel Rod Cannons will spawn.
- Glassed:
- Genesis:
- Near the Gateway, there is a dead Promethean Crawler. If the player teabags this Crawler 117 times in the same spot, 031 Exuberant Witness will be able to shoot gauss beams, extending her combat capabilities, which then makes her useful in the double Warden Eternal boss fight at the end of the mission.
Awards
- The Forging a Legend achievement is awarded for completing the campaign on Legendary.
- The Lone Wolf achievement is awarded for completing the campaign on Legendary solo.
- The Tank Still Beats Everything achievement is awarded for surviving Genesis all the way to the first Warden Eternal fight with the Scorpion still intact on Legendary.
- The Harbinger achievement is awarded for completing The Breaking on Legendary without all members of Blue Team dying.
Halo Wars 2

General differences
- This section needs expansion. You can help Halopedia by expanding it.
- Enemies are always upgraded at least one or two levels.
- Enemies often use Leader Powers to harass the player in the Campaign.
- Enemies do more damage than Normal.
Awards
- In Halo Wars 2:
- The Surviving the long war achievement is awarded for completing the campaign on Legendary.
- The Comrades in arms achievement is awarded for earning a gold medal on any mission (Except for the Prologue) on co-op on Legendary.
- The You've got a case of the Birley achievement is awarded for winning a 1v1 Skirmish match against Legendary AI, after recycling your base in the first five minutes.
- In Operation: SPEARBREAKER:
- The Vidmaster Challenge: 100 drops achievement is awarded for gaining a gold medal and completing all objectives in Gatecrashers on Legendary.
- The Vidmaster Challenge: No fly zone achievement is awarded for gaining a gold medal and completing all objectives in Not on My Watch on Legendary.
- The We go feet first! achievement is awarded for completing Operation: SPEARBREAKER on Legendary difficulty.
- In Awakening the Nightmare:
- The Banished Prowess achievement is awarded for completing any level of the Awakening the Nightmare campaign on par time, on Legendary, with a scoring skull active.
- The The Ancient Enemy achievement is awarded for completing Awakening the Nightmare on Legendary.
Halo Infinite
- This section needs expansion. You can help Halopedia by expanding it.
Awards
- The A True Test of Legends achievement is awarded for completing the campaign on Legendary.
Trivia
- The Marathon symbol was present on every difficulty shield icon, but has disappeared in Halo: Reach and following games.
- Halo 3 and all subsequent FPS Halo games keep track of whether the player has finished Legendary on Solo or Co-op.
- Legendary was the title for the most expensive editions of Halo 3 and Halo: Reach.
- The second Halo 3 map pack is named the Legendary Map Pack. (Aptly named, for the previous map pack was the Heroic Map Pack and the next one was Mythic Map Pack).
- In Halo: Combat Evolved, if The Silent Cartographer is played on any difficulty higher than Easy, the guitar version of Rock Anthem for Saving the World will play after the transmission with Echo 419 after accessing the Cartographer.
- In Halo 2, Legendary is the only difficulty in which the player can find the hidden skulls, except for the Blind Skull and the Assassins Skull. However the Assassins Skull does not give the player the effect when not on Legendary.
- The Legendary symbol is visible several times in Halo Wars, on Sergeant Forge's and Red Team's armors.
Gallery

Legend achievement in Halo 2 Vista.

Hired Gun achievement in Halo 2 Vista.

Complete Complete: Legendary achievement in Halo 3.

Promo of the Legendary Map Pack for Halo 3.

Campaign Complete: Legendary achievement in Halo 3: ODST.

Vidmaster Challenge: Classic achievement in Halo 3: ODST.

Gods Must Be Strong achievement in Halo: Reach.

A Monument to All Your Sins achievement in Halo: Reach.

Game, Set, Match achievement in Halo: Reach.

Living Legend achievement in Halo: Combat Evolved Anniversary.

Brohammer achievement in Halo: Combat Evolved Anniversary.

He's Unstoppable! achievement in Halo: Combat Evolved Anniversary.

Overshields are for Sissies achievement in Halo: Combat Evolved Anniversary.

Walk it Off achievement in Halo: Combat Evolved Anniversary.

Tying Up Loose Ends achievement in Halo: Combat Evolved Anniversary.

Tsantsa achievement in Halo: Combat Evolved Anniversary.
The reveal of the Legendary shield in Halo 4.

The Legend of 117 achievement in Halo 4.

Career Milestone 100 on Halo Waypoint.


Notes
- ^ The Halo 4 description is the same wording, however it ends with an exclamation point rather than a period.


