Control schemes: Difference between revisions
From Halopedia, the Halo wiki
No edit summary |
m (Tabbox-ed) |
||
| Line 26: | Line 26: | ||
'''Right Stick''' - Move Forward/Backward | Rotate Left/Right<br /> | '''Right Stick''' - Move Forward/Backward | Rotate Left/Right<br /> | ||
==Halo: Combat Evolved | == ''Halo: Combat Evolved'' == | ||
<div class="tabcontainer"> | |||
<div class="tabbox"> | |||
<div class="tab">Xbox</div> | |||
[[File:Xbox controller diagram.jpg|right|thumb|300px|Xbox Controller]] | [[File:Xbox controller diagram.jpg|right|thumb|300px|Xbox Controller]] | ||
'''A''' - Jump<br /> | '''A''' - Jump<br /> | ||
| Line 44: | Line 47: | ||
'''Black Button''' - Switch [[grenade]]s<br /> | '''Black Button''' - Switch [[grenade]]s<br /> | ||
'''White Button''' - Flashlight/Teamspeak<br /> | '''White Button''' - Flashlight/Teamspeak<br /> | ||
</div> | |||
== | <div class="tabbox"> | ||
<div class="tab">Xbox 360</div> | |||
[[File:Xbox360 controler face.jpg|right|thumb|300px|Xbox 360 controller]] | |||
'''A''' - Jump<br /> | '''A''' - Jump<br /> | ||
'''B''' - Melee attack<br /> | '''B''' - Melee attack<br /> | ||
'''X''' - Reload | '''X''' - Reload weapon/Action<br /> | ||
'''Y''' - Switch | '''Y''' - Switch weapons<br /> | ||
'''Left Analog''' - Movement<br /> | '''Left Analog''' - Movement<br /> | ||
'''Left Analog Click''' - Crouch<br /> | '''Left Analog Click''' - Crouch<br /> | ||
| Line 55: | Line 60: | ||
'''Right Analog Click''' - Zoom<br /> | '''Right Analog Click''' - Zoom<br /> | ||
'''Right Trigger''' - Fire weapon<br /> | '''Right Trigger''' - Fire weapon<br /> | ||
'''Left Trigger''' - Throw grenade | '''Left Trigger''' - Throw grenade<br /> | ||
'''"Back" Button''' - Go back/Multiplayer score<br /> | '''"Back" Button''' - Go back/Multiplayer score<br /> | ||
'''"Start" Button''' - Pause<br /> | '''"Start" Button''' - Pause<br /> | ||
'''Directional Pad''' - Menu Movement<br /> | '''Directional Pad''' - Menu Movement<br /> | ||
'''Directional Pad Up''' - Teamspeak<br /> | '''Directional Pad Up''' - Teamspeak<br /> | ||
''' | '''Right Bumper''' - Switch grenades<br /> | ||
''' | '''Left Bumper''' - Flashlight/Teamspeak<br /> | ||
</div></div> | |||
==Halo | == ''Halo 2'' == | ||
<div class="tabcontainer"> | |||
<div class="tabbox"> | |||
<div class="tab">Xbox</div> | |||
'''A''' - Jump<br /> | '''A''' - Jump<br /> | ||
'''B''' - Melee attack<br /> | '''B''' - Melee attack<br /> | ||
'''X''' - Reload weapon/Action<br /> | '''X''' - Reload weapon/Swap weapon/Action<br /> | ||
'''Y''' - Switch weapons<br /> | '''Y''' - Switch weapons/Duel wield weapons<br /> | ||
'''Left Analog''' - Movement<br /> | '''Left Analog''' - Movement<br /> | ||
'''Left Analog Click''' - Crouch<br /> | '''Left Analog Click''' - Crouch<br /> | ||
| Line 75: | Line 82: | ||
'''Right Analog Click''' - Zoom<br /> | '''Right Analog Click''' - Zoom<br /> | ||
'''Right Trigger''' - Fire weapon<br /> | '''Right Trigger''' - Fire weapon<br /> | ||
'''Left Trigger''' - Throw grenade<br /> | '''Left Trigger''' - Throw grenade/Fire secondary weapon/E-brake/Boost<br /> | ||
'''"Back" Button''' - Go back/Multiplayer score<br /> | '''"Back" Button''' - Go back/Multiplayer score<br /> | ||
'''"Start" Button''' - Pause<br /> | '''"Start" Button''' - Pause<br /> | ||
'''Directional Pad''' - Menu Movement<br /> | '''Directional Pad''' - Menu Movement<br /> | ||
'''Directional Pad Up''' - Teamspeak<br /> | '''Directional Pad Up''' - Teamspeak<br /> | ||
''' | '''Directional Pad Down''' - Lower weapon<br /> | ||
''' | '''Black Button''' - Switch grenades<br /> | ||
'''White Button''' - Flashlight/Invisibility/Teamspeak<br /> | |||
== | </div> | ||
<div class="tabbox"> | |||
<div class="tab">Xbox 360</div> | |||
'''A''' - Jump<br /> | '''A''' - Jump<br /> | ||
'''B''' - Melee attack<br /> | '''B''' - Melee attack<br /> | ||
| Line 101: | Line 110: | ||
'''Right Bumper''' - Switch grenades<br /> | '''Right Bumper''' - Switch grenades<br /> | ||
'''Left Bumper''' - Flashlight/Teamspeak<br /> | '''Left Bumper''' - Flashlight/Teamspeak<br /> | ||
</div></div> | |||
==Halo 3 | == ''Halo 3'' == | ||
<div class="tabcontainer"> | |||
<div class="tabbox"> | |||
<div class="tab">Default</div> | |||
'''A''' - Jump<br /> | '''A''' - Jump<br /> | ||
'''B''' - Melee Attack<br /> | '''B''' - Melee Attack<br /> | ||
| Line 134: | Line 129: | ||
'''Right Bumper''' - Action/Reload Right Weapon<br /> | '''Right Bumper''' - Action/Reload Right Weapon<br /> | ||
'''Left Bumper''' - Reload/Swap Left Weapon<br /> | '''Left Bumper''' - Reload/Swap Left Weapon<br /> | ||
<div class="Box 2" style="border:1px solid #000066; padding:4px 6px; color:#000; background-color: #f0f0ff"> | |||
This is the most common control scheme despite many flaws (see below) that often become apparent to more experienced players. This is the control scheme that Bungie starts you with, but it is suggested that one quickly learns to either use the claw grip, bumper jumper, walkie talkie, or possibly even green thumb, all of which are more often used by experienced players. | This is the most common control scheme despite many flaws (see below) that often become apparent to more experienced players. This is the control scheme that Bungie starts you with, but it is suggested that one quickly learns to either use the claw grip, bumper jumper, walkie talkie, or possibly even green thumb, all of which are more often used by experienced players. | ||
Please note that it is not possible to aim while meleeing, jumping, and deploying equipment without use of the "claw grip." | Please note that it is not possible to aim while meleeing, jumping, and deploying equipment without use of the "claw grip." | ||
</div></div> | |||
== | <div class="tabbox"> | ||
<div class="tab">Southpaw</div> | |||
{{Article Quote|For lefties.}} | |||
'''A''' - Jump<br /> | '''A''' - Jump<br /> | ||
'''B''' - Melee Attack<br /> | '''B''' - Melee Attack<br /> | ||
| Line 155: | Line 149: | ||
'''Right Bumper''' - Action/Reload Right Weapon<br /> | '''Right Bumper''' - Action/Reload Right Weapon<br /> | ||
'''Left Bumper''' - Reload/Swap Left Weapon<br /> | '''Left Bumper''' - Reload/Swap Left Weapon<br /> | ||
<div class="Box 2" style="border:1px solid #000066; padding:4px 6px; color:#000; background-color: #f0f0ff"> | |||
This is the same as default except that the triggers are switched. | This is the same as default except that the triggers are switched. | ||
Please note that if you compare new players using all button layouts this is the most accurate. Because unlike all of the other layouts offered in the game this is the only one that you are not required to use the same hand to shoot and aim with. Therefore having more reaction time and accuracy. | Please note that if you compare new players using all button layouts this is the most accurate. Because unlike all of the other layouts offered in the game this is the only one that you are not required to use the same hand to shoot and aim with. Therefore having more reaction time and accuracy. | ||
</div></div> | |||
== | <div class="tabbox"> | ||
<div class="tab">Boxer</div> | |||
{{Article Quote|Pulling the left trigger will melee.}} | |||
'''A''' - Jump<br /> | '''A''' - Jump<br /> | ||
| Line 176: | Line 170: | ||
'''Right Bumper''' - Action/Reload Right Weapon<br /> | '''Right Bumper''' - Action/Reload Right Weapon<br /> | ||
'''Left Bumper''' - Reload/Swap Left Weapon<br /> | '''Left Bumper''' - Reload/Swap Left Weapon<br /> | ||
<div class="Box 2" style="border:1px solid #000066; padding:4px 6px; color:#000; background-color: #f0f0ff"> | |||
This has the advantage of giving the user aim while meleeing, but has the disadvantage of not allowing you to aim while throwing grenades. | This has the advantage of giving the user aim while meleeing, but has the disadvantage of not allowing you to aim while throwing grenades. | ||
Please note that it is not possible to aim while throwing grenades, jumping, and deploying equipment without use of the "claw grip." | Please note that it is not possible to aim while throwing grenades, jumping, and deploying equipment without use of the "claw grip." | ||
</div></div> | |||
<div class="tabbox"> | |||
= | <div class="tab">Green Thumb</div> | ||
{{Article Quote|Pressing the right stick will melee.}} | |||
'''A''' - Jump<br /> | '''A''' - Jump<br /> | ||
| Line 198: | Line 191: | ||
'''Right Bumper''' - Action/Reload Right Weapon<br /> | '''Right Bumper''' - Action/Reload Right Weapon<br /> | ||
'''Left Bumper''' - Reload/Swap Left Weapon<br /> | '''Left Bumper''' - Reload/Swap Left Weapon<br /> | ||
<div class="Box 2" style="border:1px solid #000066; padding:4px 6px; color:#000; background-color: #f0f0ff"> | |||
This has the advantage of giving you some control over your aim while meleeing without compromising the aim of your grenades. However it is considered hard to learn and can be somewhat unreliable if not mastered. | This has the advantage of giving you some control over your aim while meleeing without compromising the aim of your grenades. However it is considered hard to learn and can be somewhat unreliable if not mastered. | ||
| Line 206: | Line 198: | ||
Also this is very similar to the default [[w:c:cod|Call of Duty]] controls. | Also this is very similar to the default [[w:c:cod|Call of Duty]] controls. | ||
</div></div> | |||
== | <div class="tabbox"> | ||
<div class="tab">Bumper Jumper</div> | |||
{{Article Quote|Jump and Melee are on the bumpers.}} | |||
'''A''' - Reload/Swap Left Weapon/change grenade type<br /> | '''A''' - Reload/Swap Left Weapon/change grenade type<br /> | ||
| Line 221: | Line 214: | ||
'''Right Bumper''' - Melee Attack<br /> | '''Right Bumper''' - Melee Attack<br /> | ||
'''Left Bumper''' - Jump<br /> | '''Left Bumper''' - Jump<br /> | ||
<div class="Box 2" style="border:1px solid #000066; padding:4px 6px; color:#000; background-color: #f0f0ff"> | |||
This has been called by many to be the best possible controller configuration as you can aim while meleeing, jumping, zooming, and throwing grenades without having to use the uncomfortable claw grip usually only taking a few days to learn. | This has been called by many to be the best possible controller configuration as you can aim while meleeing, jumping, zooming, and throwing grenades without having to use the uncomfortable claw grip usually only taking a few days to learn. | ||
Please note that it is not possible to aim while deploying equipment without use of the "claw grip," although this is not much of a deterrent for most. | Please note that it is not possible to aim while deploying equipment without use of the "claw grip," although this is not much of a deterrent for most. | ||
Bungie originally considered this as the default control scheme of ''Halo 3'', but thought it would be too radically different to players used to ''Halo: Combat Evolved'' and ''Halo 2'' and so altered it into the actual default configuration. However, with its relative popularity among Bungie workers, it was kept as an alternate configuration. | Bungie originally considered this as the default control scheme of ''Halo 3'', but thought it would be too radically different to players used to ''Halo: Combat Evolved'' and ''Halo 2'' and so altered it into the actual default configuration.{{fact}} However, with its relative popularity among Bungie workers, it was kept as an alternate configuration. | ||
Using the [[Type-26 Ground Support Aircraft|Banshee]] becomes much easier with this control scheme, seeing as how you can use your cannon and aim, as well as perform tricks and determine your trajectory at the same time. | Using the [[Type-26 Ground Support Aircraft|Banshee]] becomes much easier with this control scheme, seeing as how you can use your cannon and aim, as well as perform tricks and determine your trajectory at the same time. | ||
</div></div> | |||
== | <div class="tabbox"> | ||
<div class="tab">Walkie Talkie</div> | |||
{{Article Quote|Multiplayer team broadcasting is on the Left Bumper.}} | |||
'''A''' - Jump<br /> | '''A''' - Jump<br /> | ||
| Line 246: | Line 239: | ||
'''Right Bumper''' - Melee Attack<br /> | '''Right Bumper''' - Melee Attack<br /> | ||
'''Left Bumper''' - Team Chat<br /> | '''Left Bumper''' - Team Chat<br /> | ||
<div class="Box 2" style="border:1px solid #000066; padding:4px 6px; color:#000; background-color: #f0f0ff"> | |||
This has very similar advantages to Bumper Jumper except you can aim while deploying equipment but not while jumping, and it is much more convenient to communicate with your team as you can continue walking and aiming while you switch into your team chat. | This has very similar advantages to Bumper Jumper except you can aim while deploying equipment but not while jumping, and it is much more convenient to communicate with your team as you can continue walking and aiming while you switch into your team chat. | ||
Please note that it is not possible to aim while jumping without use of the "claw grip." | Please note that it is not possible to aim while jumping without use of the "claw grip." | ||
</div></div> | |||
<div class="tabbox"> | |||
= | <div class="tab">Theater (mode)</div> | ||
'''A''' - Play/Pause<br /> | '''A''' - Play/Pause<br /> | ||
'''B''' - Hide/Show HUD<br /> | '''B''' - Hide/Show HUD<br /> | ||
| Line 267: | Line 259: | ||
'''Right Bumper''' - Move Up<br /> | '''Right Bumper''' - Move Up<br /> | ||
'''Left Bumper''' - Move Down | '''Left Bumper''' - Move Down | ||
</div> | |||
== | <div class="tabbox"> | ||
<div class="tab">Forge (mode)</div> | |||
'''A''' - Pick up/ Drop Item<br /> | '''A''' - Pick up/ Drop Item<br /> | ||
'''B''' - Hold to Drop Item<br /> | '''B''' - Hold to Drop Item<br /> | ||
| Line 280: | Line 273: | ||
'''Right Bumper''' - Move Up<br /> | '''Right Bumper''' - Move Up<br /> | ||
'''Left Bumper''' - Move Down | '''Left Bumper''' - Move Down | ||
</div></div> | |||
== ''Halo 3: ODST'' == | |||
The controls in ''Halo 3: ODST'' are largely the same as in ''Halo 3'', except the "Back" button accesses the [[VISR]] Database, the '''X''' button activates VISR Mode, and D-pad "up" views waypoints. | |||
==Halo Wars== | == ''Halo Wars'' == | ||
'''A''' - Press to select/Hold to select with "paintbrush" tool <br /> | '''A''' - Press to select/Hold to select with "paintbrush" tool <br /> | ||
'''B''' - Cancel selection<br /> | '''B''' - Cancel selection<br /> | ||
| Line 299: | Line 296: | ||
'''Left Bumper''' - Select global units<br /> | '''Left Bumper''' - Select global units<br /> | ||
== | == ''Halo: Reach'' == | ||
<div class="tabcontainer"> | |||
<div class="tabbox"> | |||
= | <div class="tab">Default</div> | ||
'''A''' - Jump<br /> | '''A''' - Jump<br /> | ||
'''B''' - Switch Grenades<br /> | '''B''' - Switch Grenades<br /> | ||
| Line 321: | Line 315: | ||
'''''↓'' D-Pad''' - Open Mic/Regoup<br /> | '''''↓'' D-Pad''' - Open Mic/Regoup<br /> | ||
'''''←'' D-Pad''' - Night Vision<br /> | '''''←'' D-Pad''' - Night Vision<br /> | ||
</div> | |||
== | <div class="tabbox"> | ||
<div class="tab">Southpaw</div> | |||
'''A''' - Jump<br /> | '''A''' - Jump<br /> | ||
'''B''' - Switch Grenades<br /> | '''B''' - Switch Grenades<br /> | ||
| Line 338: | Line 333: | ||
'''''↓'' D-Pad''' - Open Mic/Regoup<br /> | '''''↓'' D-Pad''' - Open Mic/Regoup<br /> | ||
'''''←'' D-Pad''' - Night Vision<br /> | '''''←'' D-Pad''' - Night Vision<br /> | ||
</div> | |||
== | <div class="tabbox"> | ||
<div class="tab">Boxer</div> | |||
'''A''' - Jump<br /> | '''A''' - Jump<br /> | ||
'''B''' - Switch Grenades<br /> | '''B''' - Switch Grenades<br /> | ||
| Line 355: | Line 351: | ||
'''''↓'' D-Pad''' - Open Mic/Regoup<br /> | '''''↓'' D-Pad''' - Open Mic/Regoup<br /> | ||
'''''←'' D-Pad''' - Night Vision<br /> | '''''←'' D-Pad''' - Night Vision<br /> | ||
</div> | |||
<div class="tabbox"> | |||
= | <div class="tab">Green Thumb</div> | ||
'''A''' - Jump<br /> | '''A''' - Jump<br /> | ||
'''B''' - Switch Grenades<br /> | '''B''' - Switch Grenades<br /> | ||
| Line 373: | Line 369: | ||
'''''↓'' D-Pad''' - Open Mic/Regoup<br /> | '''''↓'' D-Pad''' - Open Mic/Regoup<br /> | ||
'''''←'' D-Pad''' - Night Vision<br /> | '''''←'' D-Pad''' - Night Vision<br /> | ||
</div> | |||
== | <div class="tabbox"> | ||
<div class="tab">Bumper Jumper</div> | |||
'''A''' - Switch Grenades<br /> | '''A''' - Switch Grenades<br /> | ||
'''B''' - Action/Reload<br /> | '''B''' - Action/Reload<br /> | ||
| Line 390: | Line 387: | ||
'''''↓'' D-Pad''' - Open Mic/Regoup<br /> | '''''↓'' D-Pad''' - Open Mic/Regoup<br /> | ||
'''''←'' D-Pad''' - Night Vision<br /> | '''''←'' D-Pad''' - Night Vision<br /> | ||
</div> | |||
== | <div class="tabbox"> | ||
<div class="tab">Recon</div> | |||
'''A''' - Jump<br /> | '''A''' - Jump<br /> | ||
'''B''' - Melee Attack<br /> | '''B''' - Melee Attack<br /> | ||
| Line 407: | Line 405: | ||
'''''↓'' D-Pad''' - Open Mic/Regoup<br /> | '''''↓'' D-Pad''' - Open Mic/Regoup<br /> | ||
'''''←'' D-Pad''' - Night Vision<br /> | '''''←'' D-Pad''' - Night Vision<br /> | ||
</div> | |||
<div class="tabbox"> | |||
= | <div class="tab">Theater (mode)</div> | ||
'''A''' - Play/Pause<br /> | '''A''' - Play/Pause<br /> | ||
'''B''' - Toggle HUD<br /> | '''B''' - Toggle HUD<br /> | ||
| Line 425: | Line 423: | ||
'''''→'' D-Pad''' - Skip Forward<br /> | '''''→'' D-Pad''' - Skip Forward<br /> | ||
'''''←'' D-Pad''' - Skip Back<br /> | '''''←'' D-Pad''' - Skip Back<br /> | ||
</div> | |||
== | <div class="tabbox"> | ||
<div class="tab">Forge (mode)</div> | |||
'''A''' - Drop/Pick Up<br /> | '''A''' - Drop/Pick Up<br /> | ||
'''B''' - Tools<br /> | '''B''' - Tools<br /> | ||
| Line 440: | Line 439: | ||
'''Left Bumper''' - Fly Down<br /> | '''Left Bumper''' - Fly Down<br /> | ||
'''''↑'' D-Pad''' - Play/Edit<br /> | '''''↑'' D-Pad''' - Play/Edit<br /> | ||
</div></div> | |||
==Halo: Combat Evolved Anniversary | == ''Halo: Combat Evolved Anniversary'' == | ||
<div class="tabcontainer"> | |||
<div class="tabbox"> | |||
= | <div class="tab">Default</div> | ||
'''A''' - Jump<br/> | '''A''' - Jump<br/> | ||
'''B''' - Switch Grenades<br/> | '''B''' - Switch Grenades<br/> | ||
| Line 458: | Line 457: | ||
'''Left Bumper''' - Flashlight<br/> | '''Left Bumper''' - Flashlight<br/> | ||
'''Back''' - Toggle Visuals<br/> | '''Back''' - Toggle Visuals<br/> | ||
</div> | |||
== | <div class="tabbox"> | ||
<div class="tab">Southpaw</div> | |||
'''A''' - Jump<br/> | '''A''' - Jump<br/> | ||
'''B''' - Melee<br/> | '''B''' - Melee<br/> | ||
| Line 473: | Line 473: | ||
'''Left Bumper''' - Flashlight<br/> | '''Left Bumper''' - Flashlight<br/> | ||
'''Back''' - Toggle Visuals<br/> | '''Back''' - Toggle Visuals<br/> | ||
</div> | |||
== | <div class="tabbox"> | ||
<div class="tab">Jumpy</div> | |||
'''A''' - Use Grenades<br/> | '''A''' - Use Grenades<br/> | ||
'''B''' - Melee<br/> | '''B''' - Melee<br/> | ||
| Line 488: | Line 489: | ||
'''Left Bumper''' - Switch Grenades<br/> | '''Left Bumper''' - Switch Grenades<br/> | ||
'''Back''' - Toggle Visuals<br/> | '''Back''' - Toggle Visuals<br/> | ||
</div> | |||
== | <div class="tabbox"> | ||
<div class="tab">Bumper Jumper</div> | |||
'''A''' - Switch Grenades<br/> | '''A''' - Switch Grenades<br/> | ||
'''B''' - Action/Reload<br/> | '''B''' - Action/Reload<br/> | ||
| Line 503: | Line 505: | ||
'''Left Bumper''' - Jump<br/> | '''Left Bumper''' - Jump<br/> | ||
'''Back''' - Toggle Visuals<br/> | '''Back''' - Toggle Visuals<br/> | ||
</div> | |||
== | <div class="tabbox"> | ||
<div class="tab">Boxer</div> | |||
'''A''' - Jump<br/> | '''A''' - Jump<br/> | ||
'''B''' - Switch Grenades<br/> | '''B''' - Switch Grenades<br/> | ||
| Line 518: | Line 521: | ||
'''Left Bumper''' - Flashlight<br/> | '''Left Bumper''' - Flashlight<br/> | ||
'''Back''' - Toggle Visuals<br/> | '''Back''' - Toggle Visuals<br/> | ||
</div> | |||
<div class="tabbox"> | |||
= | <div class="tab">Green Thumb</div> | ||
'''A''' - Jump<br/> | '''A''' - Jump<br/> | ||
'''B''' - Switch Grenades<br/> | '''B''' - Switch Grenades<br/> | ||
| Line 534: | Line 537: | ||
'''Left Bumper''' - Flashlight<br/> | '''Left Bumper''' - Flashlight<br/> | ||
'''Back''' - Toggle Visuals<br/> | '''Back''' - Toggle Visuals<br/> | ||
</div> | |||
== | <div class="tabbox"> | ||
<div class="tab">The Duke</div> | |||
'''A''' - Jump<br/> | '''A''' - Jump<br/> | ||
'''B''' - Melee<br/> | '''B''' - Melee<br/> | ||
| Line 549: | Line 553: | ||
'''Left Bumper''' - Switch Grenades<br/> | '''Left Bumper''' - Switch Grenades<br/> | ||
'''Back''' - Toggle Visuals<br/> | '''Back''' - Toggle Visuals<br/> | ||
</div> | |||
== | <div class="tabbox"> | ||
<div class="tab">Hero</div> | |||
'''A''' - Jump<br/> | '''A''' - Jump<br/> | ||
'''B''' - Melee<br/> | '''B''' - Melee<br/> | ||
| Line 564: | Line 569: | ||
'''Left Bumper''' - Switch Grenades<br/> | '''Left Bumper''' - Switch Grenades<br/> | ||
'''Back''' - Toggle Visuals<br/> | '''Back''' - Toggle Visuals<br/> | ||
</div> | |||
== | <div class="tabbox"> | ||
<div class="tab">Recon</div> | |||
'''A''' - Jump<br/> | '''A''' - Jump<br/> | ||
'''B''' - Melee<br/> | '''B''' - Melee<br/> | ||
| Line 579: | Line 585: | ||
'''Left Bumper''' - Flashlight<br/> | '''Left Bumper''' - Flashlight<br/> | ||
'''Back''' - Toggle Visuals<br/> | '''Back''' - Toggle Visuals<br/> | ||
</div></div> | |||
==Halo 4 | == ''Halo 4'' == | ||
<div class="tabcontainer"> | |||
<div class="tabbox"> | |||
= | <div class="tab">Default</div> | ||
'''A''' - Jump<br/> | '''A''' - Jump<br/> | ||
'''B''' - Crouch<br/> | '''B''' - Crouch<br/> | ||
| Line 598: | Line 604: | ||
'''Left Bumper''' - Use Armor Ability<br/> | '''Left Bumper''' - Use Armor Ability<br/> | ||
'''''←/→'' D-Pad''' - Switch Grenade<br/> | '''''←/→'' D-Pad''' - Switch Grenade<br/> | ||
</div> | |||
== | <div class="tabbox"> | ||
<div class="tab">Boxer</div> | |||
'''A''' - Jump<br/> | '''A''' - Jump<br/> | ||
'''B''' - Sprint<br/> | '''B''' - Sprint<br/> | ||
| Line 613: | Line 620: | ||
'''Left Bumper''' - Use Armor Ability<br/> | '''Left Bumper''' - Use Armor Ability<br/> | ||
'''''←/→'' D-Pad''' - Switch Grenade<br/> | '''''←/→'' D-Pad''' - Switch Grenade<br/> | ||
</div> | |||
== | <div class="tabbox"> | ||
<div class="tab">Bumper Jumper</div> | |||
'''A''' - Sprint<br/> | '''A''' - Sprint<br/> | ||
'''B''' - Action/Reload<br/> | '''B''' - Action/Reload<br/> | ||
| Line 628: | Line 636: | ||
'''Left Bumper''' - Jump<br/> | '''Left Bumper''' - Jump<br/> | ||
'''''←/→'' D-Pad''' - Switch Grenade<br/> | '''''←/→'' D-Pad''' - Switch Grenade<br/> | ||
</div> | |||
== | <div class="tabbox"> | ||
<div class="tab">Fishstick</div> | |||
'''A''' - Jump<br/> | '''A''' - Jump<br/> | ||
'''B''' - Crouch<br/> | '''B''' - Crouch<br/> | ||
| Line 643: | Line 652: | ||
'''Left Bumper''' - Use Armor Ability<br/> | '''Left Bumper''' - Use Armor Ability<br/> | ||
'''''←/→'' D-Pad''' - Switch Grenade<br/> | '''''←/→'' D-Pad''' - Switch Grenade<br/> | ||
</div> | |||
<div class="tabbox"> | |||
= | <div class="tab">Green Thumb</div> | ||
'''A''' - Jump<br/> | '''A''' - Jump<br/> | ||
'''B''' - Crouch<br/> | '''B''' - Crouch<br/> | ||
| Line 659: | Line 668: | ||
'''Left Bumper''' - Use Armor Ability<br/> | '''Left Bumper''' - Use Armor Ability<br/> | ||
'''''←/→'' D-Pad''' - Switch Grenade<br/> | '''''←/→'' D-Pad''' - Switch Grenade<br/> | ||
</div> | |||
== | <div class="tabbox"> | ||
<div class="tab">Recon</div> | |||
'''A''' - Jump<br/> | '''A''' - Jump<br/> | ||
'''B''' - Melee<br/> | '''B''' - Melee<br/> | ||
| Line 674: | Line 684: | ||
'''Left Bumper''' - Use Armor Ability<br/> | '''Left Bumper''' - Use Armor Ability<br/> | ||
'''''←/→'' D-Pad''' - Switch Grenade<br/> | '''''←/→'' D-Pad''' - Switch Grenade<br/> | ||
</div> | |||
== | <div class="tabbox"> | ||
<div class="tab">Southpaw</div> | |||
'''A''' - Jump<br/> | '''A''' - Jump<br/> | ||
'''B''' - Crouch<br/> | '''B''' - Crouch<br/> | ||
| Line 689: | Line 700: | ||
'''Left Bumper''' - Melee<br/> | '''Left Bumper''' - Melee<br/> | ||
'''''←/→'' D-Pad''' - Switch Grenade<br/> | '''''←/→'' D-Pad''' - Switch Grenade<br/> | ||
</div></div> | |||
==Alert carry== | == Alert carry == | ||
{{main|Alert carry}} | {{main|Alert carry}} | ||
Alert carry is a feature introduced in ''Halo 2'' for machinima purposes. The feature can be accessed by pressing "down" on the D-pad (''Halo 2'' only) or using a combination of buttons (''Halo 3'' and subsequent games). | |||
The | |||
==Gallery== | ==Gallery== | ||
| Line 728: | Line 723: | ||
File:Halo4 southpaw.jpg|The Southpaw button layout in ''Halo 4''. | File:Halo4 southpaw.jpg|The Southpaw button layout in ''Halo 4''. | ||
</gallery> | </gallery> | ||
[[Category:Halo: Combat Evolved]] | [[Category:Halo: Combat Evolved]] | ||
[[Category:Halo 2]] | [[Category:Halo 2]] | ||
Revision as of 03:59, September 4, 2012
| This article does not meet the wiki's general standards and/or standards on layouts. You can help by cleaning this article. |
This is a list of controller layouts available in the Halo games for the Xbox and the Xbox 360.
Stick Layouts
All Halo games save for the Halo Wars feature the same four stick layouts.
Default
Left Stick - Move Forward/Backward | Strafe Left/Right
Right Stick - Look Up/Down | Rotate Left/Right
Southpaw
"For Lefties"
Left Stick - Look Up/Down | Rotate Left/Right
Right Stick - Move Forward/Backward | Strafe Left/Right
Legacy
"An older way of doing things."
Left Stick - Move Forward/Backward | Rotate Left/Right
Right Stick - Look Up/Down | Strafe Left/Right
Legacy Southpaw
"An older way of doing things for lefties"
Left Stick - Look Up/Down | Strafe Left/Right
Right Stick - Move Forward/Backward | Rotate Left/Right
Halo: Combat Evolved

A - Jump
B - Melee attack
X - Reload weapon/Action
Y - Switch weapons
Left Analog - Movement
Left Analog Click - Crouch
Right Analog - Camera
Right Analog Click - Zoom
Right Trigger - Fire primary weapon
Left Trigger - Throw grenade
"Back" Button - Go back/Multiplayer score
"Start" Button - Pause gane
Directional Pad - Menu Movement
Directional Pad Up - Teamspeak
Black Button - Switch grenades
White Button - Flashlight/Teamspeak

A - Jump
B - Melee attack
X - Reload weapon/Action
Y - Switch weapons
Left Analog - Movement
Left Analog Click - Crouch
Right Analog - Camera
Right Analog Click - Zoom
Right Trigger - Fire weapon
Left Trigger - Throw grenade
"Back" Button - Go back/Multiplayer score
"Start" Button - Pause
Directional Pad - Menu Movement
Directional Pad Up - Teamspeak
Right Bumper - Switch grenades
Left Bumper - Flashlight/Teamspeak
Halo 2
A - Jump
B - Melee attack
X - Reload weapon/Swap weapon/Action
Y - Switch weapons/Duel wield weapons
Left Analog - Movement
Left Analog Click - Crouch
Right Analog - Camera
Right Analog Click - Zoom
Right Trigger - Fire weapon
Left Trigger - Throw grenade/Fire secondary weapon/E-brake/Boost
"Back" Button - Go back/Multiplayer score
"Start" Button - Pause
Directional Pad - Menu Movement
Directional Pad Up - Teamspeak
Directional Pad Down - Lower weapon
Black Button - Switch grenades
White Button - Flashlight/Invisibility/Teamspeak
A - Jump
B - Melee attack
X - Reload weapon/Swap weapon/Action
Y - Switch weapons/Duel wield
Left Analog Stick - Movement
Push Left Analog Stick - Crouch
Right Analog Stick - Camera
Push Right Analog Stick - Zoom
Right Trigger - Fire weapon
Left Trigger - Throw grenade/Fire secondary weapon/E-brake/Boost
"Back" Button - Go back/Multiplayer score
"Start" Button - Pause
Directional Pad - Menu Movement
Directional Pad Up - Teamspeak
Directional Pad Down - Lower weapon
Right Bumper - Switch grenades
Left Bumper - Flashlight/Teamspeak
Halo 3
A - Jump
B - Melee Attack
X - Use Equipment
Y - Swap Weapons
Left Analog - Movement
Left Analog Click - Crouch
Right Analog Click - Zoom View
Right Analog - Aiming
Right Trigger - Use Right Weapon
Left Trigger - Use Left Weapon/Throw Grenade
Up on Directional Pad - Team Chat
Right Bumper - Action/Reload Right Weapon
Left Bumper - Reload/Swap Left Weapon
This is the most common control scheme despite many flaws (see below) that often become apparent to more experienced players. This is the control scheme that Bungie starts you with, but it is suggested that one quickly learns to either use the claw grip, bumper jumper, walkie talkie, or possibly even green thumb, all of which are more often used by experienced players.
Please note that it is not possible to aim while meleeing, jumping, and deploying equipment without use of the "claw grip."
Template:Article Quote
A - Jump
B - Melee Attack
X - Use Equipment
Y - Swap Weapons
Left Analog Click - Crouch
Right Analog Click - Zoom View
Right Trigger - Use Left Weapon
Left Trigger - Use Right Weapon
Up on Directional Pad - Team Chat
Right Bumper - Action/Reload Right Weapon
Left Bumper - Reload/Swap Left Weapon
This is the same as default except that the triggers are switched.
Please note that if you compare new players using all button layouts this is the most accurate. Because unlike all of the other layouts offered in the game this is the only one that you are not required to use the same hand to shoot and aim with. Therefore having more reaction time and accuracy.
A - Jump
B - Throw Grenade
X - Use Equipment
Y - Swap Weapons
Left Analog Click - Crouch
Right Analog Click - Zoom View
Right Trigger - Use Right Weapon
Left Trigger - Melee/Use Left Weapon
Up on Directional Pad - Team Chat
Right Bumper - Action/Reload Right Weapon
Left Bumper - Reload/Swap Left Weapon
This has the advantage of giving the user aim while meleeing, but has the disadvantage of not allowing you to aim while throwing grenades.
Please note that it is not possible to aim while throwing grenades, jumping, and deploying equipment without use of the "claw grip."
A - Jump
B - Zoom View
X - Use Equipment
Y - Swap Weapons
Left Analog Click - Crouch
Right Analog Click - Melee Attack
Right Trigger - Use Right Weapon
Left Trigger - Use Left Weapon
Up on Directional Pad - Team Chat
Right Bumper - Action/Reload Right Weapon
Left Bumper - Reload/Swap Left Weapon
This has the advantage of giving you some control over your aim while meleeing without compromising the aim of your grenades. However it is considered hard to learn and can be somewhat unreliable if not mastered.
Please note that it is not possible to aim while zooming, jumping, and deploying equipment without use of the "claw grip."
Also this is very similar to the default Call of Duty controls.
A - Reload/Swap Left Weapon/change grenade type
B - Action/Reload Right Weapon
X - Use Equipment
Y - Swap Weapons
Left Analog Click - Crouch
Right Analog Click - Zoom View
Right Trigger - Use Right Weapon
Left Trigger - Use Left Weapon
Up on Directional Pad - Team Chat
Right Bumper - Melee Attack
Left Bumper - Jump
This has been called by many to be the best possible controller configuration as you can aim while meleeing, jumping, zooming, and throwing grenades without having to use the uncomfortable claw grip usually only taking a few days to learn.
Please note that it is not possible to aim while deploying equipment without use of the "claw grip," although this is not much of a deterrent for most.
Bungie originally considered this as the default control scheme of Halo 3, but thought it would be too radically different to players used to Halo: Combat Evolved and Halo 2 and so altered it into the actual default configuration.Template:Fact However, with its relative popularity among Bungie workers, it was kept as an alternate configuration.
Using the Banshee becomes much easier with this control scheme, seeing as how you can use your cannon and aim, as well as perform tricks and determine your trajectory at the same time.
A - Jump
B - Action/Reload Right Weapon
X - Reload/Swap Left Weapon
Y - Swap Weapons
Left Analog Click - Crouch
Right Analog Click - Zoom View
Right Trigger - Use Right Weapon
Left Trigger - Use Left Weapon
Up on Directional Pad - Use Equipment
Right Bumper - Melee Attack
Left Bumper - Team Chat
This has very similar advantages to Bumper Jumper except you can aim while deploying equipment but not while jumping, and it is much more convenient to communicate with your team as you can continue walking and aiming while you switch into your team chat.
Please note that it is not possible to aim while jumping without use of the "claw grip."
A - Play/Pause
B - Hide/Show HUD
X - Hide/Show Control Pad
Y - Flying Cam/Player Cam
Left Analog - Movement
Left Analog Click - Pan
Right Analog - Camera
Right Trigger - Slow Motion/Fast Forward
Left Trigger - Thrust
Directional Pad - Switch Player
Right Bumper - Move Up
Left Bumper - Move Down
A - Pick up/ Drop Item
B - Hold to Drop Item
X - Inventory/Item Options
Y - Delete Item
Left Analog - Move/Rotate Selected Item
Right Analog - Look/Rotate Selected Item
Right Trigger - Hold to Rotate Selected Item
Left Trigger - Thrust
Directional Pad - Play/ Edit Mode
Right Bumper - Move Up
Left Bumper - Move Down
Halo 3: ODST
The controls in Halo 3: ODST are largely the same as in Halo 3, except the "Back" button accesses the VISR Database, the X button activates VISR Mode, and D-pad "up" views waypoints.
Halo Wars
A - Press to select/Hold to select with "paintbrush" tool
B - Cancel selection
X - Move/Gather/Primary attack
Y - Special/Secondary attack
Left Analog - Move crosshair
Right Analog - Camera
Right Trigger - Cycle through selection
Left Trigger - Hold to speed up camera
"Back" Button" - Objectives
"Start" Button" - Pause
Up on D-pad - Leader abilities menu
Down on D-pad - Move/cycle to next army
Right on D-pad - Move to last alert location
Left on D-pad - Move/cycle to base locations
Right Bumper - Select local units
Left Bumper - Select global units
Halo: Reach
A - Jump
B - Switch Grenades
X - Action/Reload
Y - Swap Weapons
Left Analog - Movement
Left Analog Click - Crouch
Right Analog Click - Zoom View
Right Analog - Aiming
Right Trigger - Use Weapon
Left Trigger - Use Grenades
Right Bumper - Melee Attack
Left Bumper - Use Equipment
↑ D-Pad - Team Chat
↓ D-Pad - Open Mic/Regoup
← D-Pad - Night Vision
A - Jump
B - Switch Grenades
X - Action/Reload
Y - Swap Weapons
Left Analog - Movement
Left Analog Click - Crouch
Right Analog Click - Zoom View
Right Analog - Aiming
Right Trigger - Use Grenades
Left Trigger - Use Weapon
Right Bumper - Use Equipment
Left Bumper - Melee Attack
↑ D-Pad - Team Chat
↓ D-Pad - Open Mic/Regoup
← D-Pad - Night Vision
A - Jump
B - Switch Grenades
X - Action/Reload
Y - Swap Weapons
Left Analog - Movement
Left Analog Click - Crouch
Right Analog Click - Zoom View
Right Analog - Aiming
Right Trigger - Use Weapon
Left Trigger - Melee Attack
Right Bumper - Use Grenades
Left Bumper - Use Equipment
↑ D-Pad - Team Chat
↓ D-Pad - Open Mic/Regoup
← D-Pad - Night Vision
A - Jump
B - Switch Grenades
X - Action/Reload
Y - Swap Weapons
Left Analog - Movement
Left Analog Click - Crouch
Right Analog Click - Melee Attack
Right Analog - Aiming
Right Trigger - Use Weapon
Left Trigger - Use Grenades
Right Bumper - Zoom View
Left Bumper - Use Equipment
↑ D-Pad - Team Chat
↓ D-Pad - Open Mic/Regoup
← D-Pad - Night Vision
A - Switch Grenades
B - Action/Reload
X - Use Equipment
Y - Swap Weapons
Left Analog - Movement
Left Analog Click - Crouch
Right Analog Click - Zoom View
Right Analog - Aiming
Right Trigger - Use Weapon
Left Trigger - Use Grenades
Right Bumper - Melee Attack
Left Bumper - Jump
↑ D-Pad - Team Chat
↓ D-Pad - Open Mic/Regoup
← D-Pad - Night Vision
A - Jump
B - Melee Attack
X - Switch Grenades
Y - Swap Weapons
Left Analog - Movement
Left Analog Click - Crouch
Right Analog Click - Zoom View
Right Analog - Aiming
Right Trigger - Use Weapon
Left Trigger - Use Grenades
Right Bumper - Action/Reload
Left Bumper - Use Equipment
↑ D-Pad - Team Chat
↓ D-Pad - Open Mic/Regoup
← D-Pad - Night Vision
A - Play/Pause
B - Toggle HUD
X - Invoke Controls
Y - Change Camera Type
Left Analog - Movement
Left Analog Click - Change Follow View
Right Analog Click - Camera View
Right Analog - Aiming
Right Trigger - Adjust Playback Speed
Left Trigger - Camera Boost
Right Bumper - Fly Up
Left Bumper - Fly Down
↑/↓ D-Pad - Change Player
→ D-Pad - Skip Forward
← D-Pad - Skip Back
A - Drop/Pick Up
B - Tools
X - Object Options
Y - Delete
Left Analog - Move
Right Analog Click - Zoom View
Right Analog - Pivot
Right Trigger + Right Analog - Rotate
Right Trigger + Left Analog - Push/Rotate
Left Trigger + Left Analog - Thrust
Right Bumper - Fly Up
Left Bumper - Fly Down
↑ D-Pad - Play/Edit
Halo: Combat Evolved Anniversary
A - Jump
B - Switch Grenades
X - Action/Reload
Y - Change Weapon
Left Analog - Movement
Left Analog Click - Crouch
Right Analog Click - Zoom
Right Analog - Look
Right Trigger - Fire
Left Trigger - Use Grenades
Right Bumper - Melee
Left Bumper - Flashlight
Back - Toggle Visuals
A - Jump
B - Melee
X - Action/Reload
Y - Change Weapon
Left Analog - Movement
Left Analog Click - Crouch
Right Analog Click - Zoom
Right Analog - Look
Right Trigger - Use Grenades
Left Trigger - Fire
Right Bumper - Switch Grenades
Left Bumper - Flashlight
Back - Toggle Visuals
A - Use Grenades
B - Melee
X - Action/Reload
Y - Change Weapon
Left Analog - Movement
Left Analog Click - Crouch
Right Analog Click - Zoom
Right Analog - Look
Right Trigger - Fire
Left Trigger - Jump
Right Bumper - Flashlight
Left Bumper - Switch Grenades
Back - Toggle Visuals
A - Switch Grenades
B - Action/Reload
X - Flashlight
Y - Change Weapon
Left Analog - Movement
Left Analog Click - Crouch
Right Analog Click - Zoom
Right Analog - Look
Right Trigger - Fire
Left Trigger - Use Grenades
Right Bumper - Melee
Left Bumper - Jump
Back - Toggle Visuals
A - Jump
B - Switch Grenades
X - Action/Reload
Y - Change Weapon
Left Analog - Movement
Left Analog Click - Crouch
Right Analog Click - Zoom
Right Analog - Look
Right Trigger - Fire
Left Trigger - Melee
Right Bumper - Use Grenades
Left Bumper - Flashlight
Back - Toggle Visuals
A - Jump
B - Switch Grenades
X - Action/Reload
Y - Change Weapon
Left Analog - Movement
Left Analog Click - Crouch
Right Analog Click - Melee
Right Analog - Look
Right Trigger - Fire
Left Trigger - Use Grenades
Right Bumper - Zoom
Left Bumper - Flashlight
Back - Toggle Visuals
A - Jump
B - Melee
X - Action/Reload
Y - Change Weapon
Left Analog - Movement
Left Analog Click - Crouch
Right Analog Click - Zoom
Right Analog - Look
Right Trigger - Fire
Left Trigger - Use Grenades
Right Bumper - Flashlight
Left Bumper - Switch Grenades
Back - Toggle Visuals
A - Jump
B - Melee
X - Flashlight
Y - Change Weapon
Left Analog - Movement
Left Analog Click - Crouch
Right Analog Click - Zoom
Right Analog - Look
Right Trigger - Fire
Left Trigger - Use Grenades
Right Bumper - Action/Reload
Left Bumper - Switch Grenades
Back - Toggle Visuals
A - Jump
B - Melee
X - Switch Grenades
Y - Change Weapon
Left Analog - Movement
Left Analog Click - Crouch
Right Analog Click - Zoom
Right Analog - Look
Right Trigger - Fire
Left Trigger - Use Grenades
Right Bumper - Action/Reload
Left Bumper - Flashlight
Back - Toggle Visuals
Halo 4
A - Jump
B - Crouch
X - Action/Reload
Y - Switch Weapons
Left Analog - Movement
Left Analog Click - Sprint
Right Analog Click - Zoom
Right Analog - Look
Right Trigger - Fire Weapon
Left Trigger - Throw Grenade
Right Bumper - Melee
Left Bumper - Use Armor Ability
←/→ D-Pad - Switch Grenade
A - Jump
B - Sprint
X - Action/Reload
Y - Switch Weapons
Left Analog - Movement
Left Analog Click - Crouch
Right Analog Click - Zoom
Right Analog - Look
Right Trigger - Fire Weapon
Left Trigger - Melee Attacks
Right Bumper - Throw Grenade
Left Bumper - Use Armor Ability
←/→ D-Pad - Switch Grenade
A - Sprint
B - Action/Reload
X - Use Armor Ability
Y - Switch Weapons
Left Analog - Movement
Left Analog Click - Crouch
Right Analog Click - Zoom
Right Analog - Look
Right Trigger - Fire Weapon
Left Trigger - Throw Grenade
Right Bumper - Melee Attack
Left Bumper - Jump
←/→ D-Pad - Switch Grenade
A - Jump
B - Crouch
X - Action/Reload
Y - Switch Weapons
Left Analog - Movement
Left Analog Click - Sprint
Right Analog Click - Melee
Right Analog - Look
Right Trigger - Fire Weapon
Left Trigger - Zoom
Right Bumper - Throw Grenade
Left Bumper - Use Armor Ability
←/→ D-Pad - Switch Grenade
A - Jump
B - Crouch
X - Action/Reload
Y - Switch Weapons
Left Analog - Movement
Left Analog Click - Sprint
Right Analog Click - Melee
Right Analog - Look
Right Trigger - Fire Weapon
Left Trigger - Throw Grenade
Right Bumper - Zoom
Left Bumper - Use Armor Ability
←/→ D-Pad - Switch Grenade
A - Jump
B - Melee
X - Sprint
Y - Switch Weapons
Left Analog - Movement
Left Analog Click - Crouch
Right Analog Click - Zoom
Right Analog - Look
Right Trigger - Fire Weapon
Left Trigger - Throw Grenade
Right Bumper - Action/Reload
Left Bumper - Use Armor Ability
←/→ D-Pad - Switch Grenade
A - Jump
B - Crouch
X - Action/Reload
Y - Switch Weapons
Left Analog - Movement
Left Analog Click - Sprint
Right Analog Click - Zoom
Right Analog - Look
Right Trigger - Throw Grenade
Left Trigger - Fire Weapon
Right Bumper - Use Armor Ability
Left Bumper - Melee
←/→ D-Pad - Switch Grenade
Alert carry
- Main article: Alert carry
Alert carry is a feature introduced in Halo 2 for machinima purposes. The feature can be accessed by pressing "down" on the D-pad (Halo 2 only) or using a combination of buttons (Halo 3 and subsequent games).
Gallery
The post alpha control scheme for Halo Wars (outdated).
The Default button layout in Halo: Reach.
The Southpaw button layout in Halo: Reach.
The Boxer button layout in Halo: Reach.
The Green Thumb button layout in Halo: Reach.
The Bumper Jumper button layout in Halo: Reach.
The Recon button layout in Halo: Reach.

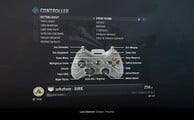
The Default button layout in Halo 4.
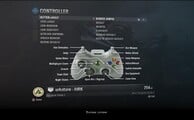
The Boxer button layout in Halo 4.

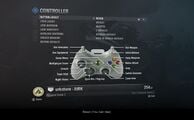
The Bumper Jumper button layout in Halo 4.

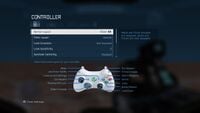
The Fishstick button layout in Halo 4.

The Green Thumb button layout in Halo 4.

The Recon button layout in Halo 4.

The Southpaw button layout in Halo 4.


