Deutoros-pattern Scarab: Difference between revisions
From Halopedia, the Halo wiki
ZodiacReborn (talk | contribs) |
|||
| Line 164: | Line 164: | ||
'''Note:''' On the fourth level of Campaign, the Scarab can be easily and quickly destroyed by abandoning your mongoose and going for a mounted Missile Pod located along the wall. As the Scarab comes over the wall, it is invulnerable for a brief period until it stops out over the lake bed. But by aiming at the general area of the armor guarding the Core and firing repeatedly, the Scarab can be destroyed in as little as 4 missile shots in Easy difficulty. <ref>[http://www.highspeedhalo.net/index.php?news&id=357|A speed run of the Storm which includes this trick]. Gameplay by RC Master, recorded and hosted by HighspeedHalo.net</ref> This still requires a good deal of luck to pull off, as the Scarab will often turn away too quickly for all of the missiles to hit properly. This can still be done on higher difficulties, even Legendary, although this is harder as the casing takes more shots to knock off (at least 6 on Legendary) and so requires the Scarab to stay nearly stationary, in the correct position, for several seconds. | '''Note:''' On the fourth level of Campaign, the Scarab can be easily and quickly destroyed by abandoning your mongoose and going for a mounted Missile Pod located along the wall. As the Scarab comes over the wall, it is invulnerable for a brief period until it stops out over the lake bed. But by aiming at the general area of the armor guarding the Core and firing repeatedly, the Scarab can be destroyed in as little as 4 missile shots in Easy difficulty. <ref>[http://www.highspeedhalo.net/index.php?news&id=357|A speed run of the Storm which includes this trick]. Gameplay by RC Master, recorded and hosted by HighspeedHalo.net</ref> This still requires a good deal of luck to pull off, as the Scarab will often turn away too quickly for all of the missiles to hit properly. This can still be done on higher difficulties, even Legendary, although this is harder as the casing takes more shots to knock off (at least 6 on Legendary) and so requires the Scarab to stay nearly stationary, in the correct position, for several seconds. | ||
One may also use a sniper to destroy the core of the scarab without even getting nearby. | One may also use a sniper rifle to destroy the core of the scarab without even getting nearby. | ||
'''Note'''This method requires a lot of patience.a recomendation is to remove the back armor gaurding the core(via missile pod or other heavy weapon) | '''Note'''This method requires a lot of patience.a recomendation is to remove the back armor gaurding the core(via missile pod or other heavy weapon) | ||
Revision as of 12:59, November 7, 2008
| This article does not meet the wiki's general standards and/or standards on layouts. You can help by cleaning this article. |
Template:Ratings Template:Ship
The Type-47 Ultra Heavy Assault Platform (abbreviated Type-47 UHAP), more commonly known as the Scarab, was a Covenant ground based heavy assault walker during the Human-Covenant war.
Introduction
The Scarab was a large Covenant walker, upheld on four large mechanical legs. This differed from all the other Covenant's ground-based vehicles, which were all propelled by gravity boosters. Plasma was the main weapon of the Scarab against all enemy fronts.
Using its four large, mechanical legs for mobility, instead of a Boosted Gravity Propulsion Drive, it could traverse terrain most vehicles could not. This advantage allowed it to climb over obstacles such as walls, trenches, buildings, and mountains to bring its extremely heavy firepower to places most vehicles couldn't get to, unlike other Covenant vehicles of the time.
It was the largest known Covenant ground vehicle during its time period. While its heavy armor and extreme size made it resistant to most attacks, it was vulnerable to boarding actions, as demonstrated in the Battle of New Mombasa, the Battle of Installation 00 and the Second Battle of Earth.[1]
The Scarab held squads of Grunts and Jackals, as well as a few Brutes or Elites to protect it from it being boarded, if anything managed to get close enough. They were been used in many battles against enemies, such as on Reach before it was glassed and on Earth where the SPARTANs, encountered a few in different locations. If a Scarab did get boarded, and there were no surviving Covenant troops on board, the Scarab could be destroyed by destroying its vulnerable reactor.
The Covenant Capital Ships and Carriers were the only ships to have carried the Scarab, for the amount of room it took to store a Scarab. The Scarab was a movable fortress on the field and the Covenant used it to the best of its abilities. The Scarab was meant to assault heavily defended structures and barriers and to give quick unstoppable support for Covenant troops on the ground. It could also deliver Covenant ground troops supportive fire to their destination through heavily defended areas; this could mean death for the defending troops, such as the United Nations Space Command Marines, which is why it could be suicide to take on Covenant troops during the Human-Covenant war, because a Scarab might have been in the area to come to the aid of the Covenant ground troops.
Features
Scarabs were quite notable for their intimidating, scorpion-like appearance, large size and massive firepower. Each of a Scarab's legs was at least 90 feet tall. These legs were surprisingly swift and accurate for their size, and were even able to find holds in narrow places, such as a canyon on Installation 05 or the streets of Mombasa. These legs could also be used for weapons, as a monstrous pointed leg able to crush anything that happened to get in its way. However, Scarab's did have a weak point on their legs, and the back of their power source.
Variation
Halo Graphic Novel
In the Halo Graphic Novel, the Scarab had a very different appearance with a roughly cross shaped body, the across sections bearing dual cannons, neither end having a visible plasma cannon. Its legs were a distinctly different shape (straight, with an 'L'-shaped joint to the body). It should be noted, however, that the story in which it appears, Second Sunrise Over New Mombasa, uses a very large amount of artistic license. The story is canonical, but the visuals of the story are clearly not.
Halo 2
- "We've all run the simulations. They're tough, but they ain't invincible."
- — Avery J. Johnson to several marines in Halo 2
The Scarab was first seen during the course of Halo 2, and appeared as a large, four legged, and silver armored behemoth, with an estimated height of ninety feet. It featured a deck on top that was guarded by numerous Elites, Jackals and Grunts along with a walkway going over the entrance to its control room. There were two spine mounted plasma cannons to provide anti-air defense. Its shell was invulnerable to damage from 90mm shells, missiles, .50 cal rounds, and ANVIL HE missiles (the armor could be similar to the ship plating the Covenant use on their starships). Anyway it proved vulnerable to boarding actions and destruction from inside. Bungie has joked that this Scarab looks more like a basket than an actual assault platform.
Halo 3

The Scarab received major changes between Halo 2 and Halo 3, with the Scarab actually being able to be destroyed, as opposed to just killing all of the enemies inside, as seen in Halo 2. Appearance wise, its body changed to have a different shape, being more bulbous at the end, similar to the Wraiths of Halo: Combat Evolved. In Halo 3, it seemed to have a greater width than in Halo 2, but wasn’t as tall as previously. In terms of weaponry, it wielded a smaller plasma beam that seems weaker (On Legendary the player is able to withstand sustained fire for a short amount of time (approx 0.8s)), as opposed to the instant death of the Halo 2 Scarab gun). The two anti-air turrets were removed for Halo 3, having been replaced by a single, large turret at the rear (which would shoot at you if you were in a Hornet or Banshee, and you were able to shoot off the covering of it with Hornet rockets.) The flaps on the plasma beam were removed, and replaced by two destructible stationary plates, and it now appears to have no crew controlling it and it is currently thought to be controlled by Lekgolo worms. This is conjecture, of course, but has a certain amount of evidence behind it. There appear to be Lekgolo worms in its engine and it is notable in the level "The Covenant" that the Scarabs shake themselves off after the fall. It also featured a set of powerful belly-jets that allowed it to survive a drop from low orbit with little or no effects. The Main gun also changed, with it appearing like a hose in Halo 3, instead of just the straight beam appearance of Halo 2. The Scarab appeared to have high impact legs due to all the jumps it makes, and it appears to be more maneuverable than in Halo 2. In Halo 3, it no longer dripped coolant/extra plasma from its belly/muzzle (gun) area and, finally, it had a darker color than in Halo 2.
A likely conjecture is that this version of the Scarab was intended to be a weapon. Its color changed to a shade of purple, like other Covenant war-ready vehicles and it was better-defended, having superior weapons. It has been speculated that Scarabs of Halo 2 were not weapons, but rather mining tools that were deployed as emergency combat relief by Regret upon finding humans on Earth. They could have been the mining Scarabs from Fall Of Reach. This is supported by the fact that Regret was looking for the device that opened the Portal to the Ark, and he needed digging machines to excavate it. Another likely explanation for the different Scarabs encountered throughout Halo is that the Scarabs depicted in Halo 2, the Graphic Novels and Halo wars were older models of Scarab tank, while the one encountered in Halo 3 was a newer model designed to replace the older versions.
Differences aside, it still had many similarities to the old Scarab. There were three levels (or decks), and the lowest was accessible when the Scarab had been temporarily disabled. This level featured a Grunt-mounted Plasma Turret, and usually one to four Brutes, depending on the difficulty level. There was a ramp that led to the second level, where there were a varying number of enemies, depending on the level and difficulty. Usually, you could expect to find a few Brutes and Grunts. On this level, there were two more Plasma Turrets, aimed to either side of the Scarab. If you turned 180° immediately upon ascending the ramp to this level, you could go up the purple slope to the third tier. This was just an open, unprotected platform below the large turret. Past the turrets on the second level (round the corner) is the power core that must be destroyed to have taken down the Scarab.
Bungie had also stated in the September issue of EGM, that the Scarab used an unscripted game Artificial Intelligence (not to be confused with story artificial intelligence units like Cortana) to create a more dynamic battle with it, as it would roam across the battlefield of its own accord and attack targets in its path. This way it would no longer require a relatively easy boarding action every time but a tactical approach.
Halo Wars
In Halo Wars, it seemed to be a combination of the Halo 2 and Halo 3 Scarab designs, featuring an encased, Covenant purple chassis with a single spine mounted plasma cannon.
The flaps on its plasma cannon, while bearing a similarity to those of the Halo 3 Scarab and also resembling a beak of a bird, operated like the flaps of the Halo 2 Scarab gun. They first concealed the weapon then before it folded out into 8 separate pieces and seemed to shoot a sustained stream of plasma fire. The cannon was described in the demonstration as "An anti-everything cannon".
However, in most recent demonstrations, also a Halo 3-like Scarab has been seen. It is unknown if both will be put in the game, but it may be possible.
List of Destructible Parts

Halo 3
- All four of the Scarab's knees were destructible to the point that the Scarab temporarily buckled under the weight of the platform. The armor on these legs could also be blown off.
- The flaps covering the Scarab's main gun could be destroyed. This did not, however, disable the weapon.
- The crest on and around the turret could be completely blown off, slowing the rate of fire and the size of the plasma bolts. This had been reported to temporarily disable the turret.
- Two side door panels near the bottom rear could be torn off to allow a singular entry.
- The barrier protecting the Core could be ripped away from the back of the Scarab by shooting the red glowing circle at the top of the barrier. Doing so would result in the Core being completely exposed, making it easier to destroy.
- All three Plasma Cannons.
- The Core.
Note: If you destroy the Core, all parts of the Scarab will be destroyed at once, except for the crest of the Scarab Gun.
Halo 2
- The forward Plasma Turret.
- The rear Plasma Turret.
- The plating on the main gun Note:This took an incredible amount of damage and was only possible using the tank glitch.
- The underside grate.
Weaponry
Primary
- (1) Front-Mounted Cannon
- Ammo: Super-Heated Plasma, presumably unguided.
- Rate of Fire: 4 second stream; 30 to 40 per second
- Movement of cannon: Through careful examination, one can see that the inside gun part seems to move forward from a cradle as the flaps open up.
- Notes: The projectile emitted from the Scarab's main gun emits a neon-green/bluish glow, indicating extremely high temperature. As the gun fires, white, hot liquid pours from the barrel onto the ground. The gun's force is enough to destroy any vehicle smaller than the Scarab in a matter of seconds. Also, on easy or normal difficulty, if you are in a small vehicle (Mongoose, Warthog, Ghost, Chopper) the sheer force of the plasma stream hitting the ground will flip your vehicle if your close enough. If this happens close to the Scarab it may step on (and destroy) your vehicle.
- Approx. Range: The effective range on a Scarab's main cannon is not exceptionally good, about 0.4 miles as seen during the Citadel and Cartographer battles, where its attack can easily be evaded if at a distance.
Secondary
- Mounted Anti-Aircraft Turrets (Two in Halo 2, One in Halo 3)
- Ammo: Super-Heated Plasma, (similar to Shielded Plasma Cannon)
- Rate of Fire: 400-600 rounds/minute
- Notes: Presumed computer controlled, but a close look indicates that it may be manually controlled. It does wildly spin around when the core is destroyed as if the automatic controls crashed. Could be shot off with little firepower. NOTE: In Halo 3 the Anti Aircraft cannon couldn’t be shot off and was invincible. The Anti Aircraft gun(s) were unsurprisingly extremely effective against aircraft.
- Approx. Range: These weapons have a much greater range than the primary cannon on the Scarab. They are extremely effective against airborne vehicles, but can also be used against ground-based vehicles, such as Warthogs or Scorpions. They are effective up to approximately 1.5 miles, which is a rough but evidence-based conclusion drawn from ships and vehicles with similar weaponry.
Halo 2 Strategies
Easy
To defeat the Scarab's crew on easy difficulty, fire at its crew on the top of the Scarab when they appear with either a Rocket Launcher, Sniper Rifle or Battle Rifle. When you reach the end of the bridge it is recommended you collect a Shotgun, the second weapon is up to you but a Rocket Launcher is recommended. Throw a couple grenades at the surviving Grunts, Jackals and Elites to kill some of them and weaken the others' shields. Jump onto the Scarab and eliminate surviving Covenant with one of your weapons. When the top deck is clear proceed down to the interior. If you have a Rocket Launcher make sure it is loaded and fire two shots to kill the Ultra. You may eliminate the rest of the interior crew however you want. However, if you have some experience, you don't need to worry, as the hostiles do minimal damage to your shields; the only enemy you actually need to be cautious of is the Ultra. Otherwise, it's charge straight in!
Normal
To defeat the Scarab's crew on normal difficulty fire at its crew on the top of the Scarab when they appear with either a Rocket Launcher, Sniper Rifle or Battle Rifle. When you reach the end of the bridge it is recommended you collect a Shotgun, the second weapon is up to you but our user usually has his second weapon be a Rocket Launcher. Throw four grenades at the surviving Grunts, Jackals, and Elites to kill some of them and weaken the others' shields. Jump onto the Scarab and eliminate surviving Covenant with one of your weapons. When the top deck is clear proceed down to the interior. If you have a Rocket Launcher make sure it is loaded and fire two or three shots to kill the Ultra. You may eliminate the rest of the interior crew however you want.
Heroic
To defeat the Scarab's crew on heroic difficulty fire at it's crew on the top of the Scarab when they appear with either a Rocket Launcher, Sniper Rifle or Battle Rifle. When you reach the end of the bridge it is recommended you collect a Shotgun, the second weapon is up to you but our user usually has his second weapon be a Rocket Launcher. Throw all your grenades at the surviving Grunts, Jackals and Elites to kill some of them and weaken the others' shields. Jump onto the Scarab and eliminate surviving Covenant with one of your weapons. When the top deck is clear proceed down to the interior. If you have a Rocket Launcher make sure it is loaded and fire three or four shots to kill the Ultra. You may eliminate the rest of the interior crew however you want.
Legendary
It's up to you how you want to end this: the quick way, or the slow but reassuring way. The quick way is to jump down onto the Scarab immediately, rush into the control room, blast the entire Covenant in there, and hope you don’t get run down from behind. This is ill advised, however, as even Major Elites are extremely difficult to kill by themselves and can finish you off in less than 7 seconds. The slow but reassuring way is to wait for the Scarab to get to the end of the waterway and fill up on rockets while waiting for it. The one time you face the Scarab, there will be a machine gun turret. Feel free to use it, but the Elites will soon finish you off. Rather, "snipe" with the rocket; that is, go at a reasonable distance, zoom, and fire at the main clusters. Use the turret to pick off stragglers. If necessary, you can use the crates as cover. At the end of the waterway, you can take out all the Covenant that come out, then jump down, go in, and finish off whatever Covenant are still inside. Either way, you win. Keep in mind, once you get inside, to kill the Ultra Elite first, toss grenades when needed, and be sure not to blow yourself up with the launcher.
Halo 3 Strategies
For all of the following strategies, the player must destroy the core located at the back of the Scarab. A large wall of armor as well as an energy shield protects it.
Hybrid Internal/Long-Range Destruction
You may be lucky enough to come upon a Scarab while in the vicinity of a Missile Pod. If this is the case begin firing at the scarab with the missile pod still attached to its stand, enabling infinite ammunition. If you get even luckier the scarab may show its back to you or you may get a shot at the power core as the scarab moves lateral to your position. In this case you may be able to shatter the power core from a distance. This is rather difficult to do and requires a large element of luck. More often the missile pod can be used to take down the legs of the scarab. The scarab remains grounded for up to thirty seconds, in which time the attacker can cover a large expanse of ground and board it, then proceed with the Internal Destruction method.
Note: On the fourth level of Campaign, the Scarab can be easily and quickly destroyed by abandoning your mongoose and going for a mounted Missile Pod located along the wall. As the Scarab comes over the wall, it is invulnerable for a brief period until it stops out over the lake bed. But by aiming at the general area of the armor guarding the Core and firing repeatedly, the Scarab can be destroyed in as little as 4 missile shots in Easy difficulty. [2] This still requires a good deal of luck to pull off, as the Scarab will often turn away too quickly for all of the missiles to hit properly. This can still be done on higher difficulties, even Legendary, although this is harder as the casing takes more shots to knock off (at least 6 on Legendary) and so requires the Scarab to stay nearly stationary, in the correct position, for several seconds.
One may also use a sniper rifle to destroy the core of the scarab without even getting nearby. NoteThis method requires a lot of patience.a recomendation is to remove the back armor gaurding the core(via missile pod or other heavy weapon)
Internal Destruction
A few of the methods below require you to board the Scarab and destroy it from the inside. Here's how:
- There is a walkway on both sides of the Scarab so if you’re lucky you can jump on them when it is down.
- There are several ways to board the Scarab, some of which are rather harrowing. One way, and the most common way, is to blow the legs and manually jump or gravity-lift to the walkway. Another way is the "Terrain Method". On The Storm, if you proceed to the back of the 'arena', you will find several Marines and several missile pods. Disregard all of these and head in either direction along the hallway until you reach a turnoff. Move along this path, and you should find an elevator, which will take you to a catwalk far above the battle. From here, jump down onto the Scarab. On the level The Ark, when fighting the Scarab, move to the large building located in the center of the area. There you should find a gravity-lift and a Chopper. You will need both of these. Get to the top of the building, and deploy the gravity-lift on the edge. Reverse until you form a line with the gravity-lift and the Scarab. Once the Scarab is close enough, boost over the gravity-lift toward it, and try to land on the main platform (note: It is recommended you leap out of your Chopper if it is going to overshoot the Scarab.).
- You can, if you wish, avoid having to go to the back of the Scarab. On each side of the Scarab, there is a purple panel that can be blown open. They are located towards the rear of the Scarab, just around from the main entrance. Destroy one of these side doors, jump in and kill whatever is waiting for you. The reason you go in the side is the Plasma Turret located at the main entrance. This way, it doesn't fire at you as you approach.
- The most common approach is to go to board the Scarab at its back ramp while it is down. Go up the ramp in the back of the Scarab. Turn 180°, and kill the enemies down one or both sides of the Scarab in whatever way you see fit.
- If the Scarab is disabled, you can jump up onto the ramp located next to the Scarabs main weapon. From there you go straight and turn near the rear of the Scarab and you will see the core.
After you have successfully boarded the Scarab, you must follow these steps to finish it off.
- At the very back of the Scarab (above the main entrance), there is the Core. It looks like a bright blue disk, similar to a Jackal Shield.
- This disk is an energy shield. Shoot at it until it disappears.
- Next there is a protective metal cover, shoot this off as well. Under this cover is a sort of X shape with a blue light in the middle. Shoot or hit this until the light turns red. Alternatively, it may be faster to shoot the orange strands of flesh that cross out of the power core. Another way is to use spike grenades to stick the core, this has the bonus of giving you a head start from the explosion.
- Turn and jump off the back of the Scarab, and get as far away as possible, because if you're too close, the explosion can kill you. It is advisable, if you can, to use a Bubble Shield, if unable to escape the explosion range, though this can still remove the Master Chief's or Arbiter's shield, much as a Power Drainer can. Do look out for falling parts of the exploded Scarab. They can hit you through the Bubble Shield and kill you.
- Watch the pretty blue explosion caused by your handy work.
Airborne
There are a few ways a Scarab can be engaged from the air. The only thing to remember, really, is that the AA-gun on the back is just that; an Anti-Aircraft gun. Give it a chance and that thing will tear a Hornet or Banshee apart in seconds. So stay close to the back and you will find a little sort of blue bolt like that of a Wraith (in Halo 2). Shoot it and the back piece falls off, leaving the core exposed. Shoot it, get some distance between you and the Scarab, and watch the fireworks. But this can be hard to achieve seeing as the Scarab wants to face you to not only protect the power core, but to shoot you with its main gun, if you are in a Hornet it would be advisable to lock on to one of the back legs and keep circling around the Scarab and continually fire. The Scarab will eventually buckle and you can quickly target the back plating and the power core before the AA gun comes back online. You can also land a Hornet or Banshee on the 2nd deck, though it is extremely hard if the Scarab is moving a lot. If you are piloting a Banshee, it is advised to strafe at the legs or at the panel protecting the core. Just remember, the Banshee's Fuel Rod Cannon's ordinance drops over a period of time. Take advantage of this, and try to aim for either point you're looking to destroy. If bombed enough, the Scarab will be temporarily disabled, giving you some time to finish up and watch the fireworks.
Aerial Drop
( The H.A.L.O. Drop )
- This is especially effective when fighting more than one Scarab in Co-op. Have one player fly a Hornet, with the other player rides in one of the side-seats. The first (piloting) player lands on top of the Scarab. The second (non-piloting) player, gets off the Hornet, and proceeds to destroy the Scarab internally. The first player, meanwhile, flies to the other Scarab and either gets off on top of the Scarab and follows the second player's example, or engages the Scarab in any way they see fit. Only one player can do this in a Banshee, obviously.
- In single player, if the player rides in the side seat with a marine in the pilot's seat, the marine will let the player board the Scarab. When the Core has been destroyed, the marine will return to pick up the player; usually remaining stationary above, or even touching, the Scarab's top-most deck. (Note: Sometimes the Marine may not come back, so be ready at all times to jump off the Scarab without your hornet.) Also, you can do this yourself by jumping off and letting the Hornet fall below. This may take multiple tries because the Scarab has the tendency to step on everything.
- Also, you could first kill all the Brutes and then land on the Scarab without destroying the legs and destroy the core (engine).
Aerial Drop for Legendary (co-op)
This tactic is really only useful in legendary mode when fighting more than one Scarab. Have one player fly the Hornet, with the other player riding in one of the side seats. The first (piloting) player hovers over the top of the Scarab for around 2 seconds whilst the other player jumps out and aims to land on the Scarab. As soon as the second player has left the Hornet the first player should either be flying into the mountains to the left or to the right under cover from the Scarab. This means that if the second player should die, he will spawn again next to the Hornet ready to take off and repeat the drop off run again.
Direct Assault
Keep circle-strafing around the Scarab, and shoot at the large blue disc located below the AA gun on the rear of the Scarab. This disc will turn red, and then disappear. Keep shooting at where it was, until a large chunk of armor falls off the back of the Scarab. This barrier protects the Core. Once the barrier comes away, it may be advantageous to shoot at the legs until the Scarab goes down so that you can get an easier shot at the Core. Alternatively, keep circle strafing and try and hit the Core, it doesn't take much to destroy it.
Indirect Assault
Use your aircraft's weapons to take down a leg, using your superior three-dimensional maneuverability to avoid destruction. Land on the ground, get out of your aircraft and proceed to take the Scarab out from the inside. This method is a bit redundant, unless you're playing meta-campaign, and want the points from all the individual kills inside, which you otherwise wouldn't get.
- Using a rocket launcher you can shoot the back of it and it will do damage to the core.
Crane Jump
Go to an elevator near the crane, go up and then go across the crane, and wait for the Scarab to get right in front of you. If you have a Rocket Launcher fire a couple of rockets at the Grunts inside, then at the Plasma Cannon. Use a Battle Rifle to take out the Brute. Then, jump down and you'll land on top of it. Beware the front cannons and rockets being fired from marines. Of course, this can only be done on the level The Storm.
Land
Land combat depends hugely on what vehicle you use.
Scorpion
You have two choices. You can either engage from an extremely long range, or an extremely short range. The Scorpion is too slow to challenge the main gun from a middle distance. Regardless, a scorpion tank if you can get in close and finally get under the scarab is one of the best vehicles for the job. Its huge firepower takes down a scarab leg in as few as 3 shots. The scarab falls slowly enough and gives enough warning, via its alarm to get out of the way. Back up and watch out for its big guns, which are still active while the scarab is grounded. Back up just enough to get a crack at the power core and two quick shots later you have blasted the shield off the core and destroyed it. Roll backwards further for a nice neon-blue explosion.
If you are playing Co-op, it's usually best to keep the Scorpion at long range, whilst the other player uses a fast, maneuverable vehicle, such as a Ghost or Mongoose to draw Scarab away. When your partner has forced the Scarab to present its back to you, fire at the barrier protecting the Core. Once that has been destroyed, fire at the Core.
The Scarab has two side doors. They will be destroyed with an explosion. You can use them to board the Scarab too.
Mongoose
There are a few ways the Mongoose can be used. The easiest way is to put a Marine on the back with a Rocket Launcher (don't use your Co-op partner, as they run out of ammo), and drive around under the Scarab until it goes down. Then dismount the Mongoose, and hop in the back of the Scarab. Proceed to destroy it from the inside, or fire directly on the Core, since the angle will be easy enough to get. Only do this if you have your own Rocket Launcher or Fuel Rod Cannon, since the Scarab will more than likely have recovered before you can do enough damage with any other weapon. Also, you may use the elevators and take a Mongoose up in the elevator. Then when the Scarab is close enough, drive onto the Scarab. A fun way of destroying the Scarab on The Storm is driving the Mongoose onto it. You will need to drive the Mongoose onto the elevator to and take it to the top. Wait for the Scarab to get close so you can drive onto the back. Drive down the ramp and park it by the control screen. Then kill remaining enemies and destroy the Scarabs core. Then hurry to the Mongoose and drive out of the Scarab before it explodes. This may take time to do due to difficulty of doing that. Note, the Mongoose will get thrown due to the Scarabs explosion.
Alternatively, the large earthen hills on the level The Covenant make excellent ramps for jumping a Mongoose directly onto the Scarab. Drive your vehicle as far to the rear of the ramp as possible, touching the canyon wall, and wait for the Scarab to turn to face you (be aware that the other scarab can still attack you, so be ready to move if necessary). Once your target scarab is in position, drive as quickly as possible and try to land on the main deck. Fight the enemies, or just run directly to the Core. It is rarely worthwhile to try to recover your vehicle, and it can sometimes survive the Scarab's explosion anyway.
A very fun (but also very hard) way to do it on the level The Storm is have your co-op partner or a marine get on the back of your Mongoose, drive to the elevator, activate it and get back in the mongoose. Then when the ramp and Scarab are directly in front of you, try to get full-speed and fly off the ramp and on the Scarab. Destroy the Core, have your friend and/or marine kill all the Brutes and Grunts and, if you're lucky, jump back on the Mongoose and ride off the Scarab as fast as you can.
Warthog
The Gauss Warthog is reasonably effective at bringing a Scarab to its knees. Similar tactics apply as with the Mongoose, except you have more firepower. This is a nice vehicle to use on Co-op, as your partner can take the gun or drive, and you can still have a rocket-armed Marine passenger. Also, while in the level The Storm, if you get a Troop Transport Warthog you can fill it with Marines equipped with rocket launchers. It can be more effective than a mongoose with someone using a rocket launcher, but because it is slower, be careful not to get destroyed by the scarab's legs.
The M41 variant of the Warthog is not as effective, but can still get the job done. Also, see above for an alternative strategy, but replace "Mongoose" with "Warthog".
Wraith
Don't attempt this unless you are VERY proficient with the Plasma Mortar. The Wraith's turning speed is too slow to make a short-range attack feasible, so it has to be engaged from long range. However you can use a wraith at close range against a scarab as long as you stay underneath it and fire as fast as you can at one of the legs, then follow up by boarding it or firing at the core. This is considerably more difficult than using a mongoose with a rocket launcher armed marine riding on the back, or even just going on foot with a rocket launcher, so a long range strategy is much more advisable. Either aim for the legs, and try and get close enough to finish the job yourself, or, in Co-op, have your partner draw the Scarab's attention from you, and fire directly at the barrier and subsequently the Core. Remember to lead your target, as the mortars travel quite slowly.
Another way to utilize the wraith is to hijack one from a pesky brute and give it to a marine, letting them bomb the Scarab from long range with its plasma mortar with great accuracy.
AA Wraith
If you are skilled enough to use the AA Wraith glitch (see How to Pilot an AA Wraith) to successfully use the vehicle in combat, it can prove quite potent against a Scarab. This tactic can only be used in the level The Storm. Once you have reached the part in the level where you are on a Mongoose with a Marine with a rocket launcher on their back, you will find two AA Wraiths. Destroy one of the them and dismount your Mongoose. (Note: make sure that the Ghosts and Choppers have also been destroyed. Otherwise they will make it very hard to get to the AA Wraith.) Use the glitch and you have a nice anti-Scarab weapon. If you are playing on co-op, you can have two anti-air wraiths as long as you don't destroy either wraith. Mop up the rest of the Covenant and wait for the Scarab. Remember that if you get out of the AA Wraith, it will explode. Take cover near the platforms with the rocket pods on them so you have a place to hide from the Scarab's withering beam. You can "button-mash" with the AA Wraith and let loose hell against the Scarab with the six Fuel Rod Cannons. Just fire on its legs till it goes down and then go around to the back and either board it or blow up the core cover and the core with the AA Wraith. Also remember that the same basic rules as using a normal Wraith against a Scarab apply here as well.
Ghost
With the Ghost, you may shoot accurately, and slowly destroy the armor on one of the Scarab's legs, therefore causing it to 'kneel down' and making it possible to board. You can try this at least on The Ark and on The Storm levels. Remember to be wary about the Scarab impaling you with one of its pointy legs, and with no one to distract the Scarab, it can be very dangerous even to approach it on higher difficulties. This strategy is only for fun, as it is considerably slower and more dangerous than any other. Also, on the The Covenant, the Ghost can be used as a way to get on board the right hand Scarab. Wait until the Scarab is facing you, and drive up the ramp of snow, activating your boosts as you go. When you land on the Scarab, get out of the Ghost and walk to the core, and destroy it with any weapon you have (except explosive weapons such as the Rocket Launcher, as the explosion radius will kill the player).
Chopper
When using a Chopper, taking out a Scarab can differ in difficulty depending on the level. If it’s on The Ark or The Covenant it's ability to boost into and destroy other vehicles is a great help. If you want to you could use the same tactic as the Scorpion, but the more fun way is to guide the Scarab over to a ledge/ramp where you can then boost off of and onto the Scarab's deck. You then can proceed to boost along the side, killing any infantry there and position yourself to either boost again into the core, or just shoot it. This is easiest achieved on The Ark, where the Scarab will usual remain around the general area of the main building in the center. This tactic is possible on The Storm, but is more difficult as first you would have to get a Chopper before it is destroyed by the marines, and getting it up the elevator is quite difficult, as it may not fit. The last danger really is when you finally get up onto the crane, where there’s the risk of one of the marines on the missile pods may hit it, or sometimes you.
On Foot
Get as many explosives as you can. Rockets, Fuel Rod Cannons, Plasma, Spike and Incendiary Grenades, Missile Pods and Brute Shots are the ONLY viable weapons. Use cover to get as close to the Scarab as possible. Ideally, you want to be underneath it. Destroy a leg, and get inside to destroy the core
Dumpster
This is only possible through the use of the so-called "Flying Dumpster" on The Storm. If both co-op players get inside the dumpster while it is on its side, you may make it fly by repeatedly pressing the Jump Button. Note: It is nearly impossible to control the dumpster and, therefore, nearly impossible to attack the Scarab. If you do land on the Scarab, proceed to slaughter its defenders and destroy the core. If you need help on flying a dumpster, there are many tutorials and other useful videos on Youtube.[3]
Character Compatibility
- Elites (Halo 2 only)
- Sergeant Johnson (Halo 2 only)
- Brutes (Halo 3 only)
- Lekgolo (theorized pilots and part of the core system of Scarabs in Halo 3)
- Grunts - passengers, use as platform for plasma cannon
Trivia

- During the level ark. If you kill everyone (including allies) and jump on the scarab whatever way you will go the scarab will follow also called 'Piloting The Scarab'. This takes place because the scarab is designed to follow you but when you go to far it follows the marines and the Covenant (not to attack them). But since everyone is dead he only follows you. Note: You can make the Scarab fall off the cliff.
- The Scarab is one of the only Covenant vehicles that is not named after supernatural beings (like a Ghost, Banshee, or Wraith), with the exception of Brute-made vehicles, although a Scarab was a mythological Egyptian giant beetle that pushed the Sun across the sky. This may be because it is in fact not a war machine but a piece of repurposed mining equipment. The Locust, a smaller but otherwise similar machine, also shares its name with an insect instead.
- In Halo 2, a Scarab Gun can be found and used in Campaign, and it evens earns you an achievement on Halo 2 Vista.
- At close range, the explosion of a Scarab has enough power to kill a Spartan (or anyone else who is close enough). It can be observed that every level on which there is a Scarab also has many vehicles nearby to make good an escape.
- In the Halo 2 Level The Great Journey you can get in the Scarab and see Johnson holding a Plasma Pistol.
- There are 7 Scarabs seen in the Halo series so far. Another 7 reference.
- In the Halo 2 Level Metropolis, if you wait until the Scarab has become trapped before jumping onto the Scarab, jump onto the leg of the Scarab (the top of the leg) you can see through the Scarab into the inside section and you can fire through, killing everybody inside.
- In Halo 3, when you shoot the Scarab's core after you take out all of the shielding, you can see what appears to be Hunter's blood coming out of it. There is also an audible 'squishy' sound when you stand next to the 'worms' in the conduits. Another hint is that Lekgolo worms control Halo 3 Scarabs is that, on the level The Covenant, after the two Scarabs land they stand up and seemingly shake themselves. It would serve no purpose for them to do this if controlled by a pilot, but might make sense if they are controlled by the worms and were shaking off the impact. However, because the Halo 2 Scarab had to be controlled to move and the Halo 3 one didn't, the Halo 2 ones are normal machines and the Lekgolo worms might only control the Halo 3 Scarabs. Some players believe that the Scarab is actually Lekgolo technology, and the Halo 2 version was just a mining machine. Others suggest that the Halo 2 Scarab was in fact a weapon, but after Johnson took over a Scarab on Delta Halo, the Covenant may have updated their tech so it couldn't be hijacked, which would explain why the Scarab core contains Hunter worms, why there is no control room on the Halo 3 Scarab, and why the Scarab changed from it's original Halo 2 version. Although this is possibly not true, seeing as the Covenant never changed their security on their ships, even after being "Hijacked" several times by Spartans and Marines.
- A Scarab is an Egyptian beetle that was worshiped as a manifestation of Khepri, an Egyptian god who drove the sun across the sky.
- In Halo 3 if you jump onto a leg of a Scarab, and the leg rises up and if you jump at the same time it will cause you to fly through the air for a considerable distance.
- The Scarab Gun is a weapon that players can pick up in Halo 2; it looks like a plasma rifle and can be found on the levels Outskirts and Metropolis as seen in a video. It fires the same projectile as the Scarab's main gun, never overheats, and can fire continuous rapid fire.
- In Halo 3 if you're on a Scarab and it blows up you die but a Brute on the Scarab or in a vehicle may survive the blast.
- In Halo 2, it is possible to look inside of a Scarab. On the level Metropolis, when the Scarab stops at the end of a level, hop on the Scarab and kill all but ONE enemy. Then, go to the main gun and hop down in the gun. Keep on one of the latches and walk towards the Scarab. You will be able to look inside the Scarab. You will also be able to detach your torso from your legs and see them walk forwards. You can try and jump on one of the Scarabs legs and get back on the Scarab, but due to it moving back and forth, it might be difficult. When looking inside a Scarab, you can shoot a Sniper Rifle or Particle Beam Rifle into it and you will see either the bullet or the beam bounce and ricochet around wildly; whether this will work depends on where you shoot inside.
- It is speculated that Scarabs are the Sharquoi mentioned in Conversations from the Universe.
- It is also notable that when a Scarab's leg is disabled, it emits a loud beep, much like that of a reversing truck (except of a lower pitch). This effect is perhaps a nod to the same death sequence (and sound) of the Juggernaut flying tanks in a previous Bungie game Marathon.
- The Scarab, once the core has been compromised, takes seven seconds to explode (going with the usual 7 "nods" Bungie puts into the games).
- The Halo 3 Scarab was recreated in Halo Actionclix and as of the game's release is the largest figure ever made by Wizkids, the game's creator. A battle-damaged version was released at the 2007 San Diego Comic Con for $250, which included the Scarab, two outdoor maps, an indoor map (representing the scarab's interior), four character cards, and rules for both the Scarab and the game itself. A normal one was also released at select retailers in November 2007.
- Template:Article Quote
- In a Halo 3 Video Documentary (ViDoc) about the new Scarab, the art directors stated that the Scarab in Halo 2 had a horrible design; Shi Kai Wang quoted "It looked like a basket with a handle and could go shopping with it."
- If you find that you may not be able to get away from a Scarab in time before it explodes, you can throw a Bubble Shield down. The shield will fully protect you from the explosion, regardless of how close you are to the Scarab, even if you are inside of it. It should be noted that doing so on the Scarab will not work, and that any large pieces from the Scarab can still pass through the shield and potentially kill you.
- In Halo 3, on the level, "The Covenant", two Scarabs are deployed by the Covenant Loyalist's fleet overhead, to defend the Citadel. However, on the previous level, "The Ark", Rtas 'Vadum claimed that "Truth's fleet lies in ruins". It could be possible that these were launched by a remaining ship as a last (failed) push to win the battle.
- A Scarab's explosion is extremely visible, as Rtas 'Vadum remarks how he saw the explosion of a Scarab from orbit, although it is possible that he may have been exaggerating.
- In the Halo 3 level The Covenant, it is possible to make the Scarab glitch underground. To do this, you must kill either of the Scarabs very quickly. If it has not yet completed it's landing animation when the killing blow hits it, the glitch will happen. This can be done with a Hornet: either drop on the deck and destroy the core ASAP, or use the Hornet to blow its back off and shoot the core. The first method will send you flying out of map, usually killing you.
- When Sgt Johnson takes control of his Scarab, he finds a way to deploy an energy shield that protected the controllers from a boarding party. Apparently the Covenant at New Mombasa either didn't have it, didn't want to use it, didn't consider the possibility of being boarded, or it could be to allow the crew to walk outside and defend the Scarab and kill the "Demon" pursuing them.
- Taking out one of the Scarab's joints, forces it to buckle and use all of its power into standing up again, which deactivates its main gun.
- The Scarabs legs can be used as weapons by crushing vehicles below. Also, if you try to board the Scarab via vehicle using the Mongoose for example, and if the timing is right, when it lifts its leg up, it can crush you in the air.
- In the Halo 2 Level Metropolis beginning cut-scene, if you have the Sputnik Skull on, it causes the truck it steps on to fly up.
- In Halo 2 on Metropolis near the end of the level when the Marines open fire moments before it's trapped it is possible to push the marines on the Scarab.
- In Halo 2, it is impossible to kill a Scarab. (Even in Metropolis), the Scarab is only downed in the cut-scene, not in actual gameplay.
- Hornet missiles do no damage to a Scarab on higher difficulties.
- On the level Metropolis, when you see the Warthog being vaporized by the Scarab, you can grenade jump out of the map and see the Scarab walking away, but it disappears afterward.
- Bungie has stated that the next Halo 3 DLC map, Assembly (formerly Purple Reign), will expand on the Scarab-Hunter mystery.
- The Scarab bears some resemblance to the tripods from the H.G. Wells novel The War of the Worlds as both are used as assault vehicles by alien species, and are unusually agile for their sizes. The numerous spider-like legs are also similar. Both use very powerful "death-beams".
- In Halo 3, when you destroy the Scarab's power core, the orange parts theorized to be Lekgolo worms appear to turn grey at "death," supporting the theory that Scarabs are manned by Lekgolo worms.
- On the Halo 2 level Metropolis, when the Scarab stops at the end of the level, you can shoot off the two turrets at the front and rear of the Scarab. When the cutscene with it being destroyed starts, the two turrets will still be there, but will seem to be a darker color shade.
- Bungie said in a video that the halo 2 scarab looked like a giant picknick basket.
- It is possible to smash most parts of its body including the turret and main cannon but doing so does not affect firing rate or damage
- In Halo 2, it is possible to jump inside the eye of the scarab. You can see and shoot both on the upper level and in the lower level of the scarab without them seeing you. You will need to keep moving forward or else you'll fall off.
- The crew of the Spirit Of Fire were the first UNSC personnel to encounter a Scarab in 2531.
- In Halo 3 on the level The Ark, if you manage to get a ghost past the Forerunner installation into the area where you fight the Scarab. Just as you come in the area you can grenade-launch the back of the ghost to fling you onto the Scarab before it walks over the un-accessible terrain. If you hang onto one of the Plasma Turrets for awhile until the scarab stops moving, you can access the core-room, blow it up and run back to the normal part of the map. If you manage this, once you get down to the part where the Scarab is supposed to fight you, it will be cut in half, with its rear body completely gone. At this point, after the Scarab lands on the beach, it will not move or attack you.
- There is also a glitch on the Scarab when it explodes. When you destroy just one leg, and the Scarab explodes, go to another leg. Start shooting it. The pieces from the leg will start to fly off, as if it were still attached to the Scarab. This glitch can be done on Halo 3.
- Another Glitch is on The Ark, when the Scarab comes by but doesn't attack, you can get on it and blow it up. When it is supposed to come back, the front half of the broken Scarab will get up and walk around, but will not attack. This glitch can be done on Halo 3.
Gallery
- Scarabbiggyprob.jpg
A Scarab near Voi.
- Scarab explodes.jpg
A scarab explodes on The Covenant.
- 1211491926 1660189468 81be5fa728 o.jpg
A destroyed Scarab.
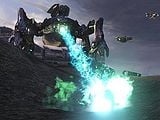
The Scarab firing it's main cannon.
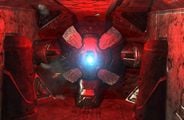
A close up of a Scarab's Core.
- 1218135664 Baydoor.jpg
The Scarab's baydoor
- 1218570208 Scarab2.jpg


See Also
Sources
- ^ Halo 3 E3 2007 Trailer
- ^ speed run of the Storm which includes this trick. Gameplay by RC Master, recorded and hosted by HighspeedHalo.net
- ^ [http://youtube.com/watch?v=icltl9KhUsY Flying Dumpster Tutorial
Template:Covenant Vehicles Template:Halo Wars Covenant Units


