Sentinel beam: Difference between revisions
From Halopedia, the Halo wiki
Shazamikaze (talk | contribs) No edit summary |
|||
| Line 4: | Line 4: | ||
{{References}} | {{References}} | ||
{{Weapon | {{Weapon | ||
|image = [[File: | |image = [[File:Sentinel Beam Transparent.png|300px]] | ||
|name = Sentinel Beam | |name = Sentinel Beam | ||
|manufacturer = Forerunners | |manufacturer = Forerunners | ||
| Line 80: | Line 80: | ||
*In ''Halo 3'', the beam appears to impact with large force, as it is able to flip an airborne Warthog with minimal effort, a feat that not even explosive weapons can achieve. This is easily witnessed during the Warthog run near the end of the game. | *In ''Halo 3'', the beam appears to impact with large force, as it is able to flip an airborne Warthog with minimal effort, a feat that not even explosive weapons can achieve. This is easily witnessed during the Warthog run near the end of the game. | ||
*In the final level of ''Halo 3'', a red Sentinel Beam can be found falling outside after [[343 Guilty Spark]] is destroyed. | *In the final level of ''Halo 3'', a red Sentinel Beam can be found falling outside after [[343 Guilty Spark]] is destroyed. | ||
==Gallery== | |||
<gallery> | |||
File:8311761-Full.jpg | |||
File:SentinelBeam-scantransparent.png | |||
</gallery> | |||
==List of appearances== | ==List of appearances== | ||
Revision as of 19:34, May 22, 2011
| This article does not meet the wiki's general standards and/or standards on layouts. You can help by cleaning this article. |
| This article does not have enough inline citations and/or does not adhere to the proper citation format. You can help Halopedia by adding citations. |
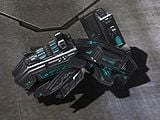
Template:Weapon The Sentinel Beam is a Forerunner directed energy weapon used by Sentinels. The weapon is particularly effective against small Flood outbreaks, and is efficient at stripping energy shields. Although typically integrated into the structure of a Sentinel, it can be used as a hand-held weapon if scavenged from a destroyed Sentinel.
Description
The Sentinel Beam was designed to effectively destroy Flood biomatter, and is intended for use against minor Flood outbreaks. Although the weapon is integrated into a Sentinel's structure, its internal power supply allows it to function independently if its Sentinel is destroyed. However, when it is not hooked up to a Sentinel, its battery life is very short.
The weapon projects a yellow-orange beam of plasma, which is capable of effectively cutting through organic matter. Continuous contact from a Sentinel Beam can be devastating even for armored opponents, and its ability to rapidly drain energy shields makes it an effective weapon against the Sentinels themselves. The weapon can temporarily overheat if 20% of the battery is used up in one continuous shot; the weapon vents excess heat in an attempt to counter this.
In the Halo games
Like the Energy Sword and the Fuel Rod Gun, the Sentinel Beam cannot be used by players in Halo: Combat Evolved without extensive use of the Dev Mode. Such usage to acquire the Sentinel Beam involves using bump possession to attain a Sentinel and then switching back to Master Chief and have him destroy said Sentinel and exchange a weapon for the Beam. The beam is not visible from the first or second person view and if the player presses the fire button a damaging red beam will appear from the center of the screen. It later became usable in Halo 2 and Halo 3. A more powerful blue version of the beam is only available in Halo 2's campaign.
In the Halo 2 campaign, the Sentinel Beam is a deadly weapon, easily capable of stripping the shields of an Elite. It possesses a decent rate of fire, amazing accuracy and range, and sustained attacks with the weapon inflict large amounts of damage. The beam's targeting reticule is also reasonably centered, making it easier to aim. The weapon's melee attack is about as strong as that of a Rocket Launcher, and is likewise considerably slow. The melee is also capable of disintegrating a Combat Form, although this process takes many hits and is impractical in most situations.
Two variants of the Sentinel Beam are seen in the campaign: the standard yellow-orange one in the silver housing, and the more powerful blue beam, which is encased in a gold housing. While the blue version is more powerful, it is also quite rare and will overheat faster than the standard version of the weapon.
The beam makes another appearance in Halo 3, with a few visual upgrades and several technical fixes. Unlike its Halo 2 counterpart, the weapon now has virtually infinite range and fires a much stronger beam that, if held consistently on an enemy, can destroy them within seconds. It is, obviously enough, extremely effective when used against Flood, and will cut down any form -- including the vaunted Pure Forms -- if aimed properly.
In Halo 3, the weapon does not spawn on any unaltered maps, and gametypes cannot be used to force it to spawn; it is only available in Forged map variants. This is likely due to the weapon's increased power and range, which make it devastating in Multiplayer matches.
Beam Variants
The blue Sentinel Beam used by the Sentinel Majors is a more powerful variant of the common yellow-orange Sentinel Beam, though it also overheats more quickly and its charge depletes faster. This difference is very similar to the relationship between the Plasma Rifle and the Brute Plasma Rifle.
The beams used by the Sentinels at Onyx were a golden color, with temperatures as high as 15,000 Kelvin.[1] Although this variation of the weapon took significantly longer to charge, it is thought to have been capable of depleting a fully shielded MJOLNIR Armor suit. Furthermore, Onyx Sentinels were capable of cooperating to generate golden beams capable of destroying entire Covenant Cruisers.
Appearances
In Halo 2, it first appears on The Arbiter, where Heretic Elites used it as a weapon to attempt to stop the Arbiter and his allies from eradicating the Heretic force, in the Gas Mine. Flood Elite Combat Forms then used it on The Oracle, since almost all of the Elite forms were once Heretic Elites. Many of these weapons appear on Sacred Icon and Quarantine Zone, where the stronger blue beam versions were available from the many destroyed Sentinel Majors.
In Halo 3, It first appears on The Ark, where it can be gained by picking one of the Sentinels being destroyed (by you, although they may attack you if you destroy too many, or the Covenant Loyalists) patrolling the area. Then it was seen on The Covenant, where some Sentinels were tasked to aid the Arbiter and John-117 in their escape from the Flood in the Ark's Citadel. When Master Chief, the Arbiter and Johnson arrive on the new Installation 04B, they had to clear the Flood blocking their way to the Control Room with the assistance of Sentinels. When one of the Sentinels is destroyed, the Sentinel Beam will remain intact. When the Monitor 343 Guilty Spark was destroyed, and the Halo ring activated, Sentinels turned on the escaping Spartan and the Arbiter. Many were destroyed in the fight and left their Beam weapons collectible to them.
Tactics
Campaign
- Ironically, it is a very good weapon against Sentinels in Halo 2 and 3, maybe because the Forerunners never planned on it being used against the Sentinels themselves.
- On the Halo 2's campaign level Quarantine Zone, provide two of your Elite allies with Sentinel Beams, and have them board the riding seats of your Spectre. Since NPCs can't run out of ammo, they make excellent weaponry. Unfortunately, further in the mission, if you manage to keep both Elites and Spectre intact to that point, you have to leave the Spectre.
- In Halo 3, the Sentinel Beam performs greatly against the Flood, as Infection Forms will burst if they are even slightly touched by the beam. Human Flood combat forms will die instantly, though Elite and Brute forms may take longer to kill. Aim for the Infection Form embedded in their chest and you'll kill it. Pure Forms are tougher due to their evolved forms; Stalkers and Ranged Forms will die by the time the weapon overheats whereas the Tank Forms will require two long blasts to take down from the stomach.
- In Halo 3, the Sentinel Beam is very useful for taking down a Brute's Power Armor quickly and effectively. It is also great for taking down Jackals and their shields as well as Grunts' armor, but it may overheat.
Multiplayer

The Sentinel Beam is quite rare in multiplayer games, and if available, it can be a powerful weapon in the hands of the well-trained.
Halo 2
- Main article: Halo 2
- This is best used in a small map like Warlock. Also good for Headlong as long as you have other more powerful weapons with you.
- If the Sentinel Beam is the only weapon you have, conserve ammo and rely on meleeing as much as possible. It has a quick and effective melee. Only fire the weapon when your target is far away, because ammo goes fast. Melee in close quarters, and avoid deadly crossfire. Replace it as often as possible.
- A Sentinel Beam is useful against unshielded foes, so use a grenade to take down the opponent's shields followed by a burst from the Sentinel Beam can quickly kill an opponent.
Halo 3
- Main article: Halo 3
- During a game of Infection, the Sentinel Beam is an effective way to rid yourself of chasing Zombie forces, but take care as to where you aim, since the beam is easy to spot and is likely to give your position away if the shot goes astray.
- When loading up vehicles, a Sentinel Beam in the passenger seat is an incredibly deadly tool. The most flexible location is in the back seat of a Mongoose, although the passenger seat of a Warthog or Prowler is also useful and advantageous to the match. The advantage of vehicle-bound Sentinel Beams is that it can 'clothesline' foes (although this technique should not be depended on).
- Steady shots can make the Sentinel Beam a great anti-sniper weapon. Fire at the sniper and then sweep the area. You will eventually meet your target, and they will have a difficult time evading the beam. While this technique is unlikely to kill a competent sniper, it is a good way to prevent them from using their scope.
- The Sentinel Beam has an extremely large power consumption rate, about 5% per second, so always carry a backup weapon and try to save the Beam for emergencies.
- The Sentinel Beam was not available in any Matchmaking playlists, until it was featured on certain map variants used in the Bungie vs World playlist and the Maption Sack playlist. Its exclusion from regular matchmaking is likely due to the weapon's power.
Trivia
- In Halo 2, if the player throws a grenade when his/her Sentinel Beam is overheating, sometimes the animation for throwing the explosive will not appear, and a grenade will just "fly" out from the player.
- The Focus Rifle in Halo: Reach and Automated Turret in Halo 3 shoot beams that are similar to that of the Sentinel Beam.
- In Halo 3, the beam appears to impact with large force, as it is able to flip an airborne Warthog with minimal effort, a feat that not even explosive weapons can achieve. This is easily witnessed during the Warthog run near the end of the game.
- In the final level of Halo 3, a red Sentinel Beam can be found falling outside after 343 Guilty Spark is destroyed.
Gallery
- SentinelBeam-scantransparent.png

List of appearances
Sources
- ^ Halo: Ghosts of Onyx, page 156


