Fireteam Zulu: Difference between revisions
From Halopedia, the Halo wiki
(→Notes) |
No edit summary |
||
| Line 3: | Line 3: | ||
|image=[[File:Marines on the Battlefield.jpg|250px|Fire Team Zulu.]] | |image=[[File:Marines on the Battlefield.jpg|250px|Fire Team Zulu.]] | ||
|formed=[[2552]] | |formed=[[2552]] | ||
|affiliation=[[United Nations Space Command|UNSC]] | |affiliation=[[United Nations Space Command|UNSC]]<ref name="CE">'''[[Halo: Combat Evolved]]''', campaign level, ''[[Assault on the Control Room]]''</ref> | ||
|branch=[[UNSC Marine Corps]] | |branch=[[UNSC Marine Corps]]<ref name="CE"/> | ||
|type= | |type= | ||
|role= | |role= | ||
|size=Six+<ref>'''[[Halo: The Flood]]''', ''page 182''</ref> | |size=Six+<ref>'''[[Halo: The Flood]]''', ''page 182''</ref> | ||
|nicknames= | |nicknames= | ||
|battles=[[Battle of Installation 04]] | |battles=[[Battle of Installation 04]]<ref name="CE"/> | ||
|commanders= | |commanders= | ||
}} | }} | ||
{{Quote|They gave it their best shot, but they didn't count on running into the biggest squad of Marine bad-asses in the Corps!|Unnamed Marine}} | {{Quote|They gave it their best shot, but they didn't count on running into the biggest squad of Marine bad-asses in the Corps!|Unnamed Marine}} | ||
'''Fire Team Zulu''' was a [[United Nations Space Command]] [[UNSC Marine Corps|Marine]] unit stationed aboard the {{UNSCShip|Pillar of Autumn}} that actively participated in the [[Battle of Installation 04]]. They encountered [[John-117]] about a third the way through the [[Assault on the Control Room]], when he stepped out onto a bridge spanning a large valley. | '''Fire Team Zulu''' was a [[United Nations Space Command]] [[UNSC Marine Corps|Marine]] unit stationed aboard the {{UNSCShip|Pillar of Autumn}} that actively participated in the [[Battle of Installation 04]]. They encountered [[SPARTAN-II|Spartan]] [[John-117]] about a third the way through the [[Assault on the Control Room]], when he stepped out onto a bridge spanning a large valley. | ||
==History== | ==History== | ||
===Battle of Installation 04=== | ===Battle of Installation 04=== | ||
{{Main|Battle of Installation 04}} | {{Main|Battle of Installation 04}} | ||
The [[D77-TC Pelican|Pelican]] that transported Fire Team Zulu was attacked by [[ | The [[D77-TC Pelican|Pelican]] that transported Fire Team Zulu was attacked by [[Covenant]] [[Type-26 Ground Support Aircraft|Banshees]] on its descent to drop off the [[Fireteam|Fire Team]]. After deploying the troops, along with a [[M12 Force Application Vehicle|Warthog]], the drop ship flew out of view into the next valley where it was later found crashed into the valley wall. The crash was not witnessed by John-117, but it is assumed that it was due to the damage sustained from the Banshee attack (seen on [[Heroic]] and [[Legendary]] difficulties).<ref>'''[[Halo: The Flood]]''', ''page 179''</ref> Fire Team Zulu was equipped with several [[Human weaponry|weapons]], including multiple [[MA5B assault rifle]]s, an [[M41 SPNKR|M41 rocket launcher]], and an [[Sniper Rifle System 99C-S2 Anti-Matériel|SRS99C-S2 sniper rifle]]. John-117, upon meeting up with the Fire Team, helped destroy a [[Type-32 Rapid Assault Vehicle|Ghost]], a couple of [[Shade]] turrets, and with a Marine manning the Warthog's [[M41 Light Anti-Aircraft Gun|turret]], destroyed a nearby [[Type-26 Assault Gun Carriage|Wraith]] guarding the valley.<ref>'''[[Halo: The Flood]]''', ''page 182-184''</ref> | ||
A [[M808B Main Battle Tank|Scorpion | A [[M808B Main Battle Tank|Scorpion tank]] was present near the dropship's apparent crash site in the next valley,<ref name="CE"/> but it does not seem likely to have been brought in by Fire Team Zulu, as a Pelican can only lift a Scorpion ''or'' a Warthog due to the Pelican's rear hitch payload capacity and the size of the vehicles. Additionally, the Fire Team Zulu Pelican can be seen carrying a Warthog from the bridge. The tank was presumably brought in earlier by another Marine unit. | ||
Later, the Master Chief encountered Marines from a previous mission | Later, the Master Chief encountered surviving Marines from a previous mission, much to [[Cortana]]'s surprise.<ref name="CE"/> | ||
Fire Team Zulu then assisted | Fire Team Zulu then assisted John-117 as he fought his way through the valleys. When the Master Chief had to ascend the final main valley in order to cross a pair of bridges overlooking the valley, they did not follow because evac had become available.<ref name="CE"/> | ||
==Trivia== | ==Trivia== | ||
*In ''Halo: Combat Evolved'', the voice of [[ | *In ''Halo: Combat Evolved'', the voice of [[Sergeant]] [[Avery Johnson]] issues from the Pelican, calling for assistance. This is not possible because he was in the swamp near the [[Flood containment facility]] with [[Jacob Keyes|Captain Keyes]] at the time. Most likely, the voice heard in-game belongs to the voice actor of Johnson, but was intended to represent the voice of another character. Alternatively, Bungie only created two sergeant models, so they had no choice but to place Johnson into the level. | ||
*When the Pelican first landed, there were already Marines deployed in the area, along with an extra Warthog. The Marines that were already there do not seem to react to friendly forces or enemies and will just stand there. If the player manages to get down | *When the Pelican first landed, there were already Marines deployed in the area, along with an extra Warthog. The Marines that were already there do not seem to react to friendly forces or enemies and will just stand there. If the player manages to get down to their location (using [[Assault on the Control Room Shortcut|a glitch]] or with mods) and shoot them, the other Marines that came out of the Pelican will turn on the player. The Marines that descend from the Pelican are normal and will move and react to friends and enemies. | ||
*Some of the Marines did not leave the Pelican that descended, and bailed out after the Pelican was supposedly shot down. These Marines are presumably the ones later encountered in the second valley, seen fending an approaching wave of Covenant approaching their position and Scorpion tank near the alleged dropship crash site. | *Some of the Marines did not leave the Pelican that descended, and bailed out after the Pelican was supposedly shot down. These Marines are presumably the ones later encountered in the second valley, seen fending an approaching wave of Covenant approaching their position and Scorpion tank near the alleged dropship crash site. | ||
*The crashed Pelican's number reads "E419". This is just a generic marker of most dropships in ''Halo: Combat Evolved''. | *The crashed Pelican's number reads "E419". This is just a generic marker of most dropships in ''Halo: Combat Evolved''. | ||
| Line 49: | Line 46: | ||
==Notes== | ==Notes== | ||
*Fire Team Zulu had at least one [[ | *Fire Team Zulu had at least one [[corporal]] and one [[sergeant]]<ref>'''[[Halo: The Flood]]''', ''page 185''</ref>. | ||
==Sources== | ==Sources== | ||
Revision as of 18:10, June 24, 2016
| Fireteam Zulu | |
|---|---|

| |
|
Active: |
|
|
Affiliation: |
|
|
Branch: |
|
|
Size: |
Six+[2] |
|
Engagements: |
|
- "They gave it their best shot, but they didn't count on running into the biggest squad of Marine bad-asses in the Corps!"
- — Unnamed Marine
Fire Team Zulu was a United Nations Space Command Marine unit stationed aboard the UNSC Pillar of Autumn that actively participated in the Battle of Installation 04. They encountered Spartan John-117 about a third the way through the Assault on the Control Room, when he stepped out onto a bridge spanning a large valley.
History
Battle of Installation 04
- Main article: Battle of Installation 04
The Pelican that transported Fire Team Zulu was attacked by Covenant Banshees on its descent to drop off the Fire Team. After deploying the troops, along with a Warthog, the drop ship flew out of view into the next valley where it was later found crashed into the valley wall. The crash was not witnessed by John-117, but it is assumed that it was due to the damage sustained from the Banshee attack (seen on Heroic and Legendary difficulties).[3] Fire Team Zulu was equipped with several weapons, including multiple MA5B assault rifles, an M41 rocket launcher, and an SRS99C-S2 sniper rifle. John-117, upon meeting up with the Fire Team, helped destroy a Ghost, a couple of Shade turrets, and with a Marine manning the Warthog's turret, destroyed a nearby Wraith guarding the valley.[4]
A Scorpion tank was present near the dropship's apparent crash site in the next valley,[1] but it does not seem likely to have been brought in by Fire Team Zulu, as a Pelican can only lift a Scorpion or a Warthog due to the Pelican's rear hitch payload capacity and the size of the vehicles. Additionally, the Fire Team Zulu Pelican can be seen carrying a Warthog from the bridge. The tank was presumably brought in earlier by another Marine unit.
Later, the Master Chief encountered surviving Marines from a previous mission, much to Cortana's surprise.[1]
Fire Team Zulu then assisted John-117 as he fought his way through the valleys. When the Master Chief had to ascend the final main valley in order to cross a pair of bridges overlooking the valley, they did not follow because evac had become available.[1]
Trivia
- In Halo: Combat Evolved, the voice of Sergeant Avery Johnson issues from the Pelican, calling for assistance. This is not possible because he was in the swamp near the Flood containment facility with Captain Keyes at the time. Most likely, the voice heard in-game belongs to the voice actor of Johnson, but was intended to represent the voice of another character. Alternatively, Bungie only created two sergeant models, so they had no choice but to place Johnson into the level.
- When the Pelican first landed, there were already Marines deployed in the area, along with an extra Warthog. The Marines that were already there do not seem to react to friendly forces or enemies and will just stand there. If the player manages to get down to their location (using a glitch or with mods) and shoot them, the other Marines that came out of the Pelican will turn on the player. The Marines that descend from the Pelican are normal and will move and react to friends and enemies.
- Some of the Marines did not leave the Pelican that descended, and bailed out after the Pelican was supposedly shot down. These Marines are presumably the ones later encountered in the second valley, seen fending an approaching wave of Covenant approaching their position and Scorpion tank near the alleged dropship crash site.
- The crashed Pelican's number reads "E419". This is just a generic marker of most dropships in Halo: Combat Evolved.
- The player can, with some luck and skill, board the Pelican when it flies over the bridge in the beginning of the level. When it flies to the second valley, one can clearly see a crashed Pelican, and the flying Pelican will crash to somewhere further on.
Gallery
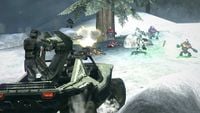
Fire Team Zulu fights for the valley.
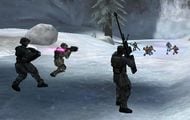
Fire Team Zulu's CO sharpshooter spots Covenant forces in the area.


List of appearances
- Halo: Combat Evolved (First appearance)
- Halo: The Flood
- Halo: Combat Evolved Anniversary
Notes
Sources
- ^ a b c d e f Halo: Combat Evolved, campaign level, Assault on the Control Room
- ^ Halo: The Flood, page 182
- ^ Halo: The Flood, page 179
- ^ Halo: The Flood, page 182-184
- ^ Halo: The Flood, page 185


