Turf
From Halopedia, the Halo wiki
| This article does not have enough inline citations and/or does not adhere to the proper citation format. You can help Halopedia by adding citations. |
Template:Multiplayer Map Infobox
Turf, is a multiplayer map that was added for Halo 2 as part of the Killtacular Pack.
Description
While Turf is actually a very small map, it gives the player the sense of large scale map. It is a small city block, complete with convenience stores, garages, and a broken down Type-47A Scarab. The map is set in Old Mombasa, and depicts the site of a skirmish between UNSC Marines and Covenant infantry following the detruction of a Type-47A Scarab, having been destroyed via a MAC strike by UNSC Brasidas.[1] In the background of the map, the bridge crossed by John-117 in the campaign level Metropolis can be observed, alongside the presence of the Mombasa Tether.
Territories
- Street
- Scarab
- Warehouse
Crates
There are numerous large, blue crates on Turf. Two of them have the number "0" written on them and contain flammable solid. These crates have a warning on the back, as opposed to a bar code number. Another crate has a "2" on it, and is the only other kind of crate besides "0" to have a warning instead of a bar code. This crate contains toxic materials. Another two crates have a "3" on them. These ones contains compressed oxygen, and have a bar code on the back: 8180 5213 9073 2807 7972. Two other crates, with a "4" on them, contain plutonium, a radioactive material, and have the same bar code on the back. The last crate, with an "8" on it, contains flammable solids, but probably not the same solids as the "0" crates, as it has a different number.
Strategies
Turf is a fantastic map for ambushes. There are many boxes and crates littering the map; these can be used for cover and to lie in wait for opponents. Many game variants, especially those that are objective based involve a defensive role. The vast amount of strategic cover in this map makes it especially easy for successive defensive and flanking maneuvers.
Another key in dominating the map is to take over the large "L" shaped section of the map typically referred to as the courtyard, or the street. This is most commonly achieved through extensive use of the sniper rifle and players to cover the person sniping. The other key factor is controlling the "Noob Combos". This allows players to easily control the large and small sections of the map, although the noob combo is most effective in medium range encounters which are abundant in Turf.
There are two large beams on the buildings on the street. When hit with a melee attack, these beams can fall and serve as a convenient walkway.
There is a way to get to the roofs of the buildings next to the medic hut. To do this, jump on the ledge that is to the side of the medic hut. There will be on the wall black knobs that stick out a bit, just enough for you to jump on them. Jump first on the one that has no awning on top of it. Then jump to the awning that is next to it. You can then jump from there up unto the top of the back wall behind the medic place, and from there run along the tops of the buildings towards where the Warthog spawns. This is a very useful spot if you have the some combination of Rockets, Snipers, and Battle Rifle. But watch out, if you're not careful and the other team has either the rockets or snipers its not too hard to take you down. This spot is an excellent strategic position for the game type Zombie.
A handy and ever so useful shotgun appears right next to where the Warthog spawns. But the shotty comes at a price, the sniper rifle lays on a higher elevation exactly opposite of its spawn point and thus makes the shotgun wielder easy to attack. It is also close to the Brute Shots, which can and will ruin the close range specialist's day if a foe grabs one. And finally, it is placed right next to a destroyable object, the Warthog.
By the fallen Scarab is a Brute plasma rifle. When combined with an SMG it is a terrifying weapon, even a new player wielding it is dangerous due to the rate of fire and pure power the weapon combo. It is very effective overall on this map, as it can force snipers to unzoom and take down enemies easily at medium to close range. If the SMG doesn't kill the target, a swift melee attack will finish them off.
Another useful combo of weapons is the Brute Shot and the battle rifle. The battle rifle is an excellent mid to long range weapon, and the Brute Shot is good for long range attacks. The Brute Shot's bayonet also makes it a useful close-range melee weapon, as it kills in one hit.
Glitches
- If you have a sniper rifle and some frag grenades, you can get to a point at the top of the level and move around to snipe. Equip overshields, and have a teammate get in the Warthog. Go to the street in front of the Human Command Post, and have your teammate drive at you to ram so that you will be hit towards the left side of the street from the Command Post's view. Drop a grenade right in front of the Warthogs path, and jump forward at the grenade. If you time it correctly, you will be launched incredibly high, and fly through the invisible walls. From there, you can use a sniper rifle to take enemies down, and if you move frequently, it will take a long time for opponents to spot you. Brute Shots and rocket launchers work well too, and if you are low on ammo, you can jump off with a sword.
- A trick can be used to reach extreme heights, overlooking the whole level. With overshields turned on, one must stand on the bar jutting out of the defensive human shield and shoot the shield in front of you with a rocket launcher, thus propelling you into the air for a bird's-eye view of the whole level.
- To get on top of the Scarab, you actually need to be a Juggernaut, with a rocket launcher. Jump on the central crate in the rubble, then Rocket Hop with splash explosion onto the Scarab's side, next to the left back leg. Then Rocket Hop backwards on top of the Scarab. This makes for an excellent sniping spot. No one will suspect you're up there!
- It is possible to go beyond the limits of the intended play space using basic sword-lunging techniques. The most popular and easiest way to do this is by standing on either side of the building with the blown out walls (45 degrees to the right of the offensive spawn, near the command post) and lunging toward a player on the opposite side. From there the players should be able to explore the rooftops.
- The Turf Vacation can be done on this level.
Easter Eggs

- There are two soda machines with Rooster Teeth logos on Turf; one near the makeshift medical camp, the other in the warehouse with a silhouette of a rooster.
Trivia
- You can shoot out the green lights on the bottom of the Scarab. They will crack, and flicker on and off.
- This is the only map to feature the Brute Plasma Rifle as a map default weapon in Xbox Version of Halo 2. District, a Halo 2 Vista map, is the only other map to spawn one by default.
- On the walls you can see newspaper clippings of Master Chief firing an M247 machine gun. These depict the original Outskirts level.
- If you kill yourself with a rocket launcher by going inside the medical tent, aiming at the ceiling and firing, your body will fall on its side and one of its arms will wave around spasmodically.
- A Hog advertisement can be seen on this level. It is on the side of the Oh2-Hnzu building facing an alley-way by the medical station.
- The now-cancelled Halo Online was to feature a remake of Turf known as Icebox. The map was to be set in Tyumen, Russia.
Gallery
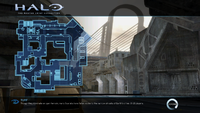
Map of the map in Halo: The Master Chief Collection.
- Turf overhead.jpg
Overhead view of Turf map.
- H2 mp turf2.jpg
Another view of the Scarab on Turf.

Sources
- ^ Cite error: Invalid
<ref>tag; no text was provided for refs namedmombasa waypoint
See also
| |||||||||||||||||||||||||||||||


