The Pit
From Halopedia, the Halo wiki
Template:Multiplayer Map Infobox
| “ | Software simulations are held in contempt by the veteran instructors who run these training facilities. | ” |
The Pit[1] is a symmetrical Halo 3 multiplayer map. It was remade in Halo 4's Bullseye Map Pack as Pitfall.
Setting
- Main article: UNSC Training Facility Bravo
While most contemporary combat simulations occur in the holographic and pneumatic world of War Games, UNSC Training Facility Bravo - alongside others located throughout the East African Protectorate - offer unfettered, live combat in real world settings. This methodology is the pride and joy of old-school drill instructors, whose lament the rise in illusory combat environs. Ironically, this site was then replicated in War Games as The Pit, a testament to its time-honored combat value.[2]
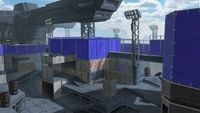
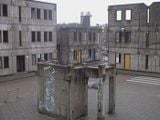
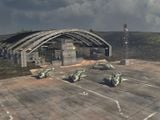
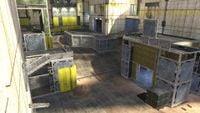
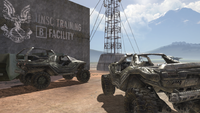
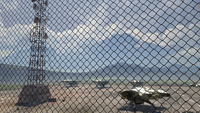
The facility itself is set in a large aircraft hangar. Although a fence prevents trainees from leaving the arena, multiple D77H-TCI Pelicans, Scout Warthogs and M831 Warthogs can be seen on the facility's runway, with Mount Kilimanjaro looming in the distance. The interior of the facility has numerous hallways and platforms with which to simulate a combat environment, and motion-activated pop-up targets of Jiralhanae wielding Spikers and Kig-Yar Snipers. The map also has a control room with multiple readout screens.

Design
Even though it is a symmetrical map, The Pit is multi-leveled, giving players many avenues and routes via ramps and walkways in which to hide and/or engage the enemy. While each side of the map is identical in geometry and weapon placement, several power weapons and power-ups exist in the central area. A sniper rifle sits on the bottom level of each base.
The Bases
On either side of the map exists an identical base with identical weapon and spawn points. Each base consists of an upper and lower area, which mainly designates where the sniper rifle and shotgun are located. The Upper and Lower bases are connected by walkways and ramps, and offer plenty of cover from enemy fire, as well as an assortment of weapons and equipment. The bases have very long sight lines and if a sniper were on top he/she would have a clear view of the other base.
Upper Base
Also known to players as "Sniper Tower," this area of the base covers the three-leveled structure where the sniper rifle, Brute Shot, and a regenerator spawn. From the top of the tower, players can see directly into the other team's tower. Snipers often use this perch, as they have a field of view over their side of the map. This area of the base is located closer to the Sword Room and overshield Alley, giving players quicker access to those power-ups. A machine gun turret is also located at the top of the tower, but players often become easy prey to snipers when mounting this weapon (the turrets are also in clear view of each other).
Lower Base

The area of the Lower Base is adjacent or similar to the Upper Base, but is considered much larger. In this area, players spawn in either a rectangular room with ramps leading to the shotgun or Upper Base. The Shotgun spawns in the farthest corner in a small hallway curving around the edge of the map. This open area features much of the combat, as it is multi-leveled with ramps that access the Rocket or Camouflage Hall, as well as the High Bridge and Sword Room. Players can pick from a selection of a battle rifle, Mauler, or two Spikers. Above the Lower Base is a room which is only accessible by re-spawning or by butterfly jumping in it. This room is an excellent sniper perch. It is also a very effective hiding place in game types such as Team Doubles.
Rocket Hall

This area of the map is aptly named for the rocket launcher that can be found here. It is often the area of heavy fire in the start of a round or game, with players rushing to secure the power weapon. Players spawning can also pick up a battle rifle or needler on their way to the hall to assist in killing the enemy. This hallway essentially serves as a connection point between the Lower Base on each side of the map. The needler run is usually an effective but suicidal attempt, so simply lob in grenades and take out any eager chargers with the battle rifle. Do not go in for the weapon until all is clear.
Camo Hall

Also referred to as the "Green Home" or "Green Box", players rushing the rocket launcher often deviate from that path, and go the route of the active camouflage power-up. This hallway is parallel to the Rocket Hall, and allows players to flank up behind the opposing team in hopes of killing them and allowing your teammates to secure the rocket launcher. This is the central-most location of the map, and players have access to any area from here. Walkways or ramps can lead players to the Upper Base or the Lower Base, the Rocket Hall, and the Sword Room.

Sword Room
Often called "Blue Room", "Control Room", or the "Sword Spawn" by players, this area houses the energy sword. Although the sword is located here, this area sometimes goes uncontested due to the claustrophobic nature of the curved hallway and limited cover; however, teams will sometimes camp in this room after securing the close range power weapons, such as shotguns and the sword, with the regenerators also being valued as it makes grenade kills virtually impossible. It is very difficult to flush players out with grenades due to the curvature of the walls, which also make for devastating ambushes against a reckless player charging into the room unprepared.
It is possible to throw grenades through a gap in the top of wall parallel to the entrances. It's also possible to get a power drain through the gap with a little luck and a good jump. A ramp on each side of the Sword Room gives players an entry and exit way to either Upper Base or Overshield Alley. Players may also take the high route, and travel across the "High Bridge" granting them access to the center area of the map. Maulers spawn on both ends of the tunnel closest to the "High Bridge", and a power drain is in the center of the bridge with plasma rifles to the sides, near the ramps leading to the power drain.
This area was originally supposed to feature real-time monitors of certain points on the map. Each screen originally displays what a certain camera placed on the map sees. This feature was removed during the development of this map due to network lag, but there are some modded maps that show the camera footage.
Overshield Alley

Located directly under the Sword Room, the Overshield Alley has three ways in and out. The alley runs parallel to the Camouflage and Rocket Launcher halls, essentially connecting both Upper Bases. In the center of the alleyway, adjacent the overshield, players can escape enemy fire by running underneath an opening in the wall, under the "High Bridge". Players can also find a battle rifle at either end of the alleyway, granting them some long-range support. The overshield is one of the key items before you go up to the Sword Room. So if it is possible, try to get the overshield before you charge in or be the target of the enemy sword.
Strategies

- Securing the rockets is very risky at the start of the game, so the best alternative is to hold off the enemy and get someone to flank through the Camo Hall.
- At the start of a match destroy the fusion cores before flanking; typically a grenade sails next to them if they are still there, destroying anyone foolish to stand close. In contrast throw a grenade so it ricochets off the wall to roast opponents attempting to flank you.
- Holding a sniper rifle and an energy sword on one of the Sniper Towers is one of the strongest positions; there are only a few things to be afraid of:
- When on the Sniper Tower, remember your weak points: the vent and the ramp. If you have either a shotgun or an energy sword, you can protect or take one of these fortified positions with little effort.
- People tend to throw a lot of grenades up, creating a cluster bomb effect, but knowing to stand where the grenades won't land is an easy way to survive. Take into account where the walls are behind your position, as the grenades can and will come back.
- A sniper on the other side, but if he is taken out, there is very little ranged opposition.
- There are often snipers who shoot through the gaps of the panels on the Sniper Tower. The only solution is to flank them, or get into a position where they will have to come out of hiding.
- The Brute Shot can be devastating if wielded on top of the Sniper Tower. A player wielding the Brute Shot looking at the Sword Room and the Overshield Alley can lay waste to anyone approaching, giving the sniper an increased sense of security.
- Holding the sniper rifle and the sword means it is best to stay between the Sniper Towers and the Sword Room, constantly moving between these areas to make it hard for enemies to close in on you, often giving you a chance to snipe them from a different area while they check where you were.
- Yet another popular tactic concerns the "Sword Room". By securing the Sword Room, one team has total control over the sword, and any future swords that may spawn there. At some point, all of the securing team's members may have a sword. In the cramped hallways surrounding the Sword Room, this is a daunting perspective. This tactic is flawed because both the shotgun and rocket launcher are outside of your "base". However, team members can secure enough heavy weapons and camp inside the base.
- Holding the building where the sword spawns can be effective. Although there are multiple entrances and exits, shotgun wielders can be exceptionally dangerous here.
- Remember that a player can be killed through the cracks of the metal plates on the Sniper Tower.
- On an Assault match, grab the Overshield and go for the bomb in the corridor.
- If at the start of a match, you go straight to the Sword Room, grab a Mauler and leave the sword. Enter the Sword Room and wait around the corner, and when someone enters, they will see the sword and run towards it, not paying any attention to you, giving you an easy assassination or Mauler kill. If you are too late and the opponent has already gotten the sword, try shooting the Mauler and meleeing at the same time, you should be able to beat him/her down and get a Bulltrue.
Note: If you see someone on your Motion Tracker before you are in position, deal with him/her before continuing.
- Some sword campers like to stay near the corners, killing any opponent that passes by, simply throw a few grenades so it bounces off the wall. If they survive, they may retreat, this is a great time to strike.
- If you are about to walk past the Sword Room and want to make sure nobody is in there, get on the side of the room where there is a wall. You can jump up. There is a hole between the wall and the ceiling. You can see anybody in there. If you're skilled, you can aim and throw grenades or shoot in there at campers.
- When you or a teammate has the sword, a good strategy is to both stand in the Sword Room, either side of the doorway and not move as you will not show up on the Motion Tracker. Then, an unsuspecting enemy will come looking for the sword, and you can pop out of nowhere and kill them.
Forge
- You can place a Receiver Node outside the chain link fence; however, it will vanish after a few seconds, so to make use of it, you need to have a Sender Node ready nearby. You will die if you remain outside of the map in Player Mode for longer than a few seconds; players in Edit Mode only seem to die in certain corners.
- You can also get out of the map using a machine gun turret. Forge the turret facing inwards to the map. Mount it, look forward (into the map) and straight up, and then dismount, entering Edit Mode as you do so.
- If you destroy the Troop Transport Warthog behind the fence, you can drive it, but you will still die after a few seconds.
- Some items will, if placed behind the fence, but very close to it, remain on the map instead of vanishing instantly or after a few seconds. Fusion coils and weapon holders behave in this manner.
- It is possible to create a near-impenetrable fortress using the entire "building" that houses the "Sword Room," which is great for Infection and One Bomb games.
- It is possible to go up some of the rooftops in this map using grav lifts or teleporters; however, you will die after a few seconds.
- Adding Mongooses to the lower floors of the Upper Bases directs focus to the fence-side center of the map and removes attention on guarding the center of the map and the rocket launcher. It is also possible for Mongooses to flank the enemy base by driving through the Overshield Hallway and up the fan near the back walk. This can be balanced by adding a trip mine along that path and placing fusion coils under the central bridge.
Warthogs
Outside of the map, there are three Warthogs, two of them are damaged Scout Warthogs, but the other one is an undamaged Troop Transport Warthog. The Troop Transport Warthog can be driven if brought into the main section of the level. To do this, you must glitch a teleporter on the other side of the fence. Once there, destroy the Warthog. After a very long time (15-45 min.), the Warthog will respawn. To get it inside of the map (so that you can drive it without being killed by the Guardians within five seconds), you must use grav lifts and flip the vehicle to get it onto an elevated gray platform outside of the map, and then onto yet another platform, from where it can be pushed into the map. You must be quick, if you are not quick enough, the Warthog will disappear and you will need to wait until it respawns back outside the map.
It is also possible to bring the Troop Transport Warthog inside the map by modding. It will respawn inside the map, but it will still take a very long time for it to respawn and you will still need to destroy it at least once for it to be drivable.
Just like in the campaign, the back seats cannot be ridden in, but players can simply stand or crouch on them.
Variant: Pit Stop
| “ | Some say the attics are haunted by fallen trainees that died camping. Warlocks are another popular theory. | ” |
Pit Stop is a map variant released to improve the gameplay balance. It was added into matchmaking with Title Update 2 on 9/23/08, and was added along with Boundless, Epilogue, and Sand Tarp. The following is a list of changes made;
- The map now has "inaccessible spawn hives". This means that the player cannot spawn in the room above the flag/bomb spawn. There are also invisible barriers blocking it off from people going up there via Brute Shot jumping, grenade jumping, and double jumping.
Trivia
Production notes
- The Pit's internal name during development was Cyberdyne and was first discovered shortly after the release of the Halo 3 Beta. However, it was referred to at least once before official reveal under the name of "Gym Class".[1]
- The codename that was given to The Pit, "Cyberdyne", is the name of the company in the Terminator movies that helps recreate artificial intelligence.
- The Pit's final name is a reference to The Wire. It was named by Joe Tung, as it's "where all the deals went down".[3]
- In the initial conception of The Pit, developrs Steve Cotton and Chris Carney were inspired by architecture of Bernard Tschumi. They were inspired by cultural centres in France, in which several buildings were built underneath one large roof. An early point of the Pit's design was to use light to differentiate both sides of the map, with one side being in light and the other in shade. This was eventually rotated, with the light area being the light streaming into the hangar from the runway and the dark area being the back wall of the hangar.[3]
- In this original design for The Pit, the map was to be the size of a small town roughly the size of Halo: Combat Evolved map Hang 'Em High, with action in the rooftop area and on the ground. In this design, the map would be two storeys high, with players fighting to control a street running down the middle while each team controlled half the town. Inspiration was later taken from Halo 2 map Turf, while playing around on the roofs. Players would be able to grab the flag out of the base and get onto the rooftops with it, and "be like Spider-Man"; jumping and running along the roof back to the friendly base. To prevent situations like those common in Zanzibar CTF, the flag would be spawned on the lower level and players on the top, so defenders have quick routes to return the flag.[3]
- The Pit was originally designed to have a Forerunner landscape with machines running around the map, and built into a cliff face. Once blocked out, the map was a "disaster". The middle street wasn't controllable, so it was decided to make the street into a wall. The bridge crossing the street became the camo hallway in the final build.[3]
- The inspiration to set the map in a training facility came from a piece of concept art by Isaac Hannaford set in a rrealistic modern day facility, built out of plywood, metal and spray paint. One concept produced by Paul Russel set the map in a human pump station, with a waterfall on one part of the map. This idea would set the level in a human military base that would later be reused and turned into the Crow's Nest level in the campaign. The map itself would be set in a cave with a waterfall leading into a pool, where players would be able to jump off the map and die.[3]
- In creating the aesthetic of the final level, concept done by Lee Wilson for Mindhunter was used for inspiration. In doing concept production for that film, Wilson had been sent to a secret facility in Holland to gather reference that he nicknamed "Crime Town". The facility had molded concrete structures that could be reconfigured or detached for training missions. From there, the artists "put in a UNSC flavor – some metal bars, little connectors, and panels. And thus The Pit was born".[3]
- The control room on the map was added with the original intention being that the monitors would actually display CCTV footage from the cameras placed around the map. The room is heavily enclosed due to how expensive this rendering is, but at one point the system was fully working and standing in the control room would let players see what was going on in other areas of the map. The cameras would operate like AI and follow players near them, but had to count as another player due to how much processing power they needed to work correctly. Because of this, it was cut but the control room remained as the sword room.[3]
- As production got going properly, the Pit's layout changed very little with the main exception being the reduced verticality from the original concept. Originally, however, the Active Camo would have spawned in a room down a ramp. This was removed and changed to the green corridor known in the final map variant.[3]
- At one point, the man cannon fans were to be mobile forge objects that could be placed anywhere.[3]
- During development, the Pelicans on the runway were placed in a layout to emulate Black Hawk Down.[3]
Miscellaneous
- Inside the room containing the energy sword, there is a phone that you can melee and will fall on the floor. Then you melee it until it is upside down. If you zoom in on it, you can see a Windows Logo.
- The Warthogs outside the map can be flipped, blown up and driven (only after it re-spawns again). The player will still be killed by the Guardians while in the Warthog if outside the map. It is possible to bring the Warthog into the gameplay area in Forge.
- The items outside the fence can be deleted, however, it does not give you any money and sometimes the number of that item on your list won't go up.
- Throughout the level, messages can be heard on the public-address system. Unfortunately, most likely due to the way sounds are saved in Halo 3's Films, most of these sounds will only play once and cannot be heard again, even if you rewind the film. Some known messages are:
- "This is a reminder: The supporting firing range is off-limits every other Sunday."
- "This is a reminder: Tampering with fusion cores is a disciplinary offense."
- "This is a reminder: Fusion cores should not be stacked more than one high."
- "Clear the runway: Hornets inbound."
- "The white zone is for unloading and loading only." (reference to the movie 'Airplane')
- "Will the owner of a blue SUV please move their vehicle."
- The voices were recorded by Lars Bakken and C. Paul Johnson.[3]
- The name BARRET is stenciled on the tarmac among the Pelicans, which can only be viewed by escaping the map boundaries in Pan Cam. The name is a reference to Bungie level designer, Chris Barrett.
- The screens in the ops centre show the same readouts as those in the mission Crow's Nest.
- Halo 5: Guardians features a remake of The Pit with Breakout aesthetics called Simulation, introduced as part of the Community Breakout playlist.
Gallery
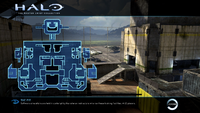
The Pit Map.

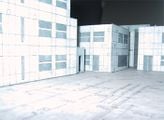
An early side view of The Pit.
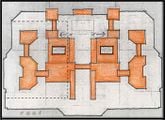
An early layout of the Pit.

An early layout of the Pit.
Concept art of The Pit by Isaac Hannaford.
Paper models of "Crime Town".
A reference photo of "Crime Town" taken from the production of Mindhunter, used for reference in The Pit's aesthetic.
An outside view of The Pit
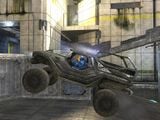
A player using a Troop Transport Hog on The Pit.
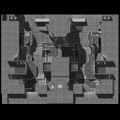
A birds-eye view of The Pit.
The Pit's Upper Base in view.
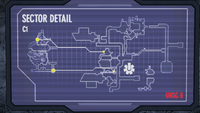
The base schematic for the Crow's Nest base.
A readout of Seismic Activity on Earth.
A full map of seismic activity on Earth to go with the previous slide.
A troop transport and an unarmed Warthog outside the map.
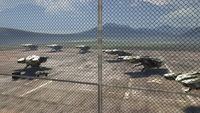
Pelicans outside the map.
The view of Mt. Kilimanjaro.


Sources
| ||||||||||||||||||||||||||||||||||||||||


