Reynolds
From Halopedia, the Halo wiki
- Jiralhanae Captain: "Tell me its location!"
- Reynolds: "Kiss...my...ass..."
- — Reynolds refusing to reveal Crow's Nest's location
Gunnery Sergeant Reynolds is a staff non-commissioned officer and an infantryman in the UNSC Marine Corps during the Human-Covenant War.[1][2]
Biography

Reynolds was present during the Battle of Earth. On the morning of November 17, 2552, Reynolds and his squad of Marines were deployed to the jungles near Mount Kilimanjaro as part of the UNSC force tasked with retrieving SPARTAN John-117, who had crash-landed in the area after exiting the Forerunner Dreadnought containing the Prophet of Truth. While his team was searching for John-117, he alerted Sergeant Major Avery Johnson to the fact that there was Covenant activity nearby. However, doing so gave away his position and he and his squad immediately came under attack by a Phantom dropship and a Jiralhanae Chieftain, and all of Bravo, except for him, were killed.
Reynolds was soon captured by a Jiralhanae Captain. The Covenant soldier held him atop a log bridge and demanded the location of the UNSC base Crow's Nest, but Reynolds' only response was "kiss my ass." Just as the Jiralhanae was about to kill him, John-117's squad intervened and killed the alien. Reynolds then jumped off the bridge, grabbed a nearby assault rifle and informed the Spartan of his situation. Reynolds then joined the Spartan in his mission to rendezvous with Sergeant Avery Johnson at the extraction point by the river. Johnson's Pelican and it's escort were both shot down by Covenant Banshees. Reynolds and the Master Chief continued through the jungle and saved Johnson, who had been captured by the Covenant. Killing all Covenant present, including a Jiralhanae Chieftain, the UNSC forces were able to return to Crow's Nest.[1]
Upon returning to Crow's Nest, the UNSC forces soon found out that they had been discovered by the Covenant, and were going to be attacked. Knowing that the base would likely be overrun, the Marines, led by Commander Miranda Keyes, begun to prepare a massive bomb intended to be detonated to deny the Covenant the base. Reynolds was one of the Marines tasked with the wiring of the bomb.[3]
Reynolds ultimately survived the destruction of Crow's Nest by taking refuge in the base's motor pool. Rallying the surviving Marines in the area, Reynolds destroyed a security camera that may lead surviving Covenant forces to them. Rendezvousing with John-117 once again, Reynolds ordered any of his men that could still walk to take the surviving Warthogs in the motor pool out of the base. They aided a group of Marines who were under attack by Covenant scouts near the base entrance and allowed them to mount up. Reynolds tried to reach Commander Keyes but was unable to as the COMs had been scrambled by the destruction of Crows Nest.[4]
Reynolds soon received a distress call from Gunnery Sergeant Stacker, who had been leading a convoy intended to bring supplies to the beleaguered UNSC forces in Voi. The convoy was unfortunately strafed by Banshees and while pinned down, a large Covenant ground force attacked them. Fortunately, Reynolds and John-117 were nearby and were able to clear out the Covenant presence. The UNSC force continued onward, but were forced to leave their vehicles shortly after as part of the highway had been destroyed. Continuing on foot, Reynolds and his men freed up another squad of Marines under attack. After holding off many waves of attacking Covenant troops, including a Wraith tank, several resupply Pelicans moved in, providing more Warthogs and troops. Mobilizing once again, the UNSC forces punched through a huge Covenant vehicular force and breach the final Covenant defensive lines barricading the way into Voi.
Battle of Voi

- Main article: Battle of Voi
Reynolds and his platoon pushed into Voi, entering the Traxus Factory Complex 09, which had mostly fallen to the Covenant by this point. Their objective was to destroy all Covenant Anti Air batteries that were preventing Fleet Admiral Hood's ships from engaging the Prophet of Truth's Forerunner Dreadnought. They pushed through the first area of the facility, catching many Covenant troops off-guard. They then entered the first lake bed, where a single AA Wraith was located. Succeeding in destroying the Covenant armor, Reynold and his men continued through the facility, meeting with a group of Marines with rocket launchers and Mongoose ATVs, who were preparing to assault the next lake bed, where more AA was located. After a huge battle, which saw the UNSC forces destroy many Covenant vehicles, as well Scarab, Reynolds and his men emerged victorious.[5]
Later, when the Flood-controlled battlecruiser crashed in the area, Reynolds was one of the few Marines who survived the onslaught of the parasitic creatures. He was ultimately able to escape from the city before it was glassed by the newly-arrived Sangheili Fleet of Retribution. After the Flood were contained, the UNSC forces regrouped up on the Sangheili Carrier, Shadow of Intent where Admiral Hood and Fleet Master Rtas 'Vadum discussed an assault on Covenant forces through the Portal.[6]
Battle of Installation 00
During the Battle of Installation 00, Reynolds, Stacker and Johnson organized a makeshift UNSC Marine armored unit from the Forward Unto Dawn for an assault on the Ark. He helped Sergeant Stacker and John-117 lead a platoon of M808 Scorpion MBTs against a battalion-sized Covenant armored force, along with a Scarab outside of the Cartographer building. The UNSC were successful in destroying all Covenant forces and allowing SPARTAN John-117 and a small strike force to proceed into the complex.[7]
Later in the battle, Reynolds was part of an strike force with the goal of deactivating three of the barrier towers providing shielding for the Citadel in which the Prophet of Truth had taken refuge and planned to activate the Halo rings from. He was part of the force that went with John-117 to neutralize the first tower. The strike force was successful in their mission, and by the end of the battle, the Prophet of Truth was dead and the Covenant was effectively destroyed.[8]
Reynolds' picture can be seen on the Voi Memorial, implying that he may have been killed in action. However, he also appears as one of the marines participating in the 21-gun salute.
Trivia

|
Check out our collection of quotes related to Reynolds on its quotes page. |
- Reynolds is voiced by Hollywood actor Nathan Fillion, best known for his role in the canceled Fox TV series Firefly and its spin-off feature film Serenity. Both Adam Baldwin and Alan Tudyk, who also starred in Firefly and Serenity, voiced UNSC Marines in Halo 3. Incidentally, Fillion's Firefly/Serenity character's last name was also Reynolds. The same character was also a Sergeant in the Unification War. Fillion also voices Gunnery Sergeant Edward Buck in Halo 3: ODST, Halo: Reach and Halo 5: Guardians.
- Reynolds makes another appearance in Halo 3: ODST during most of the missions with Marine allies. Notably this time, he is able to also don a standard-issue helmet, rather than the utility cover. Gunnery Sergeant Reynolds is one of the few marines encountered in Halo 3 who canonically appears in Halo 3: ODST. Others like Dubbo and Stacker are also encountered in ODST but their appearances are likely just easter eggs or simple mistakes since they were actually on route to Installation 05 during the time of the game.
- He often uses Stacker's lines, such as "You remember me, from New Mombasa?", even though he was not present in Halo 2, when John-117 was in New Mombasa.
- It is possible for the player to just let the Brute kill Reynolds and not intervene. The Brute will punch him in the face, crack his spine and throw him off the bridge and onto the ground below. However, he will appear in the following levels regardless, similar to Sergeant Johnson's "immortality" in Halo: Combat Evolved.
- After Reynolds is rescued, he runs unarmed over to a rock where an MA5C conveniently lies and arms himself. It is possible (if you have a different weapon) to run over, swap the MA5C leaning on the rock for something else, and watch Reynolds take an MA5C out of nowhere. Or, if you're low on ammo for your Assault Rifle, you could take it all and he would still grab one from thin air.
- On levels such as Crow's Nest, where dead marines often appear around the level, Reynolds is often one of them. On the level Sierra 117, it is possible to have three Reynolds: the live one you save from the Brute, a dead one leaning on a rock shortly after Charlie Foxtrot behind the small bunkers, and another dead one by the machine gun turret next to a magnum.
- In the level Floodgate, Reynolds can be seen guarding the loading ramp where Flood attack him and a squad of Marines. He can be saved, but it is difficult. You need to focus on the Pod infectors that fall around him because he is their main target and is killed very quickly unless protected well.
- On Floodgate, Stacker and Reynolds switch roles. While one is on the ramp, the other is fighting Flood within the factory complex.
- If Reynolds' body appears as a standard marine with a helmet, a player can shoot the helmet off, making it turn into a sergeant's cap. This is common on Crow's Nest.
Gallery
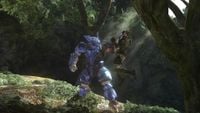
Reynolds being interrogated.
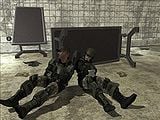
Reynolds captured in Crow's Nest's barracks.


List of appearances
- Halo 3 (First appearance)
- Halo 3 ODST
Sources
- ^ a b Halo 3, campaign level Sierra 117
- ^ Halo 3, campaign level Crow's Nest
- ^ Halo 3, campaign level, Crow's Nest
- ^ Halo 3, campaign level, Tsavo Highway
- ^ Halo 3, campaign level The Storm
- ^ Halo 3, campaign level Floodgate
- ^ Halo 3, campaign level The Ark
- ^ Halo 3, campaign level The Covenant


