Halo: Combat Evolved storyboards
From Halopedia, the Halo wiki
 This article is a stub. You can help Halopedia by expanding it.
This article is part of a series on
Halo: Combat Evolved cut content
- Cut content
Pre-Xbox Halo
Cut characters
Cut dialogue
Cut enemies and ambient life
Cut levels
Cut medals
Cut vehicles
Cut weapons
- Development
To check out cut content for other Halo games, see here!
During the development of Halo: Combat Evolved, the game's script and story went through several revisions. These storyboards are various early editions and interpretations of the game's story, and are displayed below. These storyboards were created by Lee R. Wilson and were published online on Bungie.net and ArtStation.[1]
Overview
In early 2001, Lee R. Wilson was hired to work on the storyboards.[2] By at least April 9, 2001, page 4 of the X10 storyboard series had been completed and was shown publically on the Bungie webcam.[3]
Storyboards
The Pillar of Autumn (X10, X20, X30, X40)
These storyboards are those designed for the cutscenes of the first level of Combat Evolved, The Pillar of Autumn. The boards are marked X10, X20 and X30 - coinciding with the various cutscenes which take place in the mission.
X10
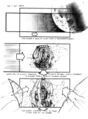
The series of storyboards marked X10 are the game's opening cutscene, depicting the UNSC Pillar of Autumn arriving at Installation 04 and the Master Chief waking from his cryo chamber. The X10 storyboards are further divided into their constituent scenes; X10 1, X10 2, X10 3, X10 4, X10 5 and X10 6 - coinciding with the initial establishing shots of the Pillar of Autumn, introducing Captain Keyes and the bridge, Sergeant Johnson giving his speech to the Marines, the Marines deploying around the ship, the cryo technicians receiving the order to wake the Spartan and Master Chief's thawing process, respectively. The storyboards are fairly faithfully recreated in the final game, though with some less cinematic flair likely due to the hectic development schedule of the game and technologies available at the time.
- X10 1
- HCE ThePillarOfAutumn Storyboard X10 4 4.jpg


- X10 2


- X10 3


- X10 4


- X10 5


- X10 6


X20
The X20 series of storyboards also take place during the Pillar of Autumn level, though are not broken up into constituent scenes like those of the introductory cinematic. These storyboards depict the arrival of Master Chief on the bridge, his talk with Captain Keyes and the Pillar of Autumn beginning to exchange fire with a Covenant CCS-class battlecruiser, before subsequently taking Cortana's datachip. As before, these cutscenes are fairly accurately replicated in-game, though with some slight differences such as more cinematic angles and shots and some small scenes such as a crewman using a fire extinguisher to put out a fire on the bridge.


X30
These storyboards depict the end of the Pillar of Autumn mission, depicting the Master Chief saving a Marine and entering the Bumblebee lifeboat before evacuating ship and closing on the Ring. The storyboards are divided into nine scenes; X30 1 through X30 9.
- X30 1


- X30 2


- X30 3


- X30 4


- X30 5


- X30 6


- X30 7


- X30 8


- X30 9


X40
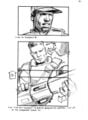
The series of storyboards marked X40 depict a cutscene not featured in the final release of Combat Evolved, set after the end of the level The Truth and Reconciliation. The cutscenes depict the commandeered Spirit dropship (notably shown flying backwards due to a mistake on Wilson's part) returning to Alpha Base, flanked by Longsword fighters. The Spirit lands on the base's landing pad to an audience of hundreds of assembled Marines, who cheer at the return of the Captain and the Master Chief. The crowd is hushed and Keyes gives a speech, before turning away from the crowd and addressing the Master Chief and Cortana directly.
This mission lines up with a cut level recalled by Joseph Staten during the Halo: Combat Evolved developer commentary included in the Halo 3 Legendary Edition, in which he mentions that a level was intended to take place between The Truth and Reconciliation and the following mission The Silent Cartographer, which would have explained the purpose of Installation 04 and its purpose as a weapon. This mission was ultimately cut and the information relegated to the cutscene on The Truth and Reconciliation in which Keyes is saved from the brig; a decision later mocked by the developers who referred to the Captain as "Captain Exposition". It is likely that the cutscene shown here would have served the purpose mentioned by Staten.
These storyboards also give a look at what Bungie intended for Alpha Base, later featured heavily in 2003's Halo: The Flood as the UNSC base of operations on the ring. Part of the original pitch of Halo: Combat Evolved would have seen the player waging a larger guerilla war against the Covenant on the ring, though by the final release almost all mentions of a UNSC home base on the ring were removed for time. The base in these storyboards resembles a beam emitter like those featured elsewhere in the game, though the base as visualised in 2018's Halo: Fireteam Raven has a drastically different appearance.
- X40 1


- X40 2

- X40 3


- X40 4


343 Guilty Spark (X50)
This happens during the 343 Guilty Spark level and is the Flood reveal.
- X50 1


- X50 2


- X50 3


Two Betrayals (X60)
The storyboard series marked X60 depict the opening cutscene of the level Two Betrayals. The storyboards have little overall differentiation from what was recreated in the final game; the only major differences lie in the visual designs of 343 Guilty Spark, the Sentinels and the Control Room. Notably, the control room is a much smaller and more enclosed room than shown in the final game, heavily resembling a control room design concepted by Eddie Smith in 2000.
- X60 1
- HCE AlphaBase Storyboard X60 1 1.jpg
- HCE AlphaBase Storyboard X60 1 2.jpg
- HCE AlphaBase Storyboard X60 1 3.jpg
- HCE AlphaBase Storyboard X60 1 4.jpg
- HCE AlphaBase Storyboard X60 1 5.jpg
- HCE AlphaBase Storyboard X60 1 6.jpg
- HCE AlphaBase Storyboard X60 1 7.jpg
- HCE AlphaBase Storyboard X60 1 8.jpg
- HCE AlphaBase Storyboard X60 1 9.jpg
- HCE AlphaBase Storyboard X60 1 10.jpg
- HCE AlphaBase Storyboard X60 1 11.jpg
- HCE AlphaBase Storyboard X60 1 12.jpg
- HCE AlphaBase Storyboard X60 1 13.jpg
- HCE AlphaBase Storyboard X60 1 14.jpg
- HCE AlphaBase Storyboard X60 1 15.jpg
- HCE AlphaBase Storyboard X60 1 16.jpg
- HCE AlphaBase Storyboard X60 1 17.jpg
- HCE AlphaBase Storyboard X60 1 18.jpg
- HCE AlphaBase Storyboard X60 1 19.jpg
- HCE AlphaBase Storyboard X60 1 20.jpg
- HCE AlphaBase Storyboard X60 1 21.jpg
- HCE AlphaBase Storyboard X60 1 22.jpg
- HCE AlphaBase Storyboard X60 1 23.jpg
- HCE AlphaBase Storyboard X60 1 24.jpg
- HCE AlphaBase Storyboard X60 1 25.jpg
- HCE AlphaBase Storyboard X60 1 26.jpg
- HCE AlphaBase Storyboard X60 1 27.jpg
- HCE AlphaBase Storyboard X60 1 28.jpg
- HCE AlphaBase Storyboard X60 1 29.jpg
- HCE AlphaBase Storyboard X60 1 30.jpg
- HCE AlphaBase Storyboard X60 1 31.jpg
- HCE AlphaBase Storyboard X60 1 32.jpg
- HCE AlphaBase Storyboard X60 1 33.jpg
- HCE AlphaBase Storyboard X60 1 34.jpg
- HCE AlphaBase Storyboard X60 1 35.jpg
- HCE AlphaBase Storyboard X60 1 36.jpg
The Maw (X70)
These cutscenes depict several moments from the final mission of Combat Evolved; The Maw. These storyboards have several differences from the mission as seen in the final game; one major difference is more emphasis on a computer battle between Cortana and Guilty Spark, with Cortana having to stay inside the Pillar of Autumn's systems to keep battling with the Monitor for control of the ship. Meanwhile, Master Chief eventually manages to hunt down and destroy the Monitor. Interestingly, the storyboards do not depict any moment of Chief rescuing Cortana from the ship's command centre, with the final shot of Cortana having her stare at a closed door to the bridge, with an invader attempting to force entry. The Master Chief instead heads to a Bumblebee escape pod and executes a pursuing combat form before blasting off; with no indication that Cortana is with him. This would mark a drastic departure from the game's actual finale, in which Cortana survives with Chief in a Longsword fighter and goes on to be featured in subsequent games. Interestingly, this scenario was replicated in Halo 2, with Cortana having to stay behind on High Charity at the game's conclusion.
- X70 1


- X70 2


- X70 3

- X70 4


- X70 5


- X70 6


- X70 7

- X70 8

- X70 9


- X70 10


- X70 11


- X70 12


- X70 13

- X70 14


- X70 15

- X70 16

- X70 17


- X70 18
- X70 19

- X70 20

Gallery

Physical X10.1 - Page 4.
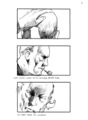
- HCE - early Cortana.jpg
A storyboard featuring an early depiction of Cortana.

Sources
- ^ Bungie.net, Halo (Xbox) storyboards (Retrieved on Jan 27, 2021) [archive]
- ^ Artstation, Halo CE storyboards (Retrieved on Dec 28, 2020) [archive]
- ^ halo.bungie.org, Early Concept Art (Retrieved on Dec 28, 2020) [archive]


