alphamoon
From Halopedia, the Halo wiki
| alphamoon | |
|---|---|

| |
|
Game: |
Halo 2 (Cut) |
|
Player: |
|
|
Location: |
|
 |
Halopedia doesn't currently have a walkthrough for this level; could you write one? |
| “ | Assault the occupied control room and find the oracle | ” |
alphamoon is the working title of a cut campaign level produced during the development of Halo 2. The level was set on Basis, the moon of the gas giant Threshold - the planet around which Installation 04 orbited. The level would have seen the player play as the Arbiter in an assault against a heretic camp on the moon.[1]
Transcript
The player spawns equipped with a Type-25 plasma rifle and a Type-25 plasma pistol.
- Rtas 'Vadum (dialogue): Our lords are with you today, Dervish.
- Rtas 'Vadum (subtitles): Their defenses are stronger than we first thought.
- Rtas 'Vadum (dialogue and subtitles): No one else survived the first drop.
- Rtas 'Vadum (dialogue): The heretics' defenses are formidable, our attack cannot proceed until you have eliminated their heavy weapons.
- Rtas 'Vadum (subtitles): were[sic] pulling back until you have neutralized their defenses.
The player engages two Sangheili Majors and two Unggoy Minors.
Analysis

alphamoon was first revealed in a stream of the Halo 2 E3 demo, shown by Frank O'Connor and Brian Jarrard following Jarrard's chance finding of a Halo 2-era Xbox devkit with the build on it in his home. alphamoon is one of a number of levels included in this build. The level as presented in the stream is based in the Halo: Combat Evolved game engine, using the Combat Evolved HUD, plasma rifle, and plasma pistol - though the Unggoy and Sangheili art assets featured are their Halo 2 incarnations. The level is from early Halo 2 development and is not optimised, resulting in a very low framerate while playing.[1] Level geometry found in an early prototype created by David Candland for Halo 2's cut Theater mode showcases a small section of level geometry - prominently including a Type-48 Weevil cannon intended as an objective for the player to destroy.[2]
In the level dialogue, the Arbiter is referred to by the title of "Dervish".[1] This name was the original title for the Arbiter in Halo 2 development, but was ultimately changed to avoid being unintentionally offensive to Muslims.
The level is set in a heretic camp on the moon of Basis. While this concept did not make its way into the final Halo 2 campaign, this idea is the basis for the setting of the multiplayer level Burial Mounds. Ultimately, several ideas from the early stages of this level's development were present in early Burial Mounds iterations such as the Control Room structure (detailed in the storyboard selection below), though the initial sketches produced by Max Hoberman were deemed too intensive for the two-man team assigned to the level - leading to the map's layout being redesigned by Chris Carney into the iteration seen in the final game.[3][4]
![A screenshot of Candland's Theater prototype, with an alphamoon saved film selected.[2]](https://halo.wiki.gallery/images/thumb/2/2c/H2_alphamoon_Theater.png/160px-H2_alphamoon_Theater.png)
A screenshot of Candland's Theater prototype, with an alphamoon saved film selected.[2]
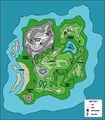
An early design document of the Burial Mounds, with several influences present from the alphamoon layout.
![A screenshot of Candland's Theater prototype, with an alphamoon saved film selected.[2]](/File:H2_alphamoon_Theater.png)

Storyboards
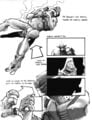
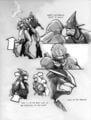
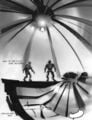
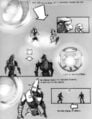
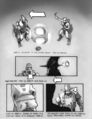
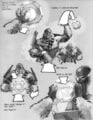
In addition to the gameplay featured in the September 2003 build of Halo 2 alongside the E3 demo, a number of storyboards released online by Lee Wilson showcase an alternate ending to the mission which would become The Oracle in the final game, likely intended from prior to alphamoon becoming alphagasgiant.[5] These storyboards showcase an encounter between the Arbiter and the Heretic leader Sesa 'Refumee similar to that of the gas mines, but instead taking place in the wreckage of the control room of Installation 04. The storyboards showcase a struggle between 'Refumee and the Arbiter, with both stopping their fighting as 343 Guilty Spark enters the room. The two would begin listening to Spark, only for the crack of a carbine to interrupt Spark, and the camera pan down to showcase the Heretic lifting a blood-soaked hand from his chest. The shooter would then be revealed to be Tartarus, who subsequently captures Guilty Spark and then executes the now-injured heretic leader before walking away.
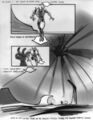
Alphamoon outro storyboard 1.
Alphamoon outro storyboard 2.
Alphamoon outro storyboard 3.
Alphamoon outro storyboard 4.
Alphamoon outro storyboard 5.
Alphamoon outro storyboard 6.

Alphamoon outro storyboard 7.
Alphamoon outro storyboard 8.
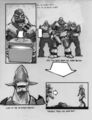
Alphamoon outro storyboard 9.
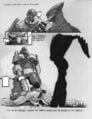
Alphamoon outro storyboard 10.
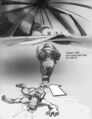
Alphamoon outro storyboard 11.


Sources
- ^ a b c d YouTube - The Moa Archive [UncookedMoa], Halo 2 E3 2003 Demo Stream from 343 + Never Before Seen Alphas/Betas (1080p 60 FPS)
- ^ a b David Candland, Halo 2 Party Prototype (Retrieved on Nov 14, 2021) [archive]
- ^ Twitter, Max Hoberman (@MaxHoberman): "Alright, one more original Halo 2 multiplayer map design to cap the week, then something else. You'll never, ever guess which map this was my original paper design for. Sorry it's so crap quality, still trying to find the original file." (Retrieved on Nov 15, 2021) [archive]
- ^ Twitter, Max Hoberman (@MaxHoberman): "Yes! This was the original idea for Burial Mounds that I put together. It was clearly out of scope - we were a two man team - so Carney scrapped it and started over." (Retrieved on Nov 15, 2021) [archive]
- ^ ArtStation, Halo 2 storyboards (Retrieved on Dec 28, 2020) [archive]


