NMPD HQ
From Halopedia, the Halo wiki
|
Prev: |
|
|
Next: |
|
| NMPD HQ | |
|---|---|

| |
|
Game: |
|
|
Map file name (?): |
|
|
Player: |
|
|
Date: |
October 20, 2552, 1914 hours [1] |
|
Location: |
|
|
Objective(s): |
|
|
Par Time: |
00:10:00 (Master Chief Collection) |
|
Par Score: |
40,000 (Master Chief Collection and Halo 3: ODST) |
 |
Halopedia has a walkthrough guide for this level; see NMPD HQ/Walkthrough. |
| “ | Pelican down. Keep your sniper rifle handy. | ” |
NMPD HQ is a Halo 3: ODST campaign level. It is played from Romeo's point of view. Completing this level on Normal or above unlocks the character Romeo for Firefight mode.
The Firefight map Windward is based on this level.
Summary[edit]
Chronologically the fifth flashback level, NMPD HQ begins at 19:14, three hours after the squad's insertion into the city. Buck and Romeo have made their way to the top of the NMPD headquarters building for pickup by an NMPD Pelican dropship. With Dutch and Mickey already onboard, the Pelican is shot down by Banshees and crashes on another landing platform. Buck and Romeo must make their way across the upper floors and rooftops of the city's tower blocks to reach their squadmates at the crash site. Once there, they defend the downed Pelican from oncoming Covenant Phantoms and Banshees. Finally, the Brute Chieftain Bracktanus drops from the last Phantom and severely wounds Romeo before the rest of the squad manages to kill him. Lacking air transport, Buck decides to evacuate the squad through subterranean train tunnels leading to the old city, and the squad heads for Kikowani Station.
Transcript[edit]
ROMEO
NMPD Headquarters
3 HOURS AFTER DROP
The cutscene begins with a door in the NMPD Headquarters opening. Buck immediately takes point while Romeo watches his back.
- Gunnery Sergeant Edward Buck: "Clear?"
- Lance Corporal Kojo "Romeo" Agu: "Yeah."
View changes to one of the Superintendent's cameras as he watches Buck and Romeo exit to the outside landing pad.
- Romeo: "We're good."
- Buck: (Activates his comm) "Hey Rookie. You out there? Respond. That's an order!"
- Romeo: (Following Buck) "Give it up, Gunny. Even if he ain't dead he's lost in that soup. Our comms can't cut through that."
Buck stops and turns to Romeo.
- Buck: "Oh, give up, huh? What if it were you down there?"
- Romeo: "Just sayin', (Shrugs) I ain't dead."
Buck shakes his head at Romeo as he walks past.
- Buck: "Oh, you're a piece of work, Romeo."
Mickey's and Dutch's NMPD variant Pelican dropship comes in for a landing as Buck flags them down.
- Private First Class Michael "Mickey" Crespo (COM): "Welcome aboard, ladies! First stop: anywhere but here!"
Just as the Pelican dropship prepares to land, two Banshees come into view and open fire on the Pelican.
- Buck: "Banshees on your six! Hit the deck!"
Buck and Romeo drop to the floor and cover their heads while the Pelican takes a hit from a Banshee's Fuel Rod Cannon.
- Corporal Taylor "Dutch" Miles (COM): "We're losing her! Watch out!"
The Pelican spins out of view as Buck and Romeo fire at the attacking Banshee.
- Mickey (COM): "Raaaaaaaggh!"
Romeo looks around for any other enemy aircraft while Buck activates his comm.
- Buck: "Mickey! Dutch! Status!"
Buck de-polarizes his visor, and puts his hands on Romeo's shoulders.
- Buck: "Alive or dead,"
The camera switches to Romeo's perspective.
- Buck: "We're pulling them out! You hear me?"
Buck turns away from Romeo and pulls the charge handle on his assault rifle.
- Buck: "Make some noise. I got your back."
{Gameplay}
The two go back indoors.
- Buck: "Back inside! Let's find that Pelican!"
- Romeo: "What about all those Covenant we side-stepped on the way up?"
- Buck: "Now we get to kill them."
They come to a flight of staircase leading to the floor above.
- Romeo: "Thanks for picking such a tall building. I'm really digging all these stairs."
- Buck: "Do you ever get tired of bitching, Romeo?"
- Romeo: "You ever get tired of busting my balls?"
- Buck: "Point taken."
Romeo and Buck sneak outside to the first courtyard.
- Buck: "They haven't seen us. Pick a target, take it out."
Romeo fires.
- Buck: "That did it! Shoot and scoot!"
A Shade turret at the far side of the courtyard fires at the duo.
- Buck: "I'll draw the turret's fire, you take out the operator!"
After a moment of fighting, a Phantom flies overhead.
- Buck: "Romeo! Phantom landing on the pad!"
If the player stalls:
- Buck: "C'mon, Romeo! Push through these doors!"
The two enter a small lobby area. They approach the next door to reveal more Covenant in the second courtyard.
From this point on until they reach crash site, if the IWHBYD skull is activated, and the player stares at Buck, the two exchange dialogue randomly chosen from the following lists:
- Buck:
- "Whatever you're thinking, Romeo, keep it to yourself."
- "Get your head in the game, Romeo."
- "Romeo, eyes on the prize. Let's find that Pelican."
- "Don't start with me, smartass."
- "We have men to save, Romeo. Let's go."
- Romeo:
- "Same song, new verse."
- "What, can't a guy look?"
- "Yeah, I hear you."
- "You're my hero, Gunny."
- "Whatever you say, boss."
Romeo and Buck fight their way into the second courtyard.
- Buck: "Jackals with carbines up top. Watch yourself!"
If the player delays with the Jackals:
- Buck: "C'mon, Romeo. We gotta kill those Jackals."
Or, if the player has already taken out the Jackals:
- Buck: "Upper level. Let's move."
If the player further stalls:
- Buck: "Romeo, you are killing me. Up those steps!"
After another firefight, the two make their way inside again.
- Dutch (COM): "We're down, Gunny. On a rooftop north-east of your location."
- Buck: "Stay put Dutch. We'll come to you."
Inside the next room, there is spare ammo and Med-Packs laying around, as well as several dead NMPD officers and Covenant troops.
- Buck: "Grab some ammo, Romeo. These boys won't need it."
Romeo grabs some more ammo and heals up if needed, then rejoins Buck outside in the third courtyard.
- Buck: "Sniper. Up high. Make your first shot count."
Romeo takes his first shot.
- Buck: "More of 'em! Romeo, get to work!"
Another Phantom arrives at the far side of the courtyard.
- Buck: "Jet Pack Brutes! Don't let 'em get behind us!"
They eliminate all the Covenant troops, and move down to the courtyard.
- Buck: "Keep pressing, we gotta get to that crash site!"
If the player stalls:
- Buck: "Move your ass, Romeo! Let's go!"
The two make their way into the fourth courtyard and dispatch all of the Covenant forces and get back indoors.
- Mickey (COM): "Gunny, we've moved one of those construction cranes; made a bridge to our location."
- Buck: "Affirmative. We're almost there."
Romeo and Buck fight their way to a landing pad, Mickey and Dutch's Pelican can be seen on the rooftop of a nearby skyscraper. There is a bundle of long girders being held up by a crane that appears to be the only way across.
- Romeo: "That's the bridge?! You have gotta be kidding me!"
- Buck: "What? You afraid of heights? Get going."
If the player stalls:
- Buck: "C'mon Romeo, follow me."
Romeo progresses over the make-shift bridge, two Banshees fly into view.
- Romeo: "Banshees!"
- Buck: "Let's get the hell off this thing!"
The Banshees, one-by-one, fly low overhead and shake the bridge. Buck and Romeo get off of the makeshift bridge and rejoin Mickey, Dutch and an NMPD Officer on a rooftop littered with various heavy weapons. They eliminate the Covenant troops around them.
- Buck: "What's our situation?"
- Dutch: "Bird's wasted. Lost the pilot on impact. Rest of us are okay."
- Mickey: "Not for long, Phantoms inbound!"
- Romeo: "Why am I not surprised?"
- Buck: "Pick a turret, Romeo! Conserve your ammo. This is gonna get hot!"
- Dutch: "Look out! Banshee!"
- Buck: "Phantom to our right!"
- Buck: "Phantom coming in left!"
The squad fights a few waves of enemy aircraft consisting of Banshee fighters and Phantom dropships. One Phantom drops off infantry.
- Buck: "Hostiles on the lower levels! Clear 'em out!"
After the enemy infantry is dispatched and a couple more waves of enemy aircraft are fought of:
- Buck: "Phantom! Dead ahead!"
More waves of Banshees and Phantoms are fought off.
- Buck: "Step back! Take 'em down!"
A Phantom drops a squadron of Jump Pack Brutes at the lower level.
- Buck: "Jet packs! Take 'em down!"
The squad takes out some of the Jump Pack Brutes while more Banshees attack.
- Buck: "Pour it on boys, we're almost through this!"
The Jump Pack Brutes are defeated.
If the player is on the lower level:
- Buck: "That's the last of them! Everyone, come up top!"
A Phantom dropship rapidly approaches.
- Dutch: "We got one more Phantom, Gunny!"
- Buck: "Look out! Chieftain!"
The Phantom dropship swoops down and drops a Jiralhanae Chieftain wielding a Gravity Hammer.
- Buck: "Scatter!"
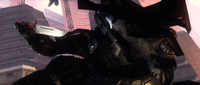
The Chieftain, Bracktanus, kills an NMPD officer with his hammer and Romeo fires at Bracktanus with his Sniper Rifle, collapsing his shield. A shockwave from the hammer sends the sniper back into a barrier and Bracktanus, using the hammer's bladed end, brings it down on Romeo's chest. Romeo's sniper rifle gets caught on the Bracktanus' hammer and it throws it off, sending the mangled weapon to the streets below.
Giving out a victorious roar, Bracktanus prepares to finish off Romeo, but Buck jumps on its back and stabs him in the neck with his combat knife. As Bracktanus chokes and gurgles while stumbling around the landing pad, Mickey tries to get a clean shot on it with his shotgun, but is unable to. Thus, he tackles Bracktanus to the ground and Dutch shoulder-charges it, finishing the Brute.
Dutch cocks his fists as if boxing while Mickey gets back up. Buck, who is still under the dead Chieftain, waves his hand out.
- Buck (Muffled): "Get. This. Thing. Off. Of. Me."
Dutch and Mickey exchange looks and help Buck with the dead Brute. Buck takes his Combat knife out of Bracktanus's neck, shakes some blood off, which hits Dutch, and cleans it off on his arm. Romeo begins to cough and wheeze and Mickey immediately tends to him.
- Buck: "How bad?"
Romeo de-polarizes his visor and takes his hand off the wound. On Legendary, a comically large amount of blood sprays out of Romeo's injured chest.
- Romeo: "Ahh, not good."
- Mickey: "We're gonna get you outta here."
Dutch gestures towards the crashed Pelican.
- Dutch: "Not by air, we're not."
- Buck: "It's alright."
Buck helps Romeo up and uses himself as support for him.
- Romeo: "Ahh!"
- Buck: "I know another way."
Switches to the Superintendent's camera, who is watching the ODSTs help their injured squadmate.
Fades to black.
Achievements[edit]
The following achievements can be unlocked on NMPD HQ across the Xbox 360 and Halo: The Master Chief Collection editions of Halo 3: ODST.
| Halo: 3: ODST (Xbox 360) | Halo: MCC (Xbox One) | Halo: MCC (Steam) | Title | Unlock requirement | Games |
|---|---|---|---|---|---|
 |
 |
 |
Complete NMPD HQ on Normal, Heroic, or Legendary. (Halo 3: ODST) Complete NMPD HQ on any difficulty. (Halo: The Master Chief Collection) |
Halo: The Master Chief Collection | |
 |
Get 15 headshot kills on NMPD HQ. | ||||
 |
 |
Beat the par time on NMPD HQ. | |||
 |
 |
Beat the par score on NMPD HQ. | |||
 |
 |
Complete NMPD HQ without firing the Sniper Rifle on Heroic or Legendary. | |||
 |
 |
Face it. | |||
 |
 |
Destroy 5 Phantoms on NMPD HQ. |
Trivia[edit]
- If the player activates this level's beacon with subtitles on, the flashback conversation between Dutch, Mickey, and the NMPD officer contains a minor typo. When the NMPD officer says "Affirmative," the subtitle identifies him as a Marine.
- The beginning of this level is shown in the ViDoc: Desperate Measures.
- Some display screens on this level show a seismic survey of the Great Rift Valley authored by Daniel Endesha, Sadie Endesha's father. This is referenced in Sadie's Story, in which her father tells Sadie about an unusual object discovered by Vergil below the region.
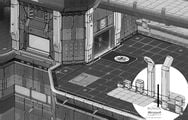
- The Weapons card and New York Times Easter eggs can be found and viewed clearly on this level.
- Romeo may be afraid of heights, an ironic quality for a sniper (particularly one in the ODSTs), as revealed by dialogue between him and Buck when the player are about to cross the construction crane to reach the crash site.
- The crashed Police Pelican contains a ridiculously large amount of ordnance, including turrets and their cases, Spartan Lasers, and even racks of Rocket Launchers with spare ammo. How the NMPD obtained heavy weapons is unknown, although it is possible that the Pelican was carrying munitions meant for UNSC forces elsewhere in the city. Another possible explanation is that due to New Mombasa being incredibly valuable as one of Earth's seven Tether cities, the UNSC provided the NMPD a large amount of weaponry during the Battle for Earth. More pessimistically, the weapons may be an example of extreme police militarization, or may be a result of Police Commissioner Kinsler's rampant corruption. An external non-canon explanation may be that the weapons are simply available for gameplay purposes.
- Occasionally, a Banshee will fly into the crashed Pelican during the last fight and become somewhat lodged there. The player can melee its Brute pilot out, but it still cannot be flown.
- Just before the level ends, Buck will announce the arrival of the final Phantom by yelling "Chieftain!" In the Theater, however, the viewer can use free-roam mode to go near the Phantom for a few seconds. At the right angle, the viewer can see that the inside of the Phantom is actually empty.
- The end cutscene shows Romeo with a Sniper Rifle no matter what weapon the player was using at the level's end.
- During the end cutscene, the NMPD officer killed by the Brute Chieftain's gravity hammer has a BR55HB battle rifle, even though the officer holds a Rocket Launcher and nothing else during gameplay, and the Battle Rifle does not otherwise appear in the game.
- This cutscene is the first instance in a Halo game of a Brute using the blade side of the Gravity Hammer, although the first time this is ever seen occurs in Halo: Landfall. Similarly, the scene also shows the first usage of a combat knife in a Halo FPS game.
- When standing before Romeo's broken sniper rifle in Mombasa Streets, one cannot tell from where it fell. None of the surrounding buildings are as tall as they were in this level, and the construction crane the player uses to reach the Pelican crash site cannot be seen.
- In this level, the player will start with 21 rounds of Sniper Rifle in total (1/20), a reference of 7 (21/3 = 7).
Gallery[edit]
Concept art[edit]
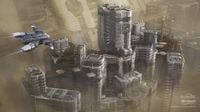
A concept piece of the top levels of the building.
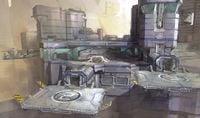
Concept art of the landing pads.
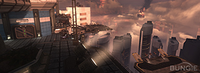
Concept art of the open-air environments.
Concept art of Romeo and Buck above the rooftops.


Screenshots[edit]
Preview of the level in Halo 3: ODST menu.
A Phantom drops troops at one of the landing pads.
A Phantom carrying Huragok passing by in the distance.
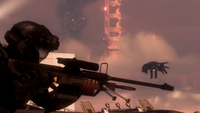
Romeo eliminates a Jackal with his sniper rifle.

Buck and Romeo on their way to the crashed Pelican.
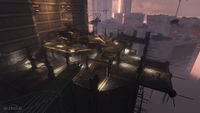
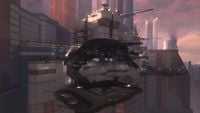
The Pelican crash-landed on a rooftop under construction.
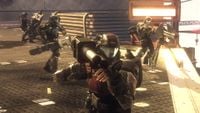
Four members of Alpha-Nine reunited at the crash site.
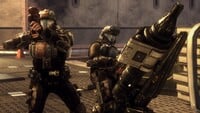
Dutch and Romeo defending the crash site.
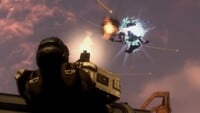
Romeo destroys a Banshee with a barrage of missiles.
Bracktanus moments before Buck stabs him in the neck.

Mickey takes aim at Bracktanus after Buck stabbed the Chieftain's neck.


Sources[edit]
| |||||||||||||||||


